【原创】使用 PyInstaller 来构建打包 Python 项目
前言
1、概要
很多语言都有构建打包的功能,主要目的就是对某些资源进行整合以方便程序的分发以及运行。比如 Java/NodeJS...
Python 也支持对资源进行打包,而且有多种方式,比如打包成 pip 包文件,whl 文件等等。而打包成可执行文件则是第三方工具提供如 pyinstaller。常见的还有 py2exe、cx_Freeze、nuitka等等...
本文介绍如何使用 PyInstaller 来进行 Python 脚本的构建与打包成可执行文件的过程。
2、相关环境
Ubuntu 18.04.5
Python 3.6.9
Pip 9.0.1
Pyinstaller 4.0
3、注意事项
打包有啥用?
(1) 首先是打包后的程序包含了一整套的该程序需要运行的环境,比如你使用了 pymysql 的第三方数据库连接包,打包后自动将其包含在里面了,你可以把这个包放到任何平台去运行,不管该平台是否有 Python3 pymysql 等等的环境。
(2) 更容易部署了,你可以将你的几十上百个 Python 脚本打包成一个可执行文件,非常方便部署运行。
(3) 一定的代码保护作用,打包后。对代码有一定的保护作用,如果你的代码有一定的隐私,别人不能轻松获取你完整的代码结构及源代码。
(4) 更方便支持跨平台,轻松实现你的程序跨平台分发。
另外,注意这里指的跨平台指的是跨平台分发并不是跨平台打包,也就是说你在 Windows 打包的程序只能在 Windows 平台运行且必须是相同架构。同理,在 MacOS、Linux 上打包的程序也只能在同一操作系统且相同架构的平台运行。
这是因为 pyinstaller 打包时需要用到各平台的
安装 PyInstaller
1、安装 PyInstaller
安装 PyInstaller 非常方便,也有很多种方法,但是最简单的就是使用 pip 进行安装了。你只需要执行如下命令便可以安装 PyInstaller 的最新版本:
pip install pyinstaller
不过这里需要注意的是 PyInstaller 究竟是全局安装呢还是按每个项目环境(通常我们会为每一个项目创建一个不同的项目运行环境,即 Python 的虚拟环境。参考另一篇文章)来安装呢?
以下是我的建议:
(1) 如果是个人电脑的话,可以全局安装 PyInstaller,这样的话我们可以非常方便地对任意的 Python 脚本进行打包了。
(2) 如果你是从开发一个团队协作式的项目,建议也应该在项目环境中添加 PyInstaller 的声明与安装(requirements.txt 中)。这样,我们在进行项目构建打包的时候,比如我们可能会在 DevOps 过程中使用 docker 容器来进行构建打包,这时候我们不用管容器中是否有全局安装 PyInstaller 了。
示例:
$ pip3 -V
pip 9.0.1 from /usr/lib/python3/dist-packages (python 3.6)
$
$ pip3 install pyinstaller -i https://pypi.douban.com/simple
Collecting pyinstaller
  Downloading https://pypi.doubanio.com/packages/82/96/21ba3619647bac2b34b4996b2dbbea8e74a703767ce24192899d9153c058/pyinstaller-4.0.tar.gz (3.5MB)
    100% |████████████████████████████████| 3.5MB 561kB/s
Collecting altgraph (from pyinstaller)
  Downloading https://pypi.doubanio.com/packages/ee/3d/bfca21174b162f6ce674953f1b7a640c1498357fa6184776029557c25399/altgraph-0.17-py2.py3-none-any.whl
Collecting pyinstaller-hooks-contrib>=2020.6 (from pyinstaller)
  Downloading https://pypi.doubanio.com/packages/2a/e6/4a47a7d41266cbca531bed3031c6412f9601ba2a2319e6d8c43f6917c51d/pyinstaller_hooks_contrib-2020.10-py2.py3-none-any.whl (166kB)
    100% |████████████████████████████████| 174kB 9.3MB/s
Collecting setuptools (from pyinstaller)
  Downloading https://pypi.doubanio.com/packages/6d/38/c21ef5034684ffc0412deefbb07d66678332290c14bb5269c85145fbd55e/setuptools-50.3.2-py3-none-any.whl (785kB)
    100% |████████████████████████████████| 788kB 2.1MB/s
Building wheels for collected packages: pyinstaller
  Running setup.py bdist_wheel for pyinstaller ... done
  Stored in directory: /home/jiangzl/.cache/pip/wheels/b2/b1/e4/dcab76aa7f2a453aad3bdc503b11d578ae8229251e3014c6db
Successfully built pyinstaller
Installing collected packages: altgraph, pyinstaller-hooks-contrib, setuptools, pyinstaller
Successfully installed altgraph-0.17 pyinstaller-4.0 pyinstaller-hooks-contrib-2020.10 setuptools-50.3.2
2、验证 PyInstaller
执行如下命令验证 pyinstaller 的安装
pyinstaller -v
示例:
$ pyinstaller -v
4.0
注:如果安装完成后执行 pyinstaller -v 提示该命令找不到,请参考:【原创】Ubuntu 普通用户安装 PyInstaller 后提示找不到命令
3、升级 PyInstaller
执行如下命令可以对 pyinstaller 进行版本升级
pip install --upgrade pyinstaller
示例:
$ pip install --upgrade pyinstaller -i https://pypi.douban.com/simple
Looking in indexes: https://pypi.douban.com/simple
Requirement already up-to-date: pyinstaller in /usr/local/lib/python3.8/site-packages (4.0)
Requirement already satisfied, skipping upgrade: pyinstaller-hooks-contrib>=2020.6 in /usr/local/lib/python3.8/site-packages (from pyinstaller) (2020.10)
Requirement already satisfied, skipping upgrade: altgraph in /usr/local/lib/python3.8/site-packages (from pyinstaller) (0.17)
Requirement already satisfied, skipping upgrade: setuptools in /usr/local/lib/python3.8/site-packages (from pyinstaller) (49.2.0)
Requirement already satisfied, skipping upgrade: macholib>=1.8; sys_platform == "darwin" in /usr/local/lib/python3.8/site-packages (from pyinstaller) (1.14)
使用 PyInstaller
1、打包一个脚本
(1) 准备一个 Python 脚本
经典的 hello world 开场。如下,写了一个 hello.py 文件,里面就一行代码 print('hello world')。
$ pwd
/Users/jiangzl/temp
$
$ ls -lh
total 4.0K
-rw-rw-r-- 1 jiangzl jiangzl 21 Nov  1 02:25 hello.py
$ cat hello.py
print('hello world')
正常情况下,我们可以使用 python3 hello.py 来运行,如下:
$ python3 hello.py
hello world
但有时候可能会觉得麻烦,如果我要运行的环境中没有 python3 呢?那 PyInstaller 就正中靶心了。
(2) PyInstaller 打包成 Linux/Unix 的可执行文件
以下是默认方式,会打包生成 dist/hello 目录,在该目录下有可执行文件和相关的依赖资源。
pyinstaller hello.py
示例:
$ pyinstaller hello.py
23 INFO: PyInstaller: 4.0
23 INFO: Python: 3.6.9
24 INFO: Platform: Linux-5.3.0-40-generic-x86_64-with-Ubuntu-18.04-bionic
24 INFO: wrote /home/jiangzl/temp/hello.spec
...
2571 INFO: Appending archive to ELF section in EXE /home/jiangzl/temp/build/hello/hello
2577 INFO: Building EXE from EXE-00.toc completed successfully.
2578 INFO: checking COLLECT
2578 INFO: Building COLLECT because COLLECT-00.toc is non existent
2578 INFO: Building COLLECT COLLECT-00.toc
2643 INFO: Building COLLECT COLLECT-00.toc completed successfully.
打包成功后生成的文件与目录如下:
➜  temp ll
total 16
drwxr-xr-x  3 jiangzhuolin  staff    96B Nov  1 01:04 __pycache__
drwxr-xr-x  3 jiangzhuolin  staff    96B Nov  1 01:04 build
drwxr-xr-x  3 jiangzhuolin  staff    96B Nov  1 01:04 dist
-rwxr--r--  1 jiangzhuolin  staff    21B Nov  1 00:34 hello.py
-rw-r--r--  1 jiangzhuolin  staff   973B Nov  1 01:04 hello.spec
2、打包流程
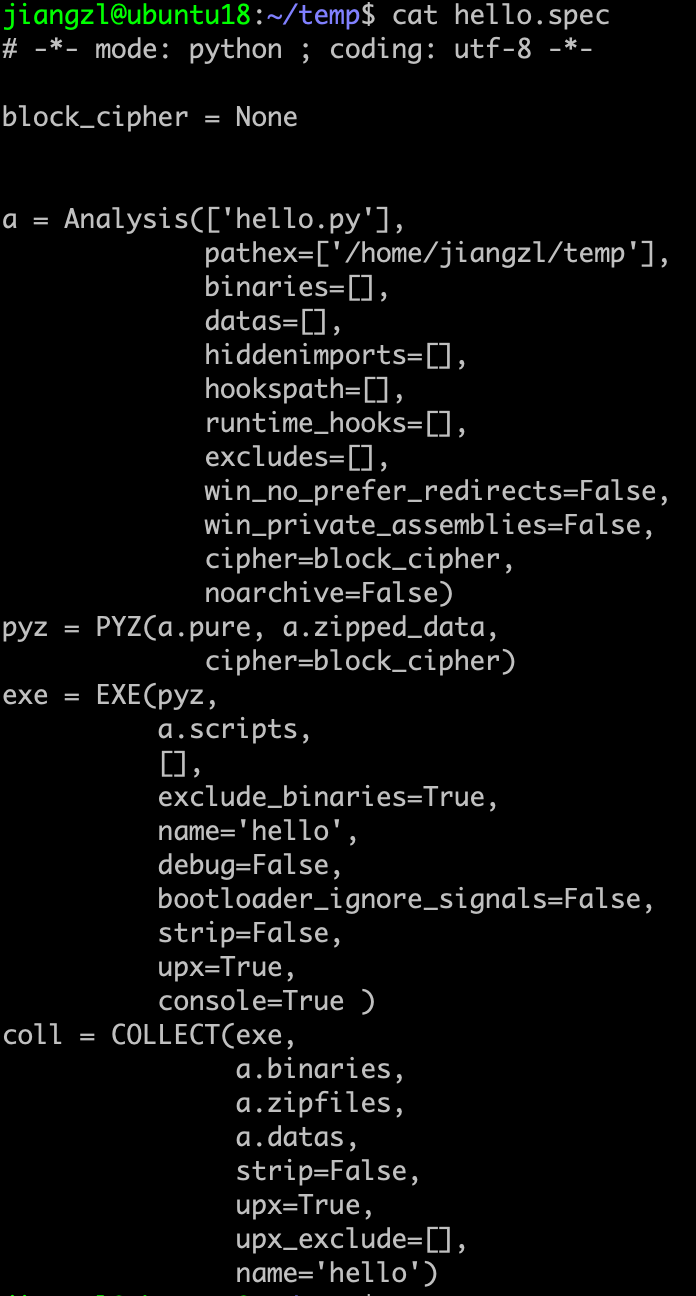
(1) 在打包脚本同级目录创建一个与打包的文件同名的 spec 文件,如 hello.spec,其中记录构建相关信息
(2) 在打包脚本同级目录创建 build 目录用于构建过程文件的存储
(3) 写一些构建日志文件,中间过程文件到 build 目录中
$ pwd
/home/jiangzl/temp/build/hello
$ ll
total 4456
-rw-rw-r-- 1 jiangzl jiangzl   12166 Nov  1 04:03 Analysis-00.toc
-rw-rw-r-- 1 jiangzl jiangzl  771132 Nov  1 04:03 base_library.zip
-rw-rw-r-- 1 jiangzl jiangzl    2494 Nov  1 04:03 COLLECT-00.toc
-rw-rw-r-- 1 jiangzl jiangzl    1038 Nov  1 04:03 EXE-00.toc
-rwxr-xr-x 1 jiangzl jiangzl 1186680 Nov  1 04:03 hello*
drwxrwxr-x 2 jiangzl jiangzl    4096 Nov  1 04:03 localpycos/
-rw-rw-r-- 1 jiangzl jiangzl 1153872 Nov  1 04:03 PKG-00.pkg
-rw-rw-r-- 1 jiangzl jiangzl     946 Nov  1 04:03 PKG-00.toc
-rw-rw-r-- 1 jiangzl jiangzl 1140922 Nov  1 04:03 PYZ-00.pyz
-rw-rw-r-- 1 jiangzl jiangzl    9042 Nov  1 04:03 PYZ-00.toc
-rw-rw-r-- 1 jiangzl jiangzl    1994 Nov  1 04:03 warn-hello.txt
-rw-rw-r-- 1 jiangzl jiangzl  248730 Nov  1 04:03 xref-hello.html
(4) 在打包脚本同级目录创建 dist 目录用于存储二进种文件
(5) 将 hello 的可执行文件写到 dist 目录下的 hello 目录
可以从 dist 的 hello 目录中找到叫 hello 的可执行文件。
$ pwd
/Users/jiangzl/temp/dist/hello
$ ll hello
-rwxr-xr-x 1 jiangzl jiangzl 1186680 Nov  1 04:03 hello*
3、运行
运行可执行文件的方式有多种,如下举了几种常用的方式。
(1) 使用 ./hello 方式
$ pwd
/Users/jiangzhuolin/temp/dist/hello
$ ./hello
hello world
(2) 配置 $PATH 再执行
$ export PATH=$PATH:.
$ hello
hello world
或者
$ export PATH=$PATH:~/temp/dist
$ hello
hello world
(3) 将可执行文件链接到 $PATH 的目录
示例:将 hello 可执行文件链接到 /usr/local/bin 目录
$ sudo link  /home/jiangzl/temp/dist/hello /usr/local/bin/hello
$ which hello
/usr/local/bin/hello
$ hello
hello world
(4) 将可执行文件复制到 $PATH 目录
注:该方法只适合打包成一个文件的方式,默认是打包成一个目录的方式,只复制可执行文件没有包含依赖运行会报错。
$ hello
[125542] Error loading Python lib '/usr/local/bin/libpython3.6m.so.1.0': dlopen: /usr/local/bin/libpython3.6m.so.1.0: cannot open shared object file: No such file or directory
总结
pyinstaller 还有很多的用法在此不多作解释了,可以去参考附录中的 pyinstaller 官网文档进行查看。
以下给下使用 pyinstaller 常用的参数的使用
pyinstaller -F myScript.py            # 将 myScript.py 及其依赖打包成一个可执行文件,建议使用此方式。
pyinstaller -F -n Hello myScript.py   # 将 myScript.py 及其依赖打包成一个可执行文件,并将其命令为 Hello。
pyinstaller -Fw -n Hello myScript.py  # 将 myScript.py 及其依赖打包成一个可执行窗口化程序(适用于 Windows/MacOS),并将其命令为 Hello。
附录
pyinstaller 官网:
http://www.pyinstaller.org/
pyinstaller 安装文档:
https://pyinstaller.readthedocs.io/en/stable/installation.html
pyinstaller 用法文档:
https://pyinstaller.readthedocs.io/en/stable/usage.html

近期评论