【原创】Ubuntu 使用 pip3 安装 jupyterlab
安装准备
1、什么是 JupyterLab?
JupyterLab is a web-based interactive development environment for Jupyter notebooks, code, and data. JupyterLab is flexible: configure and arrange the user interface to support a wide range of workflows in data science, scientific computing, and machine learning. JupyterLab is extensible and modular: write plugins that add new components and integrate with existing ones.
上面的话来自于 jupyter 官网,下面是我的翻译加理解。
首先,Jupyterlab 是一款基于 Web 的交互式开发环境,主要用于 Jupyter notebooks,开发代码和处理数据。JupyterLab 非常地灵活,只需要通过用户界面配置便可以支持非常宽泛的工作流程,包括数据科学,科学计算和机器学习等场景。而且 JupyterLab 也是可扩展且支持模块化集成的,你可以编写插件来添加新的组件和功能并且将这些插件都集成到一起。
简单来说,JupyterLab 提供一个基于 Web 的便捷开发环境,你可以在 Web 网页上编写与调试你的代码、数据、程序等。较多的场景是使用在数据科学领域,但其他很多领域也完全适用。
2、什么是 Jupyter Notebook?
The Jupyter Notebook is an open-source web application that allows you to create and share documents that contain live code, equations, visualizations and narrative text. Uses include: data cleaning and transformation, numerical simulation, statistical modeling, data visualization, machine learning, and much more.
Jupyter Notebook 是 JupyterLab 中的一个功能,Jupyter Notebook 简单来说就是一个代码及其结果的记事本,你可以通过 Jupyter Notebook 创建一篇文档用来阐述你的某个功能或者某个想法的代码实现过程。
Jupyter Notebook 的使用场景也非常的广,数据清洗与数据回去的,数值模拟,统计建模,数据可视化,机器学习等等。
使用 Jupyter Notebook 你还可以把你把的代码或者功能模块的结果保存为一个文档(文件),然后你可以把他分享给其他人,能够非常方便给实现知识记录与分享。
3、安装环境
Ubuntu 18.04.5
Python 3.8.5
Pip3 20.0.2
Jupyter-lab 2.2.8
4、安装规划
本文计划在我家里的一台服务器设备(Ubuntu 18.04 虚拟机)上安装一个 JupyterLab 的服务,并且让其持续在后台运行,然后通过内网穿透将其发布到外网。这样,我就可以在我的任何有浏览器的设备上访问 JupyterLab 的 Web 服务来进行我需要的开发与工作了,赞~
安装步骤
1、安装 jupyterlab
jupyterlab 的安装可以说非常简单了,可以使用 pip3 执行如下命令安装 jupyterlab
pip3 install jupyterlab
示例:
$ pip3 install jupyterlab -i https://pypi.douban.com/simple
Looking in indexes: https://pypi.douban.com/simple
Collecting jupyterlab
Downloading https://pypi.doubanio.com/packages/d7/a9/d7c904ee406d1ce320fd1d91e05111fa158e66bb217f68d070b5f58c5937/jupyterlab-2.2.8-py3-none-any.whl (7.8 MB)
|████████████████████████████████| 7.8 MB 8.8 MB/s
...
...
Successfully built tornado pyrsistent pandocfilters
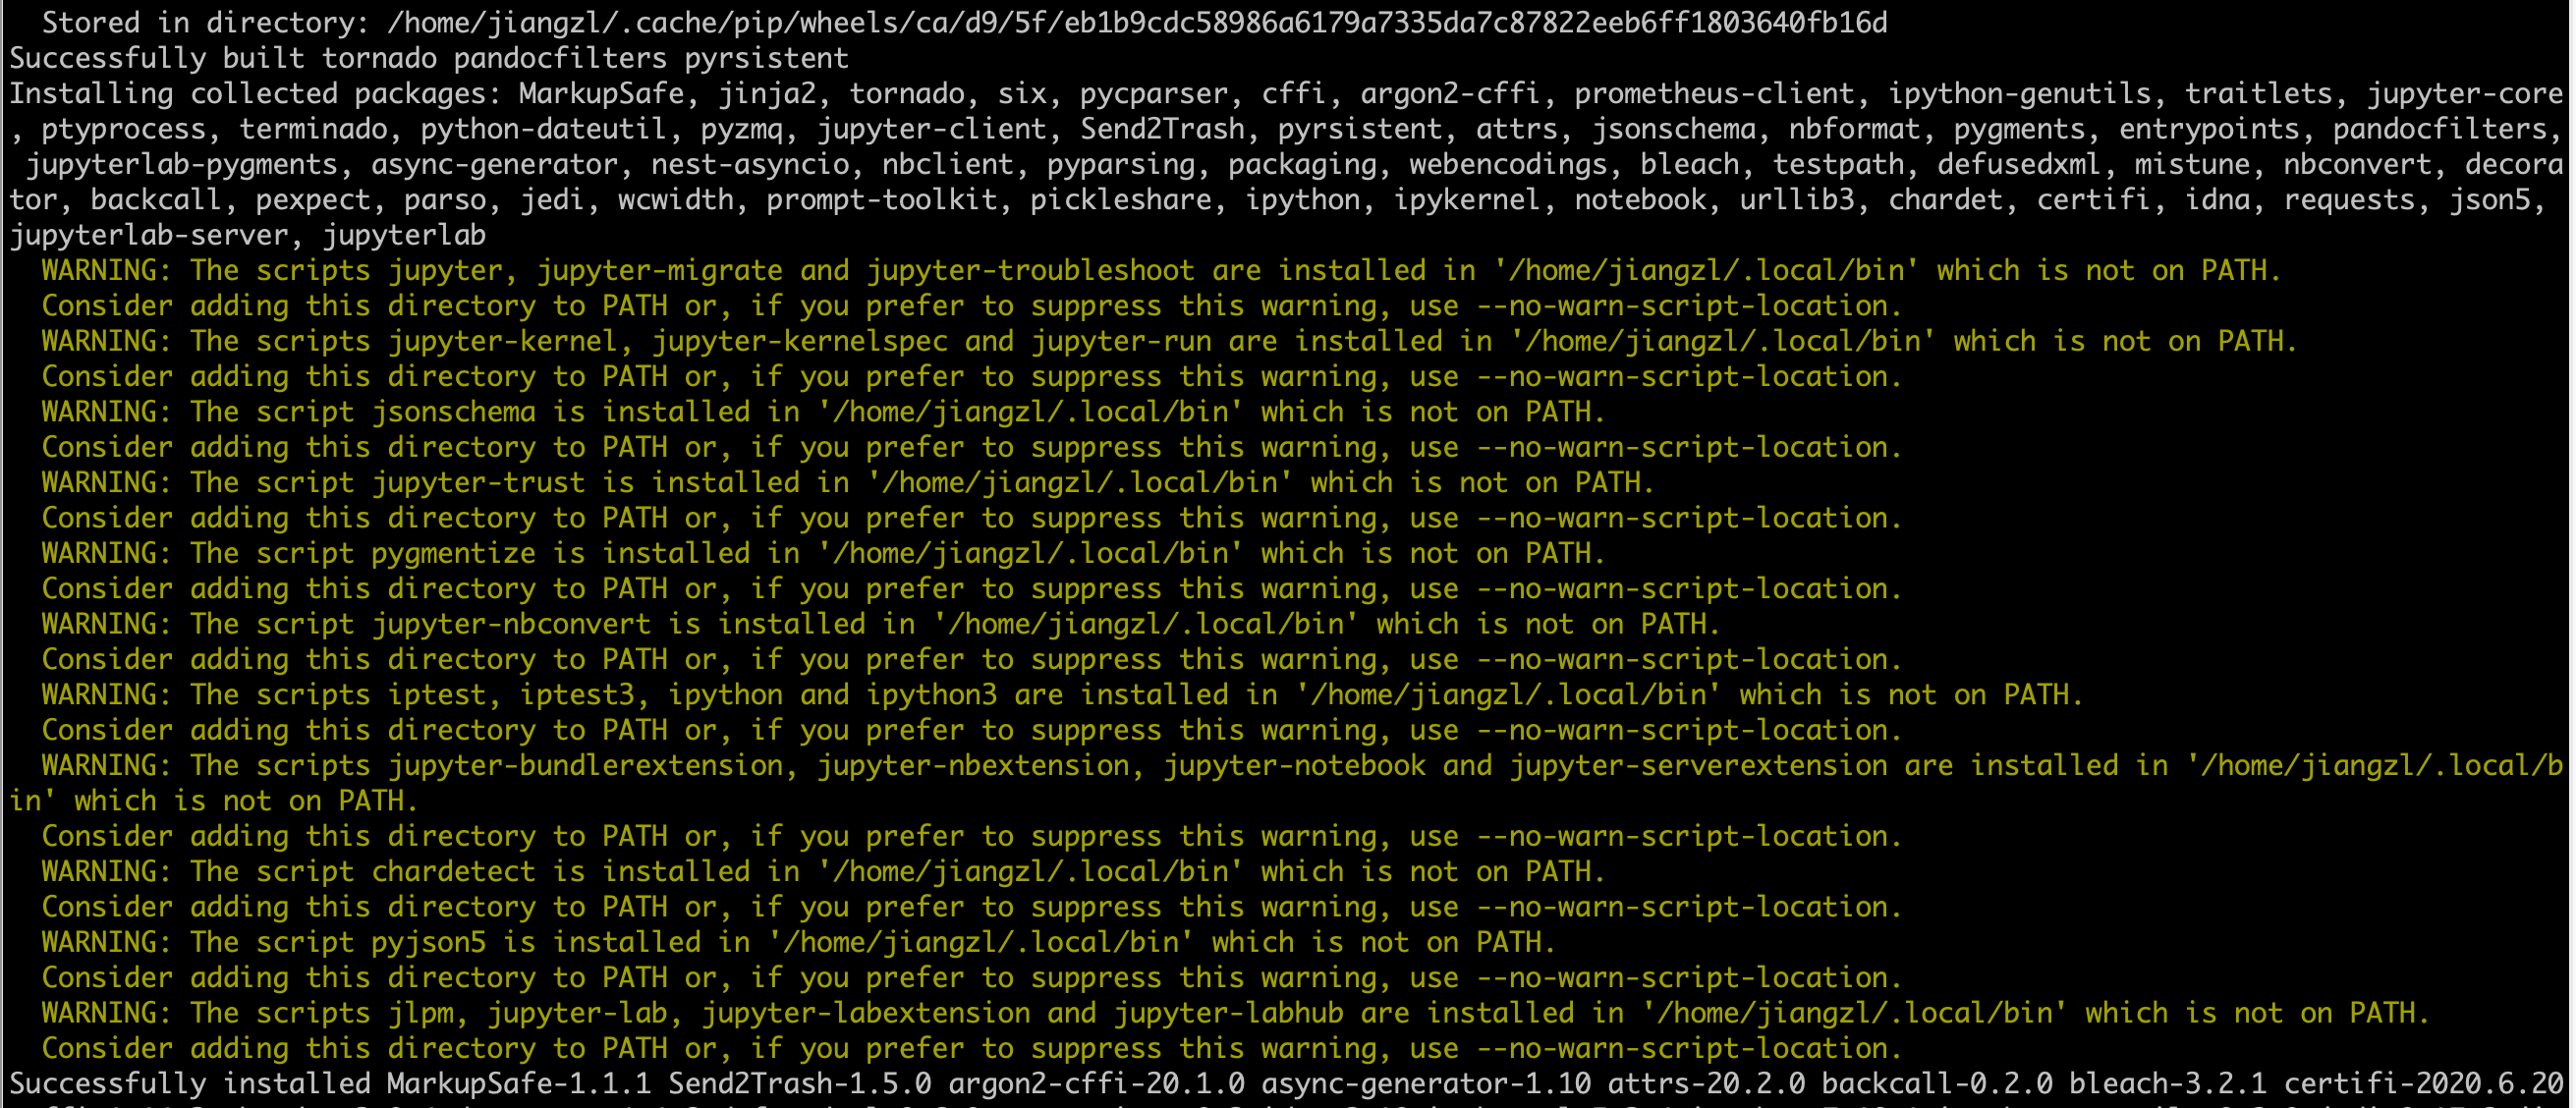
Installing collected packages: json5, urllib3, certifi, idna, chardet, requests, pyrsistent, attrs, jsonschema, tornado, pyzmq, ipython-genutils, traitlets, jupyter-core, python-dateutil, jupyter-client, prometheus-client, backcall, pygments, decorator, ptyprocess, pexpect, parso, jedi, pickleshare, wcwidth, prompt-toolkit, appnope, ipython, ipykernel, testpath, pyparsing, packaging, webencodings, bleach, entrypoints, defusedxml, nbformat, async-generator, nest-asyncio, nbclient, jupyterlab-pygments, mistune, pandocfilters, nbconvert, terminado, Send2Trash, pycparser, cffi, argon2-cffi, notebook, jupyterlab-server, jupyterlab
Successfully installed Send2Trash-1.5.0 appnope-0.1.0 argon2-cffi-20.1.0 async-generator-1.10 attrs-20.2.0 backcall-0.2.0 bleach-3.2.1 certifi-2020.6.20 cffi-1.14.3 chardet-3.0.4 decorator-4.4.2 defusedxml-0.6.0 entrypoints-0.3 idna-2.10 ipykernel-5.3.4 ipython-7.18.1 ipython-genutils-0.2.0 jedi-0.17.2 json5-0.9.5 jsonschema-3.2.0 jupyter-client-6.1.7 jupyter-core-4.6.3 jupyterlab-2.2.8 jupyterlab-pygments-0.1.2 jupyterlab-server-1.2.0 mistune-0.8.4 nbclient-0.5.1 nbconvert-6.0.7 nbformat-5.0.8 nest-asyncio-1.4.1 notebook-6.1.4 packaging-20.4 pandocfilters-1.4.2 parso-0.7.1 pexpect-4.8.0 pickleshare-0.7.5 prometheus-client-0.8.0 prompt-toolkit-3.0.8 ptyprocess-0.6.0 pycparser-2.20 pygments-2.7.1 pyparsing-2.4.7 pyrsistent-0.17.3 python-dateutil-2.8.1 pyzmq-19.0.2 requests-2.24.0 terminado-0.9.1 testpath-0.4.4 tornado-6.0.4 traitlets-5.0.5 urllib3-1.25.11 wcwidth-0.2.5 webencodings-0.5.1
注:这里也可以使用 sudo 权限安装 jupyterlab,这样所有用户都能使用 jupyterlab,而且也不用下方的配置环境变量的步骤。
2、配置环境变量
如果不使用 sudo 权限进行安装,也可以安装完成,但可能会提示如下告警,而且直接运行 jupyter-lab 命令可能会提示找不到命令。
安装警告信息:
WARNING: The scripts jupyter, jupyter-migrate and jupyter-troubleshoot are installed in '/home/jiangzl/.local/bin' which is not on PATH.
  Consider adding this directory to PATH or, if you prefer to suppress this warning, use --no-warn-script-location.
  WARNING: The scripts jupyter-kernel, jupyter-kernelspec and jupyter-run are installed in '/home/jiangzl/.local/bin' which is not on PATH.
  Consider adding this directory to PATH or, if you prefer to suppress this warning, use --no-warn-script-location.
  WARNING: The script jsonschema is installed in '/home/jiangzl/.local/bin' which is not on PATH.
  Consider adding this directory to PATH or, if you prefer to suppress this warning, use --no-warn-script-location.
  WARNING: The script jupyter-trust is installed in '/home/jiangzl/.local/bin' which is not on PATH.
  Consider adding this directory to PATH or, if you prefer to suppress this warning, use --no-warn-script-location.
  WARNING: The script pygmentize is installed in '/home/jiangzl/.local/bin' which is not on PATH.
  Consider adding this directory to PATH or, if you prefer to suppress this warning, use --no-warn-script-location.
  WARNING: The script jupyter-nbconvert is installed in '/home/jiangzl/.local/bin' which is not on PATH.
  Consider adding this directory to PATH or, if you prefer to suppress this warning, use --no-warn-script-location.
  WARNING: The scripts iptest, iptest3, ipython and ipython3 are installed in '/home/jiangzl/.local/bin' which is not on PATH.
  Consider adding this directory to PATH or, if you prefer to suppress this warning, use --no-warn-script-location.
  WARNING: The scripts jupyter-bundlerextension, jupyter-nbextension, jupyter-notebook and jupyter-serverextension are installed in '/home/jiangzl/.local/bin' which is not on PATH.
  Consider adding this directory to PATH or, if you prefer to suppress this warning, use --no-warn-script-location.
  WARNING: The script chardetect is installed in '/home/jiangzl/.local/bin' which is not on PATH.
  Consider adding this directory to PATH or, if you prefer to suppress this warning, use --no-warn-script-location.
  WARNING: The script pyjson5 is installed in '/home/jiangzl/.local/bin' which is not on PATH.
  Consider adding this directory to PATH or, if you prefer to suppress this warning, use --no-warn-script-location.
  WARNING: The scripts jlpm, jupyter-lab, jupyter-labextension and jupyter-labhub are installed in '/home/jiangzl/.local/bin' which is not on PATH.
  Consider adding this directory to PATH or, if you prefer to suppress this warning, use --no-warn-script-location.
如下图所示:
$ juypyter-lab
bash: juypyter-lab: command not found
按照警告信息中的提示,只需要将 '/home/jiangzl/.local/bin' 目录添加到环境变量的 PATH 变量中即可。
执行如下命令添加环境变量
echo 'export PATH=$PATH:'${HOME}'/.local/bin' | tee -a ~/.profile
示例:
$ echo 'export PATH=$PATH:'${HOME}'/.local/bin' | tee -a ~/.profile
PATH=$PATH:/home/jiangzl/.local/bin
注:
(1) 这里我将 /home/jiangzl 用环境变量 ${HOME} 来代替了,这样就算是用户名不相同也不用替换直接执行上面的命令即可。
(2) 如果你没有警告信息,也可以执行 jupyter-lab 命令,则不必进行上面的配置。
3、使用环境变量生效
$ source ~/.profile
至此,jupyterlab 的安装就完成了,可以说是十分简单了。
运行验证
1、验证安装
执行如下命令,如果成功显示版本号,则表示安装配置已经成功。
$ jupyter-lab -V
2.2.8
2、运行
执行如下命令即可以在前台运行一个 jupyter-lab server,然后你就可以在浏览器中访问服务来使用了。
jupyter-lab
示例:
$ cd ~
$ mkdir -p ~/Workspace/jupyterlab
$ cd ~/Workspace/jupyterlab
$ pwd
/home/jiangzl/Workspace/jupyterlab
$ nohup jupyter-lab --ip=0.0.0.0 --port=8888 >> ./jupyterlab.log 2>&1 &
[1] 5450
注:
(1) 运行 jupyter-lab 命令的目录即被作为 jupyter-lab 的 notebook 的目录,也就是说你从 jupyterlab 界面创建的 notebook,markdow 等文件都将存在于 jupyter-lab 命令运行所在的目录~
(2) 默认情况下,jupyterlab 监听 localhost 的 8888 端口,只能在本机访问。当然也可以通过上面示例代码进行传参来控制监听的 IP 与 Port。0.0.0.0 表示可以从任意位置请求该服务,如果你只在本机使用,则执行如下命令即可:
$ nohup jupyter-lab >> ./jupyterlab.log 2>&1 &
(3) 默认情况下,监听 localhost 以及从本机访问时,不需要 token 或者密码,但如果从远程访问,则需要 token 或者密码。
3、查看运行日志
验证安装是否完成,比如查看日志,查看进程等
$ pwd
/home/jiangzl/Workspace/jupyterlab
$ -100f jupyterlab.log
[I 11:55:13.548 LabApp] JupyterLab extension loaded from /usr/local/lib/python3.6/dist-packages/jupyterlab
[I 11:55:13.548 LabApp] JupyterLab application directory is /usr/local/share/jupyter/lab
[I 11:55:13.550 LabApp] Serving notebooks from local directory: /home/jiangzl/Workspace/jupyterlab
[I 11:55:13.550 LabApp] Jupyter Notebook 6.1.4 is running at:
[I 11:55:13.550 LabApp] http://ubuntu:8888/?token=e8a370327d94b7fe8f951a70468a0147f2c577
[I 11:55:13.550 LabApp]  or http://127.0.0.1:8888/?token=e8a370327d94b7fe8f951a70468a0147f2c577
[I 11:55:13.550 LabApp] Use Control-C to stop this server and shut down all kernels (twice to skip confirmation).
[W 11:55:13.552 LabApp] No web browser found: could not locate runnable browser.
[C 11:55:13.552 LabApp]

    To access the notebook, open this file in a browser:
        file:///home/jiangzl/.local/share/jupyter/runtime/nbserver-525722-open.html
    Or copy and paste one of these URLs:
        http://ubuntu:8888/?token=e8a370327d94b7fe8f951a70468a0147f2c577
     or http://127.0.0.1:8888/?token=e8a370327d94b7fe8f951a70468a0147f2c577
4、访问
使用 jupyter-lab 运行的情况下默认开启 8888 端口,所以你可以在浏览器输入 http://ip:port/lab 来访问 jupyter lab,如下示例:

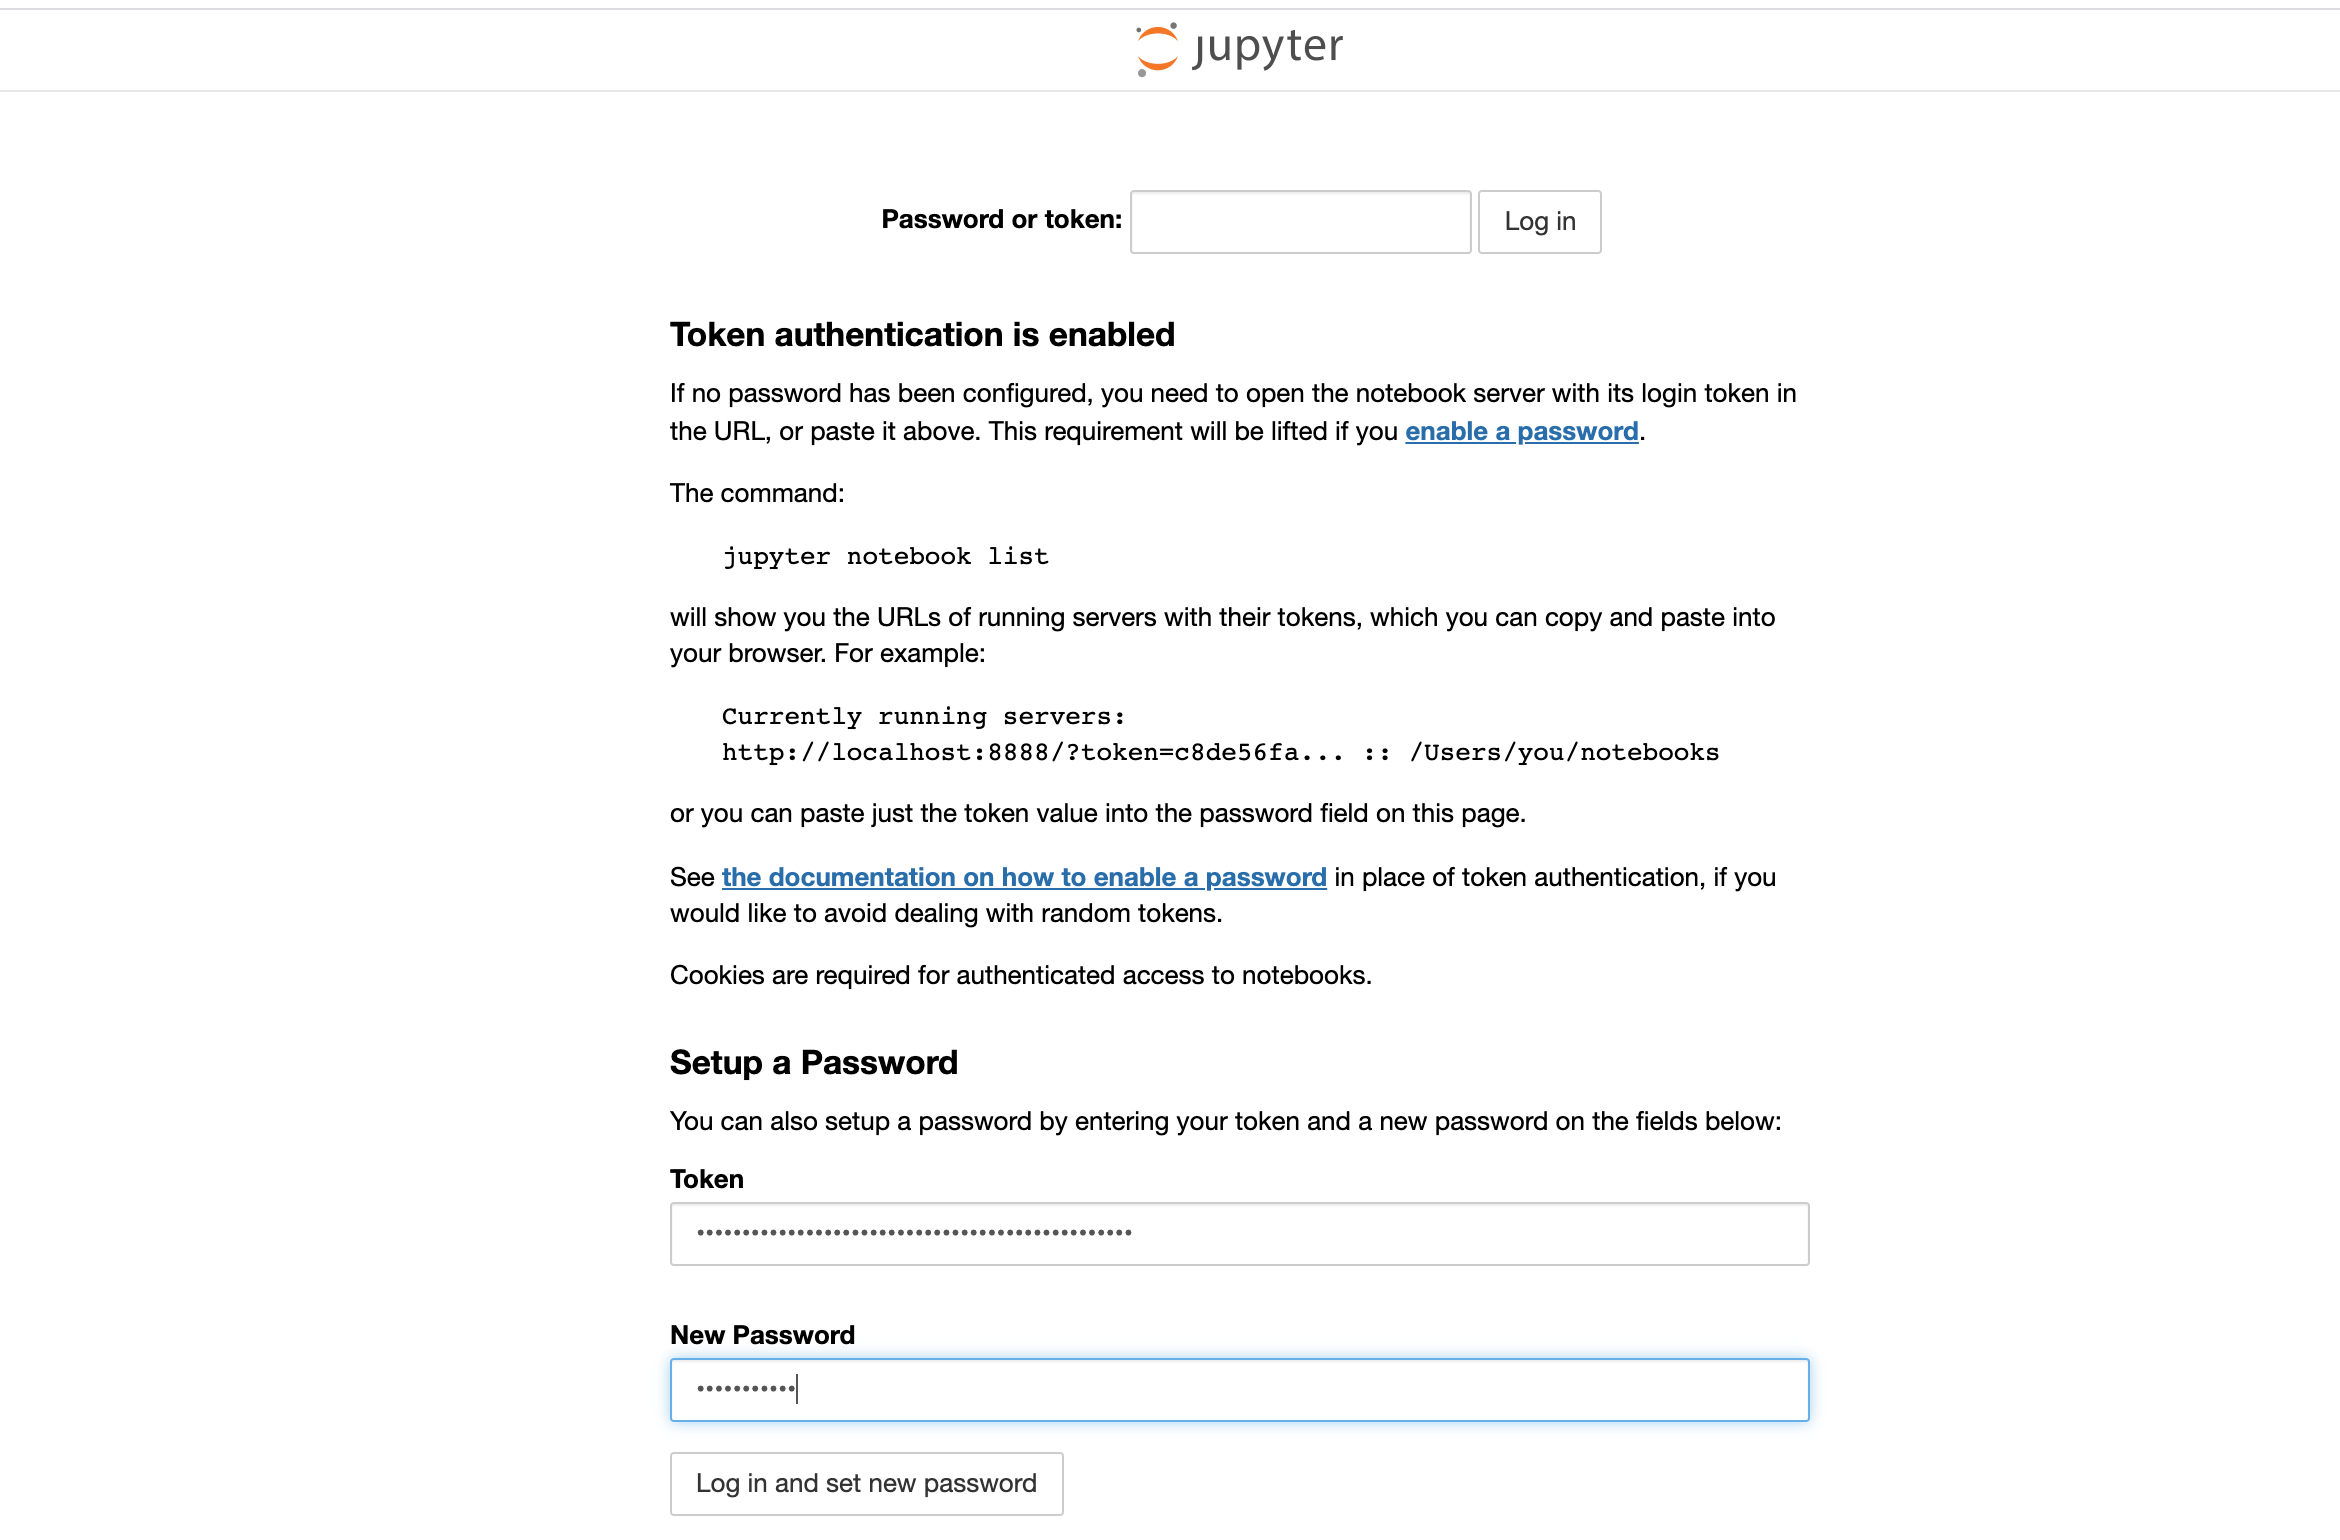
注:初次从外网访问时,默认的 token 可从 log 中获取,http://127.0.0.1:8888/?token=e8a370327d94b7fe8f951a70468a0147f2c577 日志中类似这样的 URL 后面的 token= 后面的部分就是我们初始登录的 token 值。
输入 token 值并设置新的密码,以后就使用密码进行登录了。
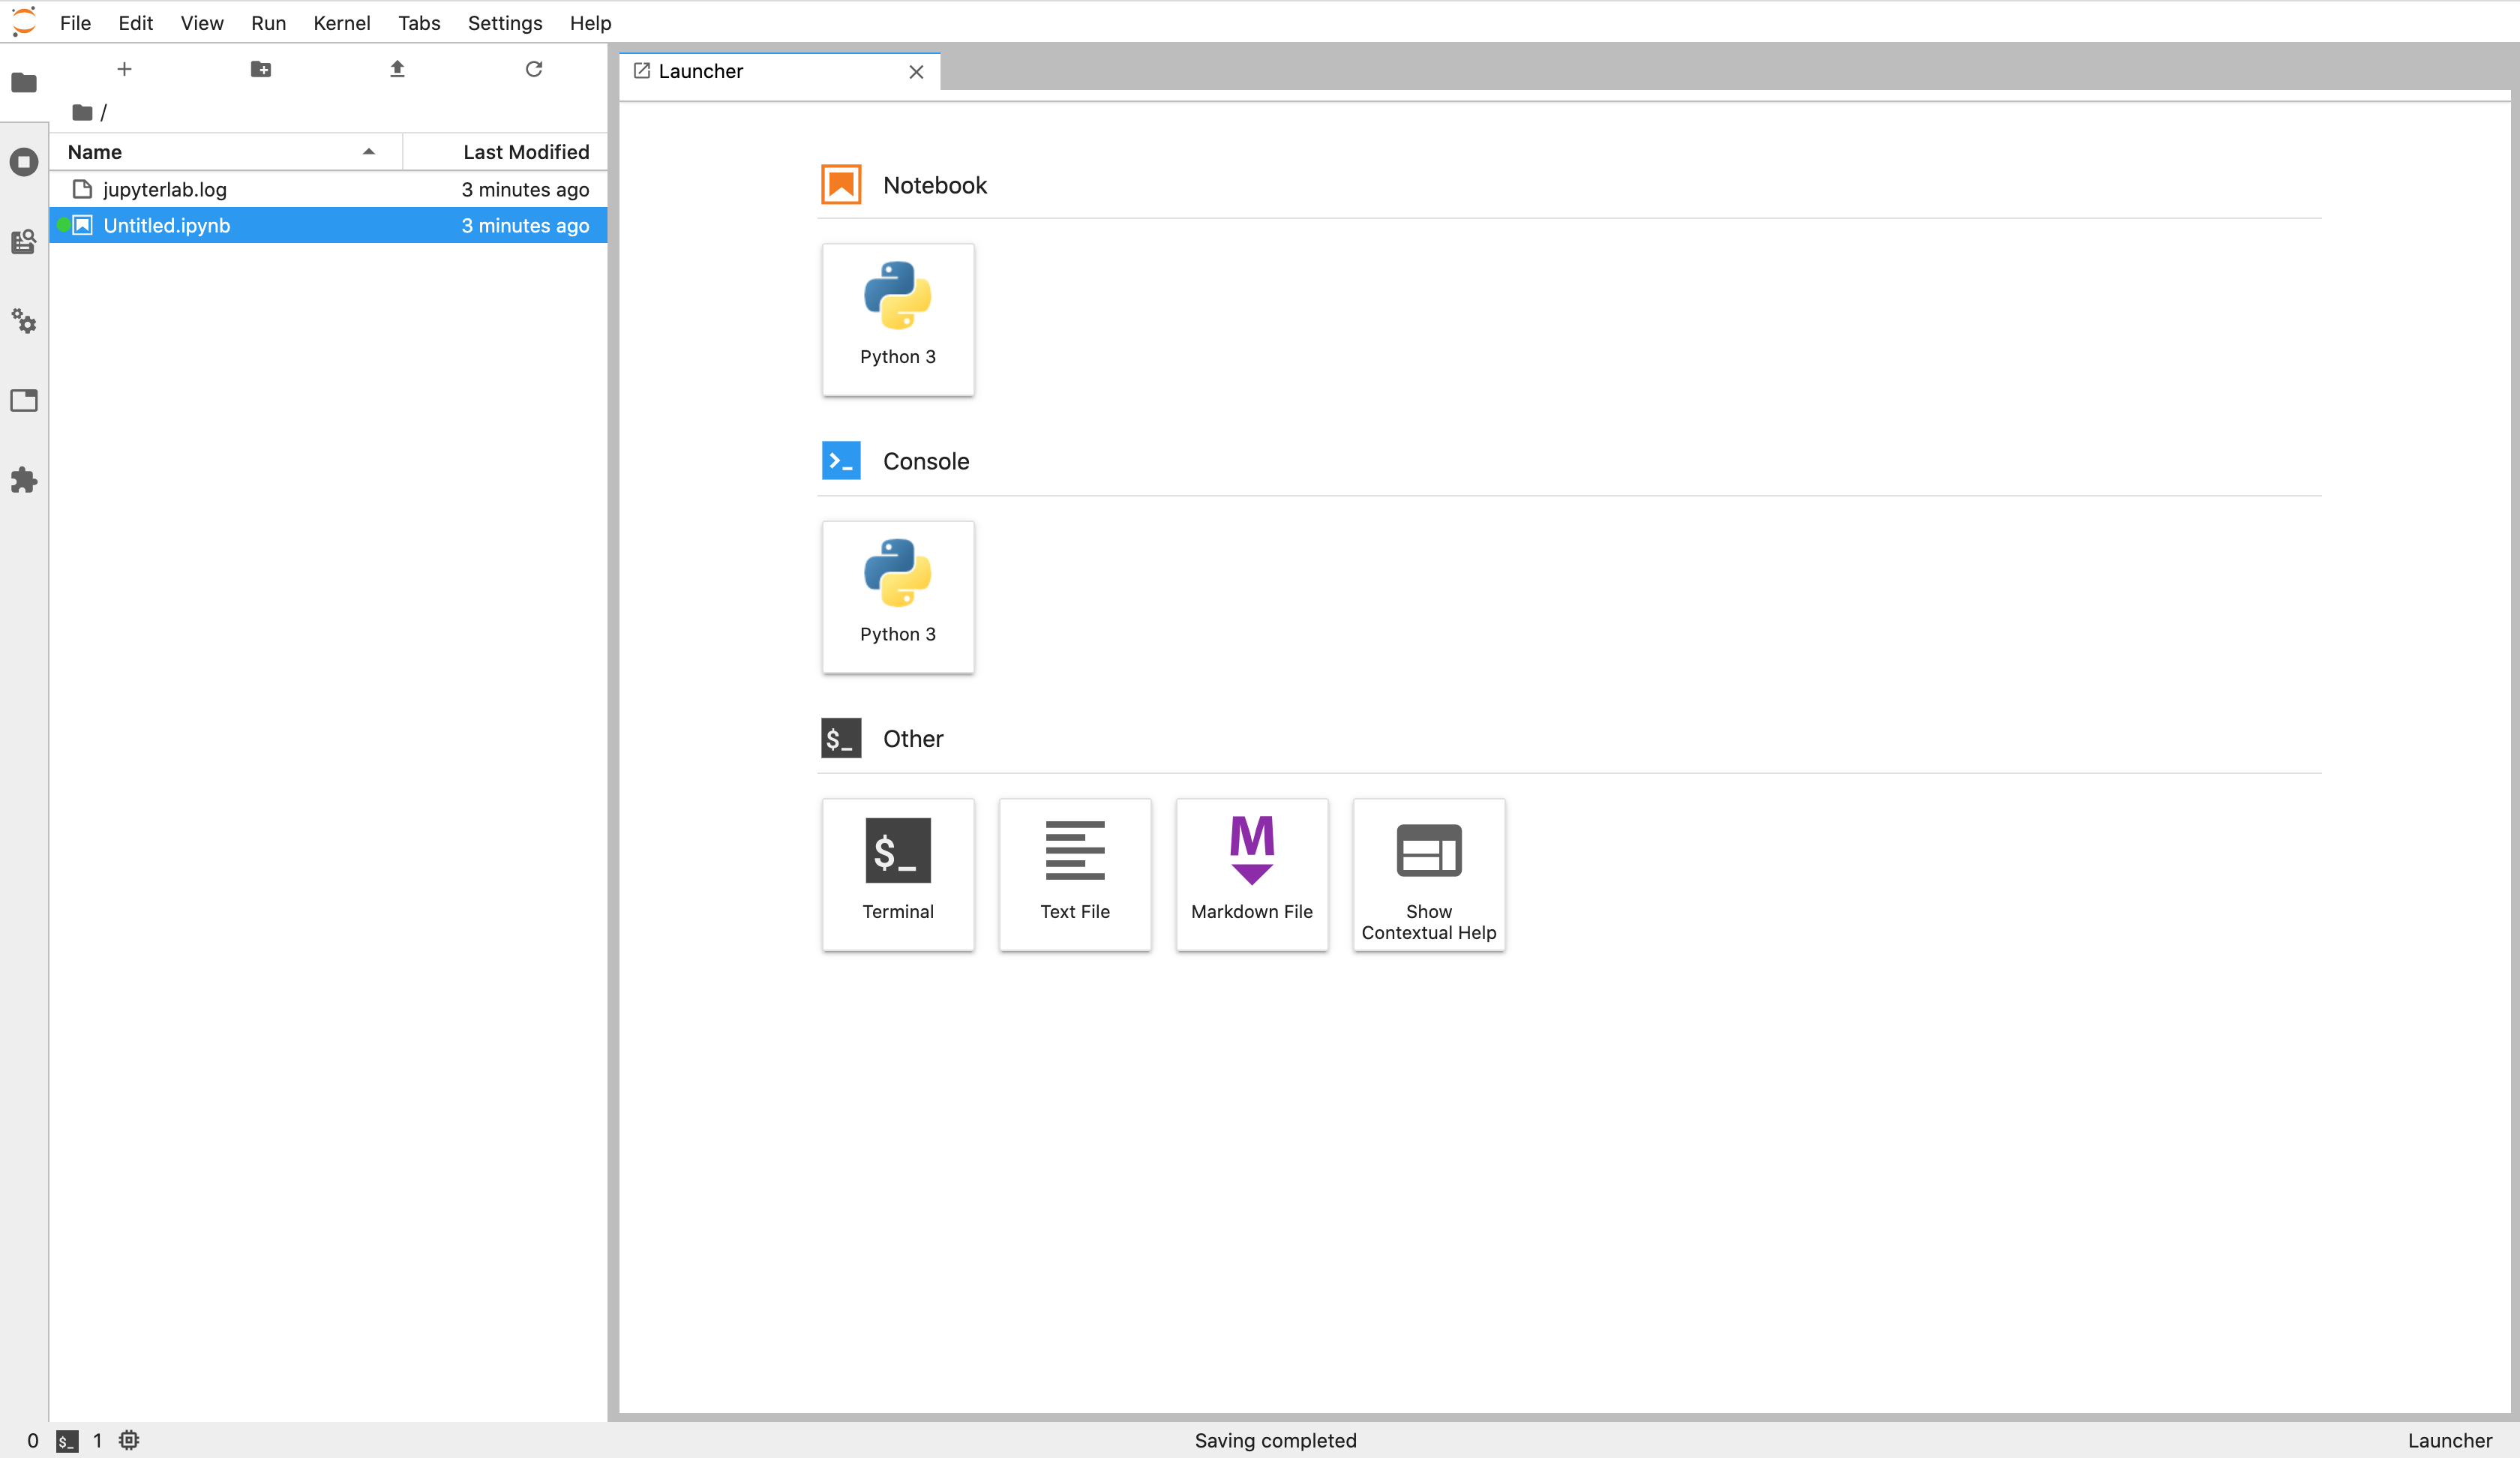
登录进来啦~ 右侧是 Jupyterlab 默认支持的使用场景,可以看到支持 Notebook,Python Console,Terminal,Markdown file 等等。
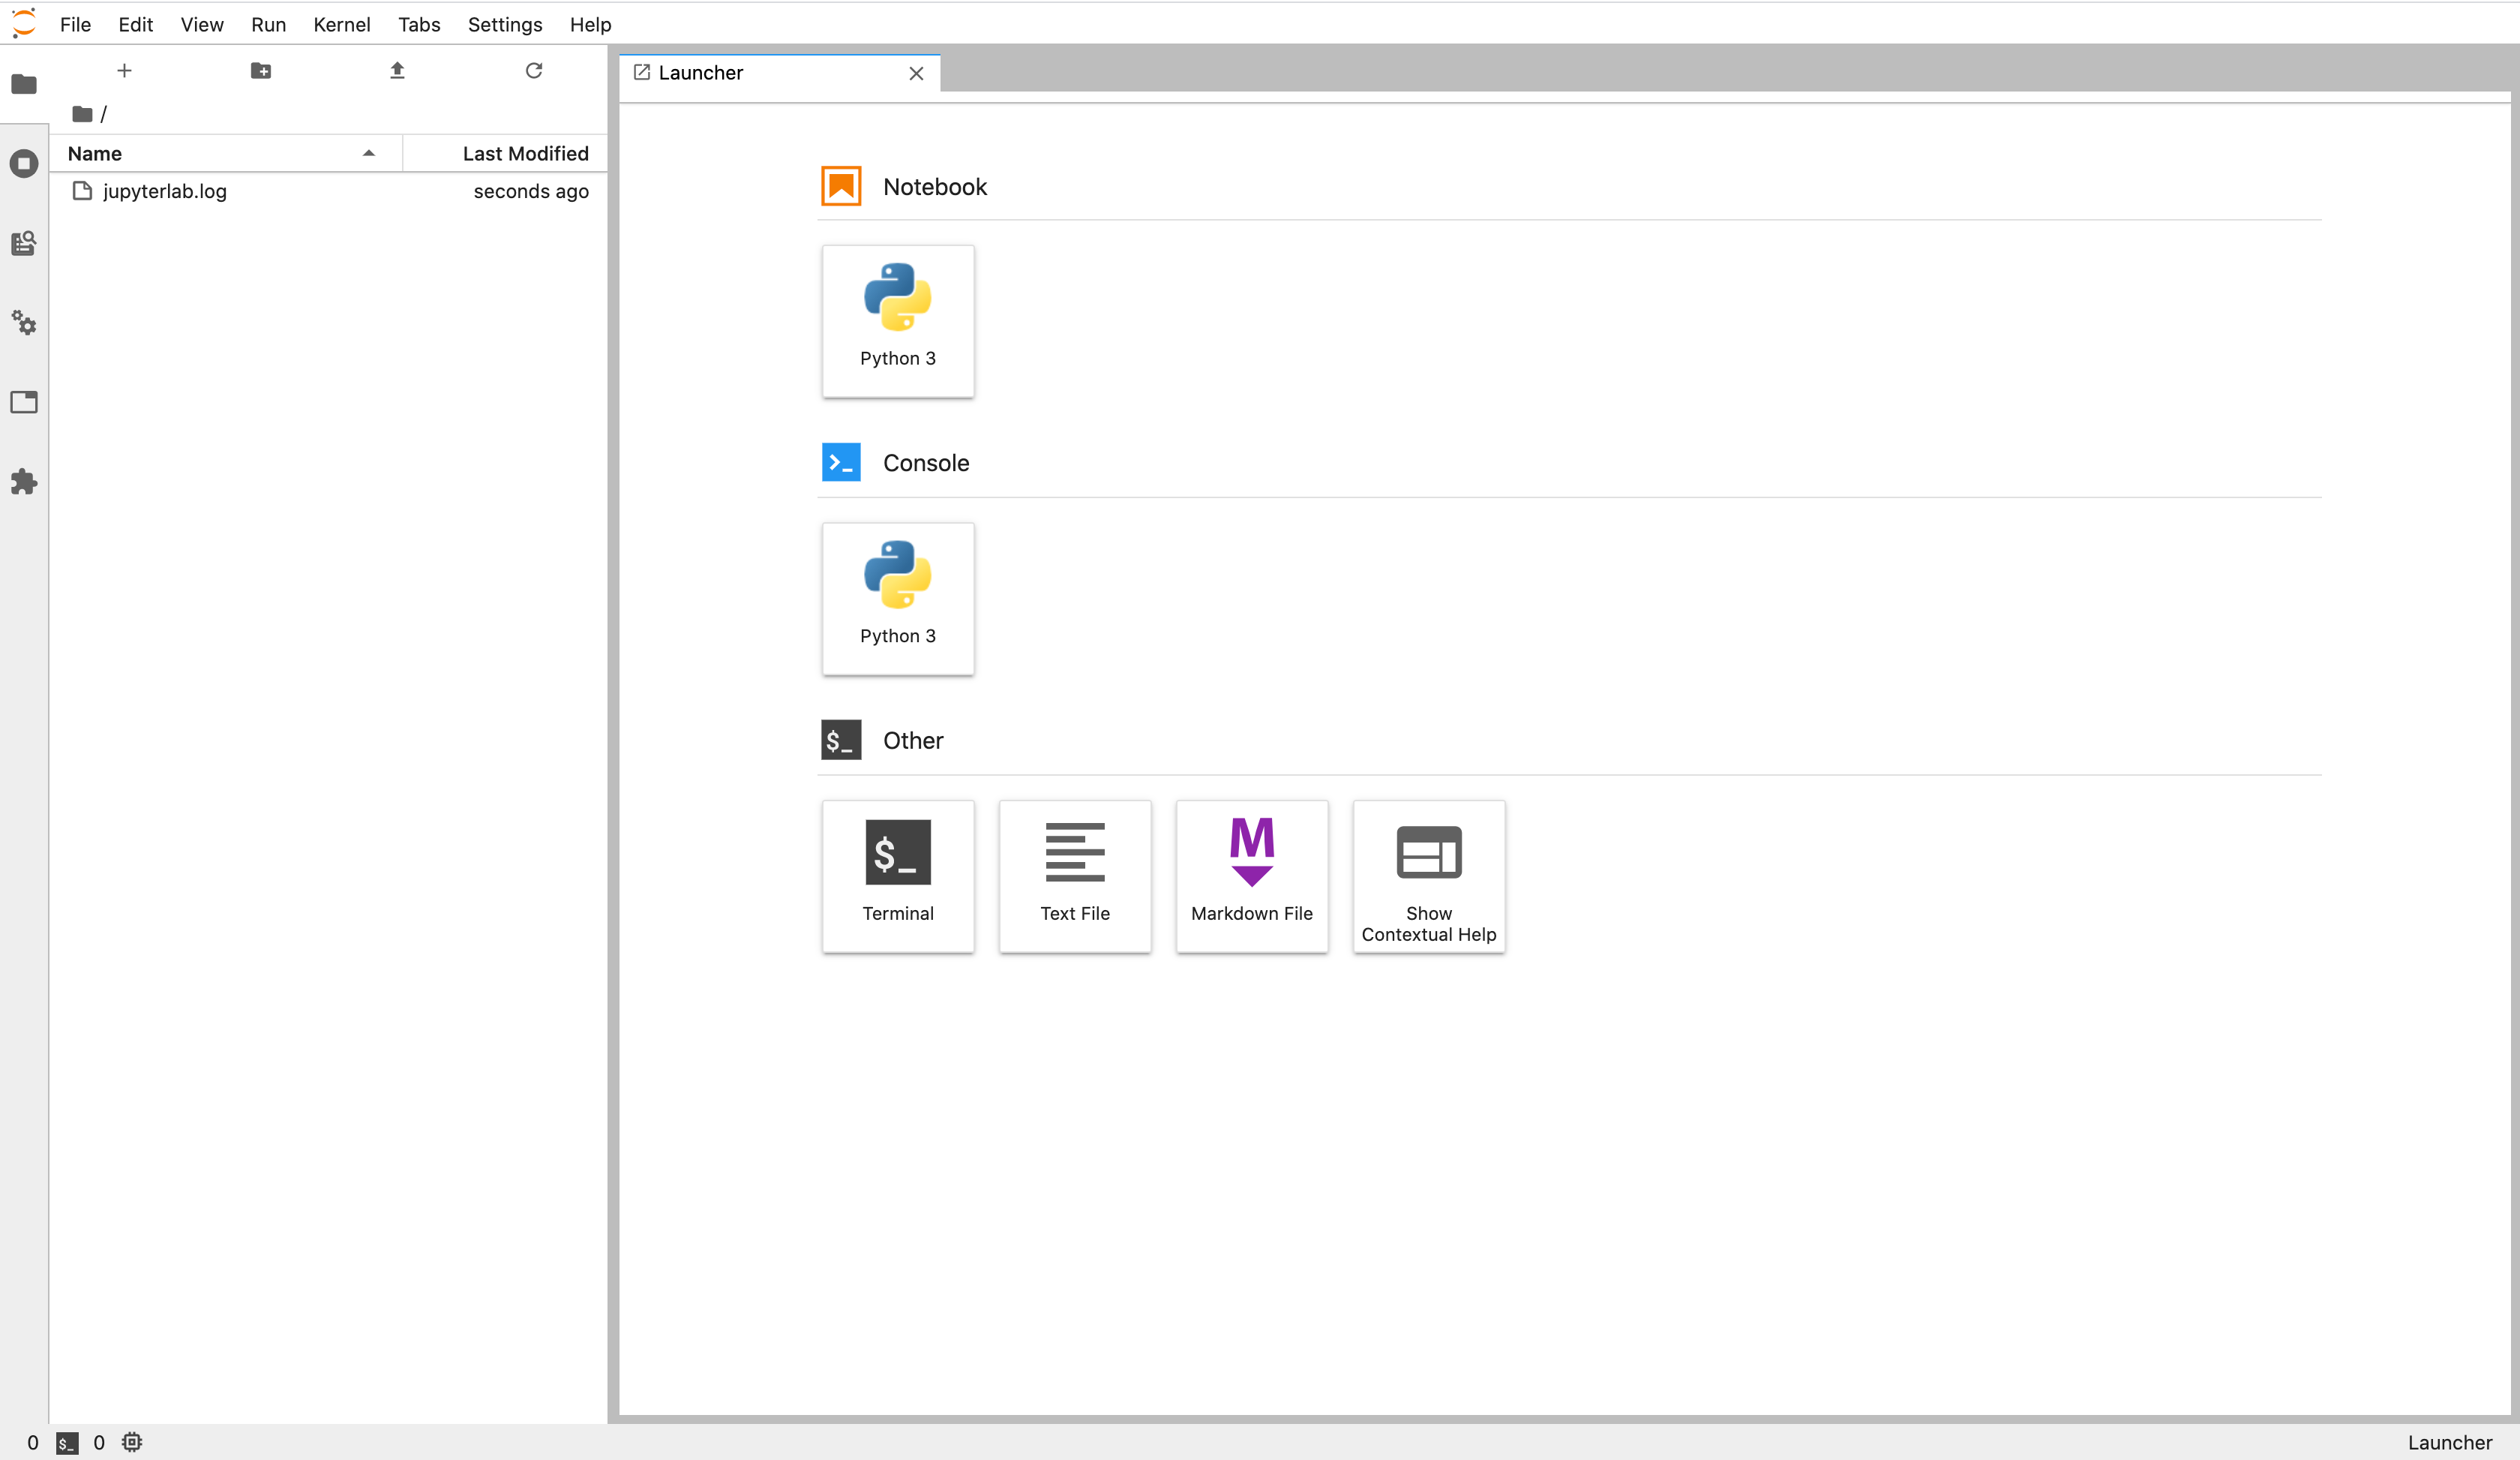
5、简单使用
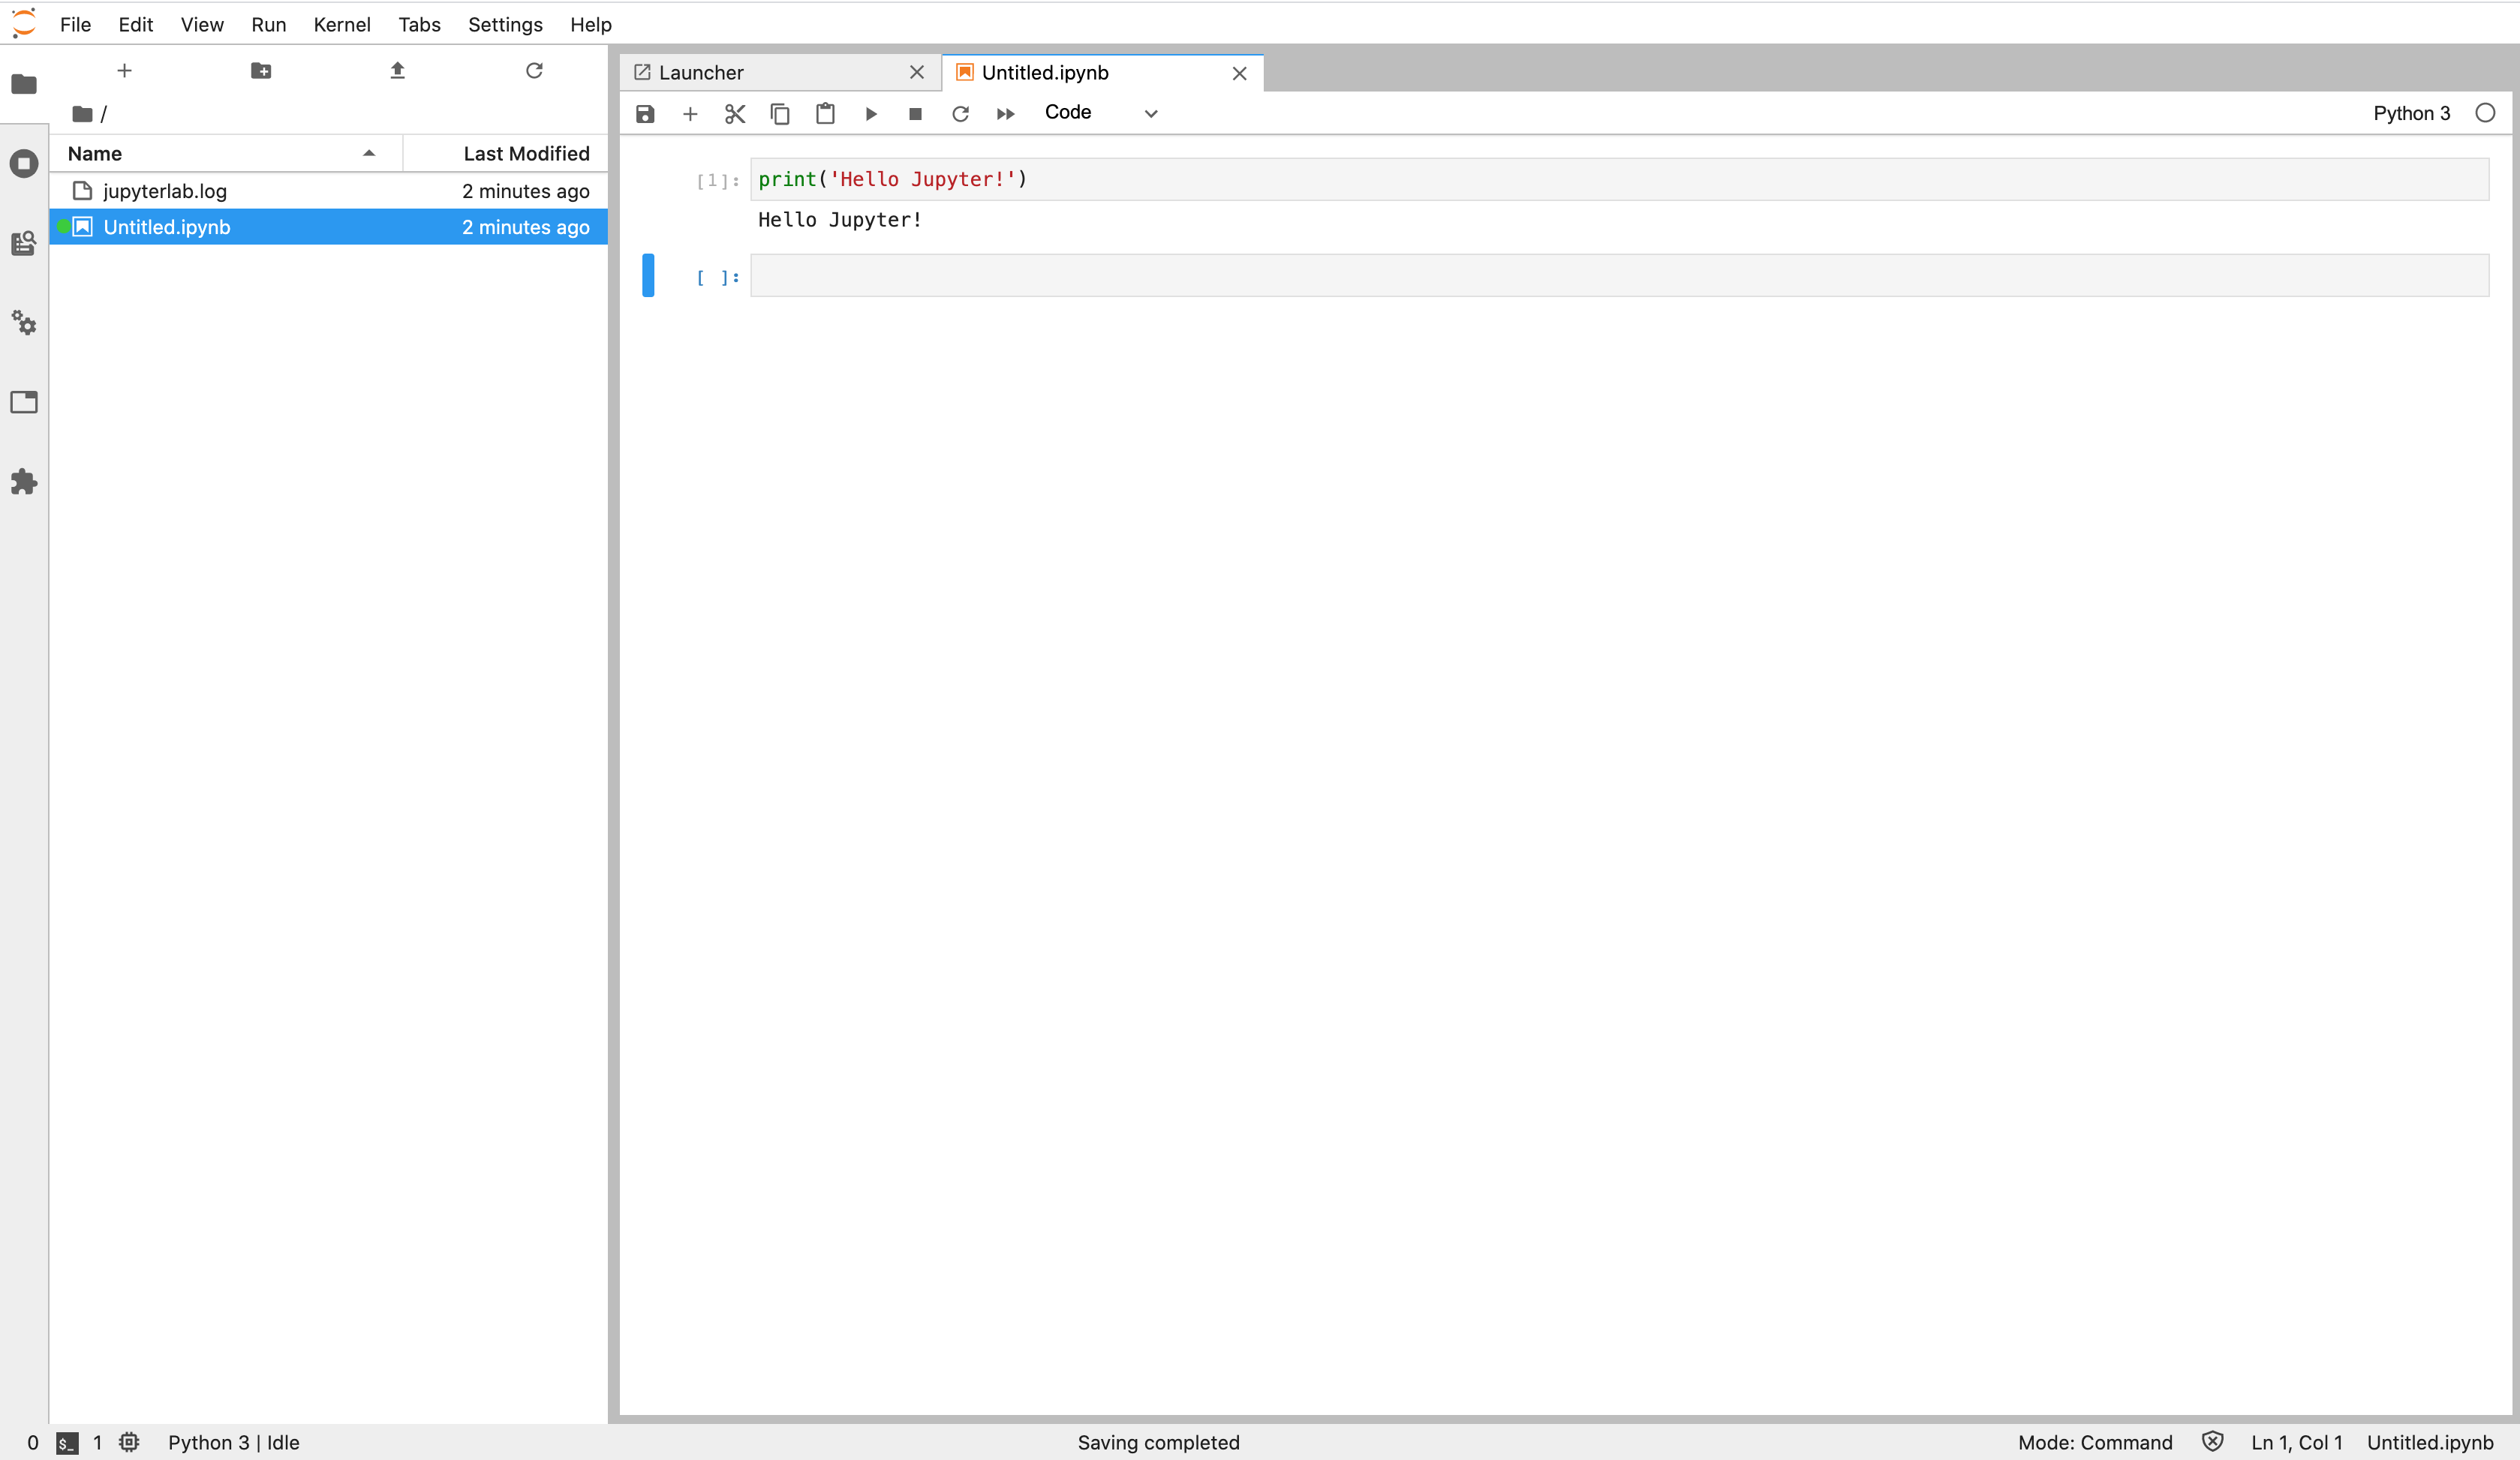
点击 File -> New -> Notebook -> 选择 Python3
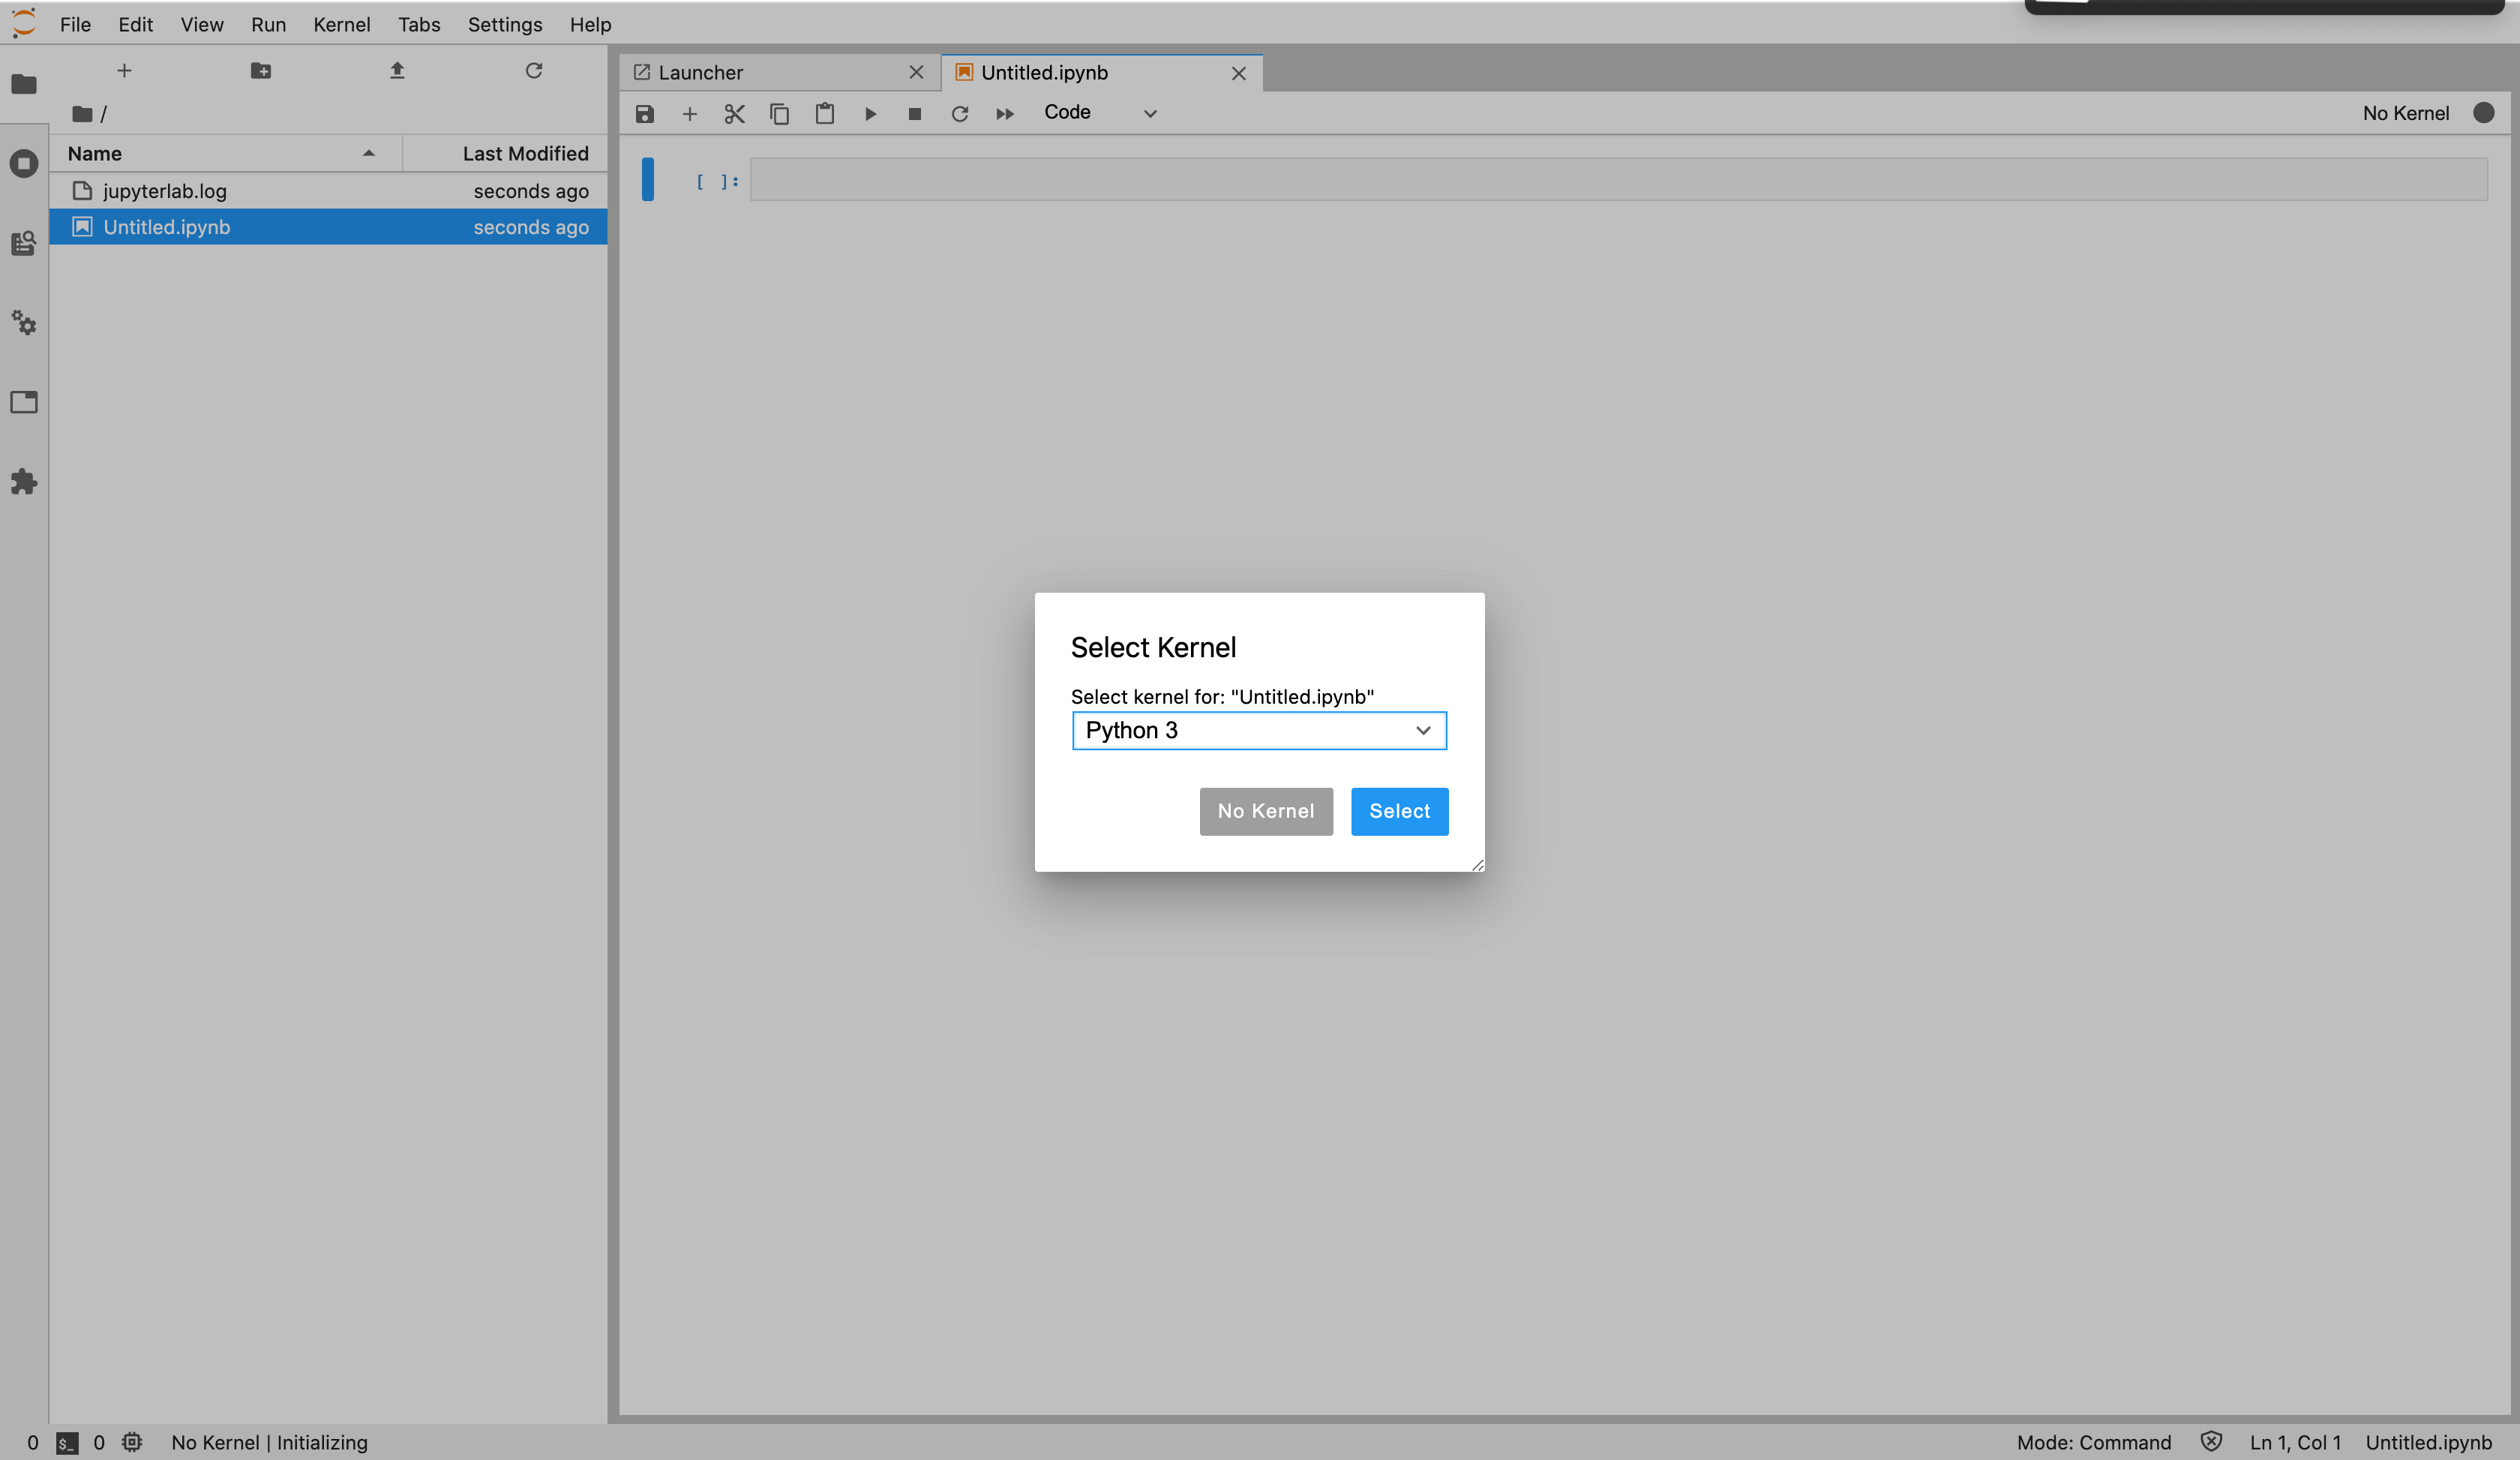
Hello Jupyter 已经运行成功了!
6、关闭与重启 jupyterlab
由于 jupyterlab 没有提供关闭与重启的命令。因此,只能通过 kill -TERM 的方式来进行关闭与重启
关闭命令
ps -ef | grep jupyter-lab | grep -v grep | awk '{print $2}' | xargs kill -TERM
示例:
$ ps -ef | grep jupyter-lab | grep -v grep | awk '{print $2}' | xargs kill -TERM
[1]+  Done                    nohup jupyter-lab --ip=0.0.0.0 --port=8888 >> ./jupyterlab.log
重启就是先关闭再执行一次重启命令。
7、总结
虽然我写了一大堆,但其实 jupyterlab 的安装真的是超级简单,而且非常好用,建议你也试试吧。
另外,其实我本人的 Jupyterlab 是在 docker 中运行的,后面抽时间我把对应的 Docker 运行的 Dockerfile 分享出来并把镜像提交到仓库中~
附录
https://jupyter.org/
https://jupyter.org/install

近期评论