Windows 下安装 python 虚拟环境 virtualenv 及管理工具 workon
二、安装 virtualenv
1、安装 virtualenv
2、配置 pip 安装第三方库的镜像源地址
3、使用 virtualenv
4、退出虚拟环境:
三、安装 virtualenvwrapper-win
1、安装 virtualenvwrapper-win
2、创建虚拟机
3、使用 workon 命令
4、workon home
5、删除虚拟环境
附录一:pip 使用方法
附录二:pip 安装失败
python 的虚拟环境 virtualenv 可以为一个 python 项目提供独立的解释环境、依赖包等资源,既能够很好的隔离不同项目使用不同 python 版本带来的冲突,而且还能方便项目的发布。
此处已经假设你已经安装好了 python 3.6.1 版本和 python 2.7.6 版本,且环境变量中默认设置的是 python 3.6.1 的位置
一、系统环境
Windows 10
python 3.6.1
python 2.7.6
二、安装 virtualenv
1、安装 virtualenv
pip install virtualenv2、配置 pip 安装第三方库的镜像源地址
由于多种原因,内地连接到国外服务器的网络会比较慢,使用 pip 安装的时候可能会出现连接超时这样的情况。这时可以尝试使用国内优秀的豆瓣源镜像来安装。如果是本身就是在国外,则完全不需要。
(1) 豆瓣源
https://pypi.douban.com/simple(2) 使用豆瓣源
pip install -i https://pypi.douban.com/simple virtualenv3、使用 virtualenv
(1) 创建一个 Virtualenv
示例,如下命令表示在当前目录下创建一个名叫 scrapy_spider 的目录(虚拟环境),该目录下包含了独立的 Python 运行程序,pip 包管理工具
C:\Users\jiangzhuolin\python\env>virtualenv scrapy_spider(2) 切换到虚拟环境
如下示例,切换到创建的虚拟环境的 Scripts 目录下:
C:\Users\jiangzhuolin\python\env>cd scrapy_spider/Scripts执行如下命令切换到虚拟环境:
C:\Users\jiangzhuolin\python\env\scrapy_spider\Scripts>activate
(scrapy_spider) C:\Users\jiangzhuolin\python\env\scrapy_spider\Scripts>
切换后,前面有个括号,里面标了虚拟环境目录。
查看切换到虚拟环境后的 Python 和 pip
(scrapy_spider) C:\Users\jiangzhuolin\python\env\scrapy_spider\Scripts>python -V

Python 3.6.1

(scrapy_spider) C:\Users\jiangzhuolin\python\env\scrapy_spider\Scripts>pip -V
pip 9.0.1 from c:\users\jiangzhuolin\python\env\scrapy_spider\lib\site-packages
(python 3.6)
(scrapy_spider) C:\Users\jiangzhuolin\python\env\scrapy_spider\Scripts>python
Python 3.6.1 (v3.6.1:69c0db5, Mar 21 2017, 18:41:36) [MSC v.1900 64 bit (AMD64)]
on win32
Type "help", "copyright", "credits" or "license" for more information.
>>>(3) 创建指定版本的 Python 虚拟环境
示例:
virtualenv -p C:\python27\python.exe python27_testC:\Users\jiangzhuolin\python\env>virtualenv -p C:\python27\python.exe python27_test
Running virtualenv with interpreter C:\python27\python.exe
New python executable in C:\Users\jiangzhuolin\python\env\python27_test\Scripts\
python.exe
Installing setuptools, pip, wheel…done.进入方法一致:
C:\Users\jiangzhuolin\python\env\python27_test\Scripts>activate

(python27_test) C:\Users\jiangzhuolin\python\env\python27_test\Scripts>python -V

Python 2.7.12

(python27_test) C:\Users\jiangzhuolin\python\env\python27_test\Scripts>pip -V
pip 9.0.1 from c:\users\jiangzhuolin\python\env\python27_test\lib\site-packages
(python 2.7)
4、退出虚拟环境:
(scrapy_spider) C:\Users\jiangzhuolin\python\env\scrapy_spider\Scripts>deactivate三、安装 virtualenvwrapper-win
virtualenv 虽然使我们的开发环境进行了隔离,极大地方便了我们的开发。但是使用 virtualenv 的体验并不是特别好,原因在于每次需要进入虚拟环境,都需要进入虚拟环境的创建位置,找到 Scripts 目录下的 activate 脚本,然后执行才能进入虚拟环境。
当然,如果你刚使用 virtualenv 的时候可能不觉得有任何问题。但当你创建的虚拟环境很多,或者你创建了一段时间以后,可能使用起来就不方便了。因为你很有可能不记得自己当初创建的虚拟环境放在了什么位置。
这种情况下,使用虚拟环境管理工具就能很好解决这个问题。virtualenvwrapper 是一个虚拟环境管理工具,它能够管理创建的虚拟环境的位置,并能够方便地查看虚拟环境的名称以及切换到指定的虚拟环境。
1、安装 virtualenvwrapper-win
C:\Users\jiangzhuolin\python\env>pip -V
pip 9.0.1 from c:\program files\python36\lib\site-packages (python 3.6)

C:\Users\jiangzhuolin\python\env>pip install -i https://pypi.douban.com/simple virtualenvwrapper-win
注:
- 安装需要在非虚拟环境下进行
2、创建虚拟机
安装好 virtualenvwrapper-win 后,可以按如下示例的方法创建一个虚拟环境
C:\Users\jiangzhuolin\python\env>mkvirtualenv test
C:\Users\jiangzhuolin\Envs is not a directory, creating
Using base prefix 'c:\\program files\\python36'
New python executable in C:\Users\jiangzhuolin\Envs\test\Scripts\python.exe
Installing setuptools, pip, wheel…done.
(test) C:\Users\jiangzhuolin\python\env>
注:
- 创建虚拟环境完成后,会自动切换到创建的虚拟环境中
- 当然也可以指定虚拟机的 python 版本
C:\Users\jiangzhuolin\python\env>mkvirtualenv python27env -p C:\python27\python.
exe
Running virtualenv with interpreter C:\python27\python.exe
New python executable in C:\Users\jiangzhuolin\Envs\python27env\Scripts\python.e
xe
Installing setuptools, pip, wheel…done.

(python27env) C:\Users\jiangzhuolin\python\env>
3、使用 workon 命令
使用 workon 命令可以查看和切换虚拟环境:
a. 查看虚拟环境,单独执行 workon 命令就是查看当前已经通过 mkvirtualenv 创建的虚拟环境
C:\Users\jiangzhuolin>workon

Pass a name to activate one of the following virtualenvs:
==============================================================================
python27env
test
b. 切换虚拟环境,使用 workon [virtual-name] 即可切换到对应的虚拟环境
C:\Users\jiangzhuolin>workon python27env
(python27env) C:\Users\jiangzhuolin>
c. 退出虚拟环境
在虚拟环境中,使用 deactivate 即可退出虚拟环境
(python27env) C:\Users\jiangzhuolin>deactivate4、workon home
a. 安装完 virtualenvwrapper-win 后,创建的虚拟机的默认目录在当前 windows 用户目录下的 Envs 目录中
C:\Users\jiangzhuolin>cd envs

C:\Users\jiangzhuolin\Envs>dir
驱动器 C 中的卷没有标签。
卷的序列号是 9E79-6BA6

C:\Users\jiangzhuolin\Envs 的目录

2017/10/29 22:56 <DIR> .
2017/10/29 22:56 <DIR> ..
2017/10/29 22:56 <DIR> python27env
2017/10/29 22:54 <DIR> test
0 个文件 0 字节
4 个目录 42,458,050,560 可用字节
b. 配置虚拟机的存放目录
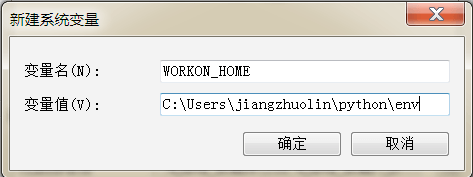
计算机 -> 属性 -> 高级系统设置 -> 环境变量 -> 在系统变量下方区域点击 "新建" 按键 -> 配置环境变量信息 -> "变量名":WORKON_HOME, "变量值":"YOUR_DIR" -> 然后点击 "确定"
如下示例:
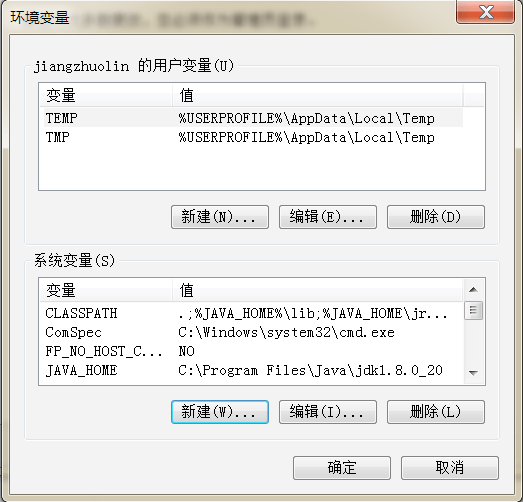
注:
- 变量名的值 WORKON_HOME 是固定写法,大写。不能更改
- 变量值则可以配置为你自己想要存放 python 虚拟环境的目录
- 配置完环境变量后,如果有已经打开的 CMD 窗口程序,则需要重启 CMD 程序才能使 WORKON_HOME 的配置生效
- 可以直接将默认 WORKON_HOME 中的虚拟环境拷贝到新的 WORKON_HOME 目录下
配置完成可以看到,使用 workon 已经不再显示默认的目录中的 虚拟环境了
C:\Users\jiangzhuolin>workon

Pass a name to activate one of the following virtualenvs:
==============================================================================
python27_test
scrapy_spider

C:\Users\jiangzhuolin>cd python/env

C:\Users\jiangzhuolin\python\env>dir
驱动器 C 中的卷没有标签。
卷的序列号是 9E79-6BA6

C:\Users\jiangzhuolin\python\env 的目录

2017/10/29 22:25 <DIR> .
2017/10/29 22:25 <DIR> ..
2017/10/29 22:25 <DIR> python27_test
2017/10/29 21:53 <DIR> scrapy_spider
0 个文件 0 字节
4 个目录 42,457,989,120 可用字节


C:\Users\jiangzhuolin\Envs>dir
驱动器 C 中的卷没有标签。
卷的序列号是 9E79-6BA6

C:\Users\jiangzhuolin\Envs 的目录

2017/10/29 22:56 <DIR> .
2017/10/29 22:56 <DIR> ..
2017/10/29 22:56 <DIR> python27env
2017/10/29 22:54 <DIR> test
0 个文件 0 字节
4 个目录 42,457,464,832 可用字节
5、删除虚拟环境
rmvirtualenv [virtualenv-name]如下示例:
C:\Users\jiangzhuolin\Envs>rmvirtualenv python27_test

Deleted C:\Users\jiangzhuolin\python\env\python27_test
注:
- 使用 rmvirtualenv 命令进行删除,必须要指定存放在 WORKON_HOME 中的虚拟环境,如果是在其他目录,该命令不能删除
也可以直接使用操作系统删除目录命令直接删除目录
C:\Users\jiangzhuolin\Envs>rd/s/q test

C:\Users\jiangzhuolin\Envs>dir
驱动器 C 中的卷没有标签。
卷的序列号是 9E79-6BA6

C:\Users\jiangzhuolin\Envs 的目录

2017/10/29 23:24 <DIR> .
2017/10/29 23:24 <DIR> ..
2017/10/29 22:56 <DIR> python27env
0 个文件 0 字节
3 个目录 42,508,488,704 可用字节
附录一:pip 使用方法
Usage:
pip <command> [options]

Commands:
install Install packages.
download Download packages.
uninstall Uninstall packages.
freeze Output installed packages in requirements form
list List installed packages.
show Show information about installed packages.
check Verify installed packages have compatible depe
cies.
search Search PyPI for packages.
wheel Build wheels from your requirements.
hash Compute hashes of package archives.
completion A helper command used for command completion.
help Show help for commands.

General Options:
-h, --help Show help.
--isolated Run pip in an isolated mode, ignoring
environment variables and user configuration.
-v, --verbose Give more output. Option is additive, and can
used up to 3 times.
-V, --version Show version and exit.
-q, --quiet Give less output. Option is additive, and can
used up to 3 times (corresponding to WARNING,
ERROR, and CRITICAL logging levels).
--log <path> Path to a verbose appending log.
--proxy <proxy> Specify a proxy in the form
[user:passwd@]proxy.server:port.
--retries <retries> Maximum number of retries each connection shou
attempt (default 5 times).
--timeout <sec> Set the socket timeout (default 15 seconds).
--exists-action <action> Default action when a path already exists:
(s)witch, (i)gnore, (w)ipe, (b)ackup, (a)bort.
--trusted-host <hostname> Mark this host as trusted, even though it does
not have valid or any HTTPS.
--cert <path> Path to alternate CA bundle.
--client-cert <path> Path to SSL client certificate, a single file
containing the private key and the certificate
in PEM format.
--cache-dir <dir> Store the cache data in <dir>.
--no-cache-dir Disable the cache.
--disable-pip-version-check
Don't periodically check PyPI to determine
whether a new version of pip is available for
download. Implied with --no-index.s
附录二:pip 安装失败
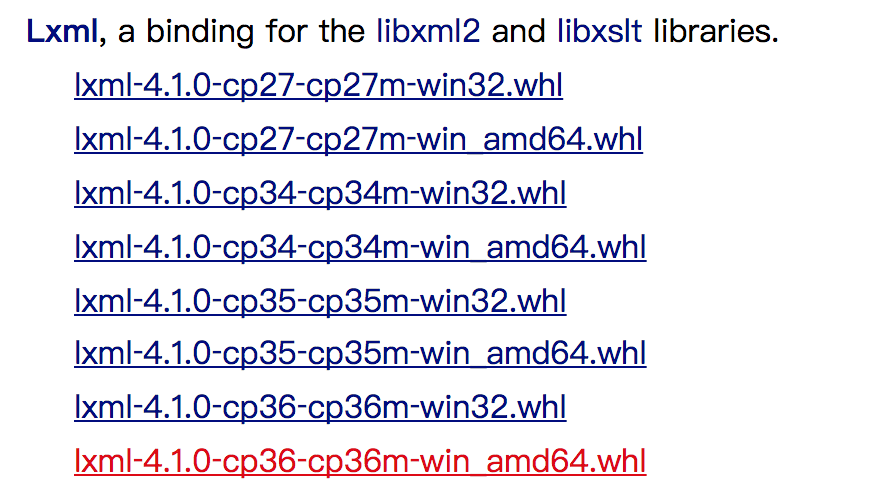
pip 安装失败缺少第三方库的时候可到如下地址查找对应的包
http://www.lfd.uci.edu/~gohlke/pythonlibs如下示例:
缺少 lxml 库,找到它

点击进入,找到对应 python 版本的库,点击文件下载
进入文件下载目录,执行命令安装
(scrapy_spider) C:\Users\jiangzhuolin>cd Desktop\Download
(scrapy_spider) C:\Users\jiangzhuolin\Desktop\Download>pip install lxml-4.1.0-cp
36-cp36m-win_amd64.whl
注:
- 需要进入虚拟环境后再安装

近期评论