【原创】Vagrant 创建 CentOS7 并安装 Docker
概要
MacOS 10.15.6
Vagrant 2.2.10
Docker Engine 19.03.12
正文
1、创建一个目录
创建一个用于 vagrant 初始化的目录,一般推荐将 vagrant 虚拟机均归档在一个相同的目录下,便于访问与管理。比如我的 vagrant 虚拟机均归档在 /Users/jiangzhuolin/vagrant 目录下
➜  vagrant pwd
/Users/jiangzhuolin/vagrant
➜  vagrant mkdir centos7_docker_machine
➜  vagrant cd centos7_docker_machine
2、vagrant init
运行命令 vagrant init centos/7 先在当前目录初始化一个默认的 Vagrantfile 文件。
➜  centos7_docker_machine vagrant init centos/7
A `Vagrantfile` has been placed in this directory. You are now
ready to `vagrant up` your first virtual environment! Please read
the comments in the Vagrantfile as well as documentation on
`vagrantup.com` for more information on using Vagrant.
3、编辑 Vagrantfile
编辑 Vagrantfile 文件,在其中加入安装 docker 相关的命令。
➜ centos7_docker_machine vim Vagrantfile
在文件末尾插入如下内容:
config.vm.provision "shell", inline: <<-SHELL
    sudo yum remove docker \
                  docker-client \
                  docker-client-latest \
                  docker-common \
                  docker-latest \
                  docker-latest-logrotate \
                  docker-logrotate \
                  docker-engine
    sudo yum install -y yum-utils
    sudo yum-config-manager --add-repo https://download.docker.com/linux/centos/docker-ce.repo
    sudo yum install -y docker-ce docker-ce-cli containerd.io
    sudo systemctl start docker
SHELL
示例:
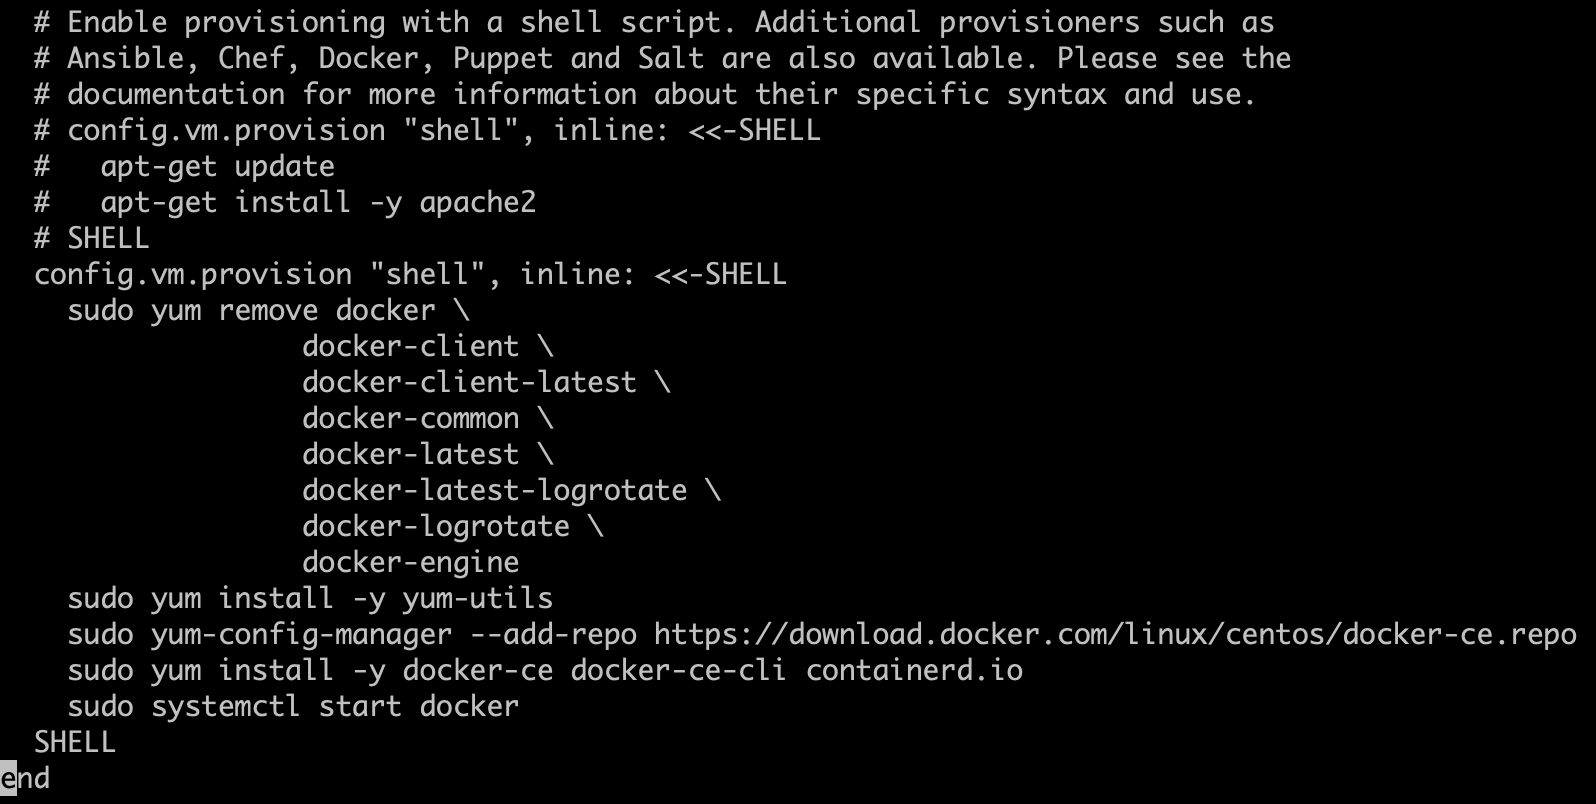
这些命令表示的是运行虚拟机成功后将要执行的 shell 命令,这些命令就是安装 docker 的相关命令,均来自 docker 官方文档。
https://docs.docker.com/engine/install/centos/
4、vagrant up
运行 vagrant up 运行启动虚拟机并安装 docker
➜  centos7_docker_machine vagrant up
Bringing machine 'default' up with 'virtualbox' provider...
==> default: Importing base box 'centos/7'...
==> default: Matching MAC address for NAT networking...
==> default: Checking if box 'centos/7' version '2004.01' is up to date...
==> default: Setting the name of the VM: centos7_docker_machine_default_1599678489544_30790
==> default: Clearing any previously set network interfaces...
==> default: Preparing network interfaces based on configuration...
    default: Adapter 1: nat
==> default: Forwarding ports...
    default: 22 (guest) => 2222 (host) (adapter 1)
==> default: Booting VM...
==> default: Waiting for machine to boot. This may take a few minutes...
    default: SSH address: 127.0.0.1:2222
    default: SSH username: vagrant
    default: SSH auth method: private key
    default:
    default: Vagrant insecure key detected. Vagrant will automatically replace
    default: this with a newly generated keypair for better security.
    default:
    default: Inserting generated public key within guest...
    default: Removing insecure key from the guest if it's present...
    default: Key inserted! Disconnecting and reconnecting using new SSH key...
==> default: Machine booted and ready!
==> default: Checking for guest additions in VM...
    default: No guest additions were detected on the base box for this VM! Guest
    default: additions are required for forwarded ports, shared folders, host only
    default: networking, and more. If SSH fails on this machine, please install
    default: the guest additions and repackage the box to continue.
    default:
    default: This is not an error message; everything may continue to work properly,
    default: in which case you may ignore this message.
==> default: Rsyncing folder: /Users/jiangzhuolin/vagrant/centos7_docker_machine/ => /vagrant
==> default: Running provisioner: shell...
    default: Running: inline script
    ...
    default:
    default: Dependency Installed:
    default:   audit-libs-python.x86_64 0:2.8.5-4.el7
    default:   checkpolicy.x86_64 0:2.5-8.el7
    default:   container-selinux.noarch 2:2.119.2-1.911c772.el7_8
    default:   libcgroup.x86_64 0:0.41-21.el7
    default:   libsemanage-python.x86_64 0:2.5-14.el7
    default:   policycoreutils-python.x86_64 0:2.5-34.el7
    default:   python-IPy.noarch 0:0.75-6.el7
    default:   setools-libs.x86_64 0:3.3.8-4.el7
    default: Complete!
总结
1、查看虚拟机状态
运行 vagrant status 命令查看虚拟机状态
➜  centos7_docker_machine vagrant status
Current machine states:
default                   running (virtualbox)
The VM is running. To stop this VM, you can run `vagrant halt` to
shut it down forcefully, or you can run `vagrant suspend` to simply
suspend the virtual machine. In either case, to restart it again,
simply run `vagrant up`.
2、进入虚拟机 ssh
➜  centos7_docker_machine vagrant ssh
[vagrant@bogon ~]$
3、查看 docker version
[vagrant@bogon ~]$ sudo docker version
Client: Docker Engine - Community
 Version:           19.03.12
 API version:       1.40
 Go version:        go1.13.10
 Git commit:        48a66213fe
 Built:             Mon Jun 22 15:46:54 2020
 OS/Arch:           linux/amd64
 Experimental:      false
Server: Docker Engine - Community
 Engine:
  Version:          19.03.12
  API version:      1.40 (minimum version 1.12)
  Go version:       go1.13.10
  Git commit:       48a66213fe
  Built:            Mon Jun 22 15:45:28 2020
  OS/Arch:          linux/amd64
  Experimental:     false
 containerd:
  Version:          1.2.13
  GitCommit:        7ad184331fa3e55e52b890ea95e65ba581ae3429
 runc:
  Version:          1.0.0-rc10
  GitCommit:        dc9208a3303feef5b3839f4323d9beb36df0a9dd
 docker-init:
  Version:          0.18.0
  GitCommit:        fec3683
至此,一个运行着 docker 19.03.12 的 CentOS7 虚拟机便创建好了,非常方便吧。
附录
参考:
Vagrant 文件中的 shell 命令均来自 docker 官方文档:
https://docs.docker.com/engine/install/centos/
近期评论