【原创】Vagrant 设置 host-only网络
前言
1、概述
使用 Vagrant 默认创建的虚拟机,只能从虚拟机内部访问网络。
但如果想从宿主机直接访问虚拟机中的服务,默认情况下是使用端口转发的方式的,但端口转发有弊端。比如:虚拟机中每新加一个服务就需要配置一个端口转发规则,而且端口转发会占用宿主机的端口,这样有可能出现宿主机的端口冲突等。
本文分享如何为 Vagrant 创建管理的虚拟机配置指定的 host-only 网络,使得从宿主机能直接访问各个虚拟机,且同一网段各虚拟机之间也可以相互通信。
2、相关环境
-
MacOS 11.2.3
-
VirtualBox 6.1.16
-
Vagrant 2.2.10
正文
1、配置新的虚拟机网络
如果你的宿主机没有已经配置的虚拟网卡,只需要在 Vagrantfile 配置文件中配置 config.vm.network 项,就可以新建一个虚拟网卡。
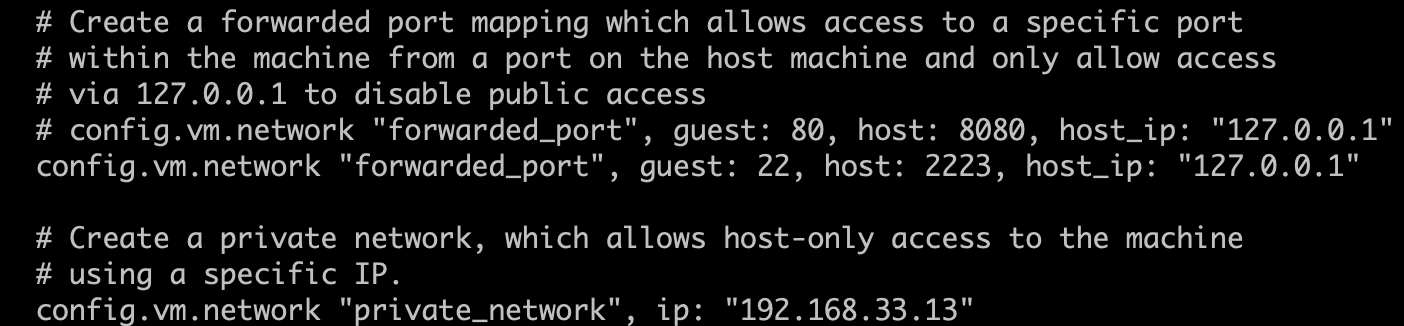
Vagrantfile 中的下面这行默认是注释掉的,删除 # 去掉注释,后面的 IP 是一个默认的网段 192.168.33 和默认的 IP 192.168.33.10。
config.vm.network "private_network", ip: "192.168.33.10"

修改后的配置如下示例:
注:
-
192.168.33 是 vagrant 给的默认网段,192.168.33.10 也是 vagrant 默认的 IP。都可以修改。比如:192.168.10.11,但不建议设置为 192.168.10.1,因为默认情况下第一个 IP 会作为虚拟网卡的网关
-
如果你的宿主机还没有 192.168.33 网段的虚拟网卡,则在配置后运行 vagrant up/reload 时会自动创建一个虚拟网卡,网段是 192.168.33
-
如果你有多个 vagrant 创建的虚拟机,你想使用这些虚拟机来搭建集群需要这些虚拟机之间进行网络通信,那只需要将各个虚拟机的 Vagrantfile 中的网段设置相同即可。比如:192.168.33.10,192.168.33.11,192.168.33.12
修改 Vagrantfile 并保存退出后,如果还没运行过虚拟机则使用 vagrant up 运行,如果虚拟机正在运行则使用 vagrant reload 重启。
$ vagrant reload
==> default: Attempting graceful shutdown of VM...
==> default: Checking if box 'centos/7' version '2004.01' is up to date...
==> default: Clearing any previously set forwarded ports...
==> default: Fixed port collision for 22 => 2222. Now on port 2201.
==> default: Clearing any previously set network interfaces...
==> default: Preparing network interfaces based on configuration...
    default: Adapter 1: nat
    default: Adapter 2: hostonly
==> default: Forwarding ports...
    default: 22 (guest) => 2201 (host) (adapter 1)
==> default: Running 'pre-boot' VM customizations...
==> default: Booting VM...
==> default: Waiting for machine to boot. This may take a few minutes...
    default: SSH address: 127.0.0.1:2201
    default: SSH username: vagrant
    default: SSH auth method: private key
==> default: Machine booted and ready!
==> default: Checking for guest additions in VM...
    default: No guest additions were detected on the base box for this VM! Guest
    default: additions are required for forwarded ports, shared folders, host only
    default: networking, and more. If SSH fails on this machine, please install
    default: the guest additions and repackage the box to continue.
    default:
    default: This is not an error message; everything may continue to work properly,
    default: in which case you may ignore this message.
==> default: Configuring and enabling network interfaces...
==> default: Rsyncing folder: /Users/jiangzhuolin/Vagrant/bigdata/node3/ => /vagrant
==> default: Machine already provisioned. Run `vagrant provision` or use the `--provision`
==> default: flag to force provisioning. Provisioners marked to run always will still run.
网络校验
$ ping 192.168.33.13
PING 192.168.33.13 (192.168.33.13): 56 data bytes
64 bytes from 192.168.33.13: icmp_seq=0 ttl=64 time=0.259 ms
64 bytes from 192.168.33.13: icmp_seq=1 ttl=64 time=0.372 ms
64 bytes from 192.168.33.13: icmp_seq=2 ttl=64 time=0.388 ms
64 bytes from 192.168.33.13: icmp_seq=3 ttl=64 time=0.312 ms
64 bytes from 192.168.33.13: icmp_seq=4 ttl=64 time=0.383 ms
64 bytes from 192.168.33.13: icmp_seq=5 ttl=64 time=0.350 ms
^C
--- 192.168.33.13 ping statistics ---
6 packets transmitted, 6 packets received, 0.0% packet loss
round-trip min/avg/max/stddev = 0.259/0.344/0.388/0.046 ms

$ vagrant ssh
==> vagrant: A new version of Vagrant is available: 2.2.14 (installed version: 2.2.10)!
==> vagrant: To upgrade visit: https://www.vagrantup.com/downloads.html
Last login: Thu Mar 25 06:50:08 2021 from 192.168.33.1
[vagrant@localhost ~]$ ifconfig
eth0: flags=4163<UP,BROADCAST,RUNNING,MULTICAST> mtu 1500
inet 10.0.2.15 netmask 255.255.255.0 broadcast 10.0.2.255
inet6 fe80::5054:ff:fe4d:77d3 prefixlen 64 scopeid 0x20<link>
ether 52:54:00:4d:77:d3 txqueuelen 1000 (Ethernet)
RX packets 794 bytes 93243 (91.0 KiB)
RX errors 0 dropped 0 overruns 0 frame 0
TX packets 587 bytes 97017 (94.7 KiB)
TX errors 0 dropped 0 overruns 0 carrier 0 collisions 0
eth1: flags=4163<UP,BROADCAST,RUNNING,MULTICAST> mtu 1500
inet 192.168.33.13 netmask 255.255.255.0 broadcast 192.168.33.255
inet6 fe80::a00:27ff:feca:6320 prefixlen 64 scopeid 0x20<link>
ether 08:00:27:ca:63:20 txqueuelen 1000 (Ethernet)
RX packets 75 bytes 7668 (7.4 KiB)
RX errors 0 dropped 0 overruns 0 frame 0
TX packets 75 bytes 7881 (7.6 KiB)
TX errors 0 dropped 0 overruns 0 carrier 0 collisions 0
lo: flags=73<UP,LOOPBACK,RUNNING> mtu 65536
inet 127.0.0.1 netmask 255.0.0.0
inet6 ::1 prefixlen 128 scopeid 0x10<host>
loop txqueuelen 1000 (Local Loopback)
RX packets 0 bytes 0 (0.0 B)
RX errors 0 dropped 0 overruns 0 frame 0
TX packets 0 bytes 0 (0.0 B)
TX errors 0 dropped 0 overruns 0 carrier 0 collisions 0
2、配置已有的虚拟机网络
如果你的宿主机已经有存在的虚拟网卡,则可以将 Vagrantfile 中的 IP 改为已存在的网段的 IP,这样所有使用该网段的虚拟机之前均可通信。如下所示:
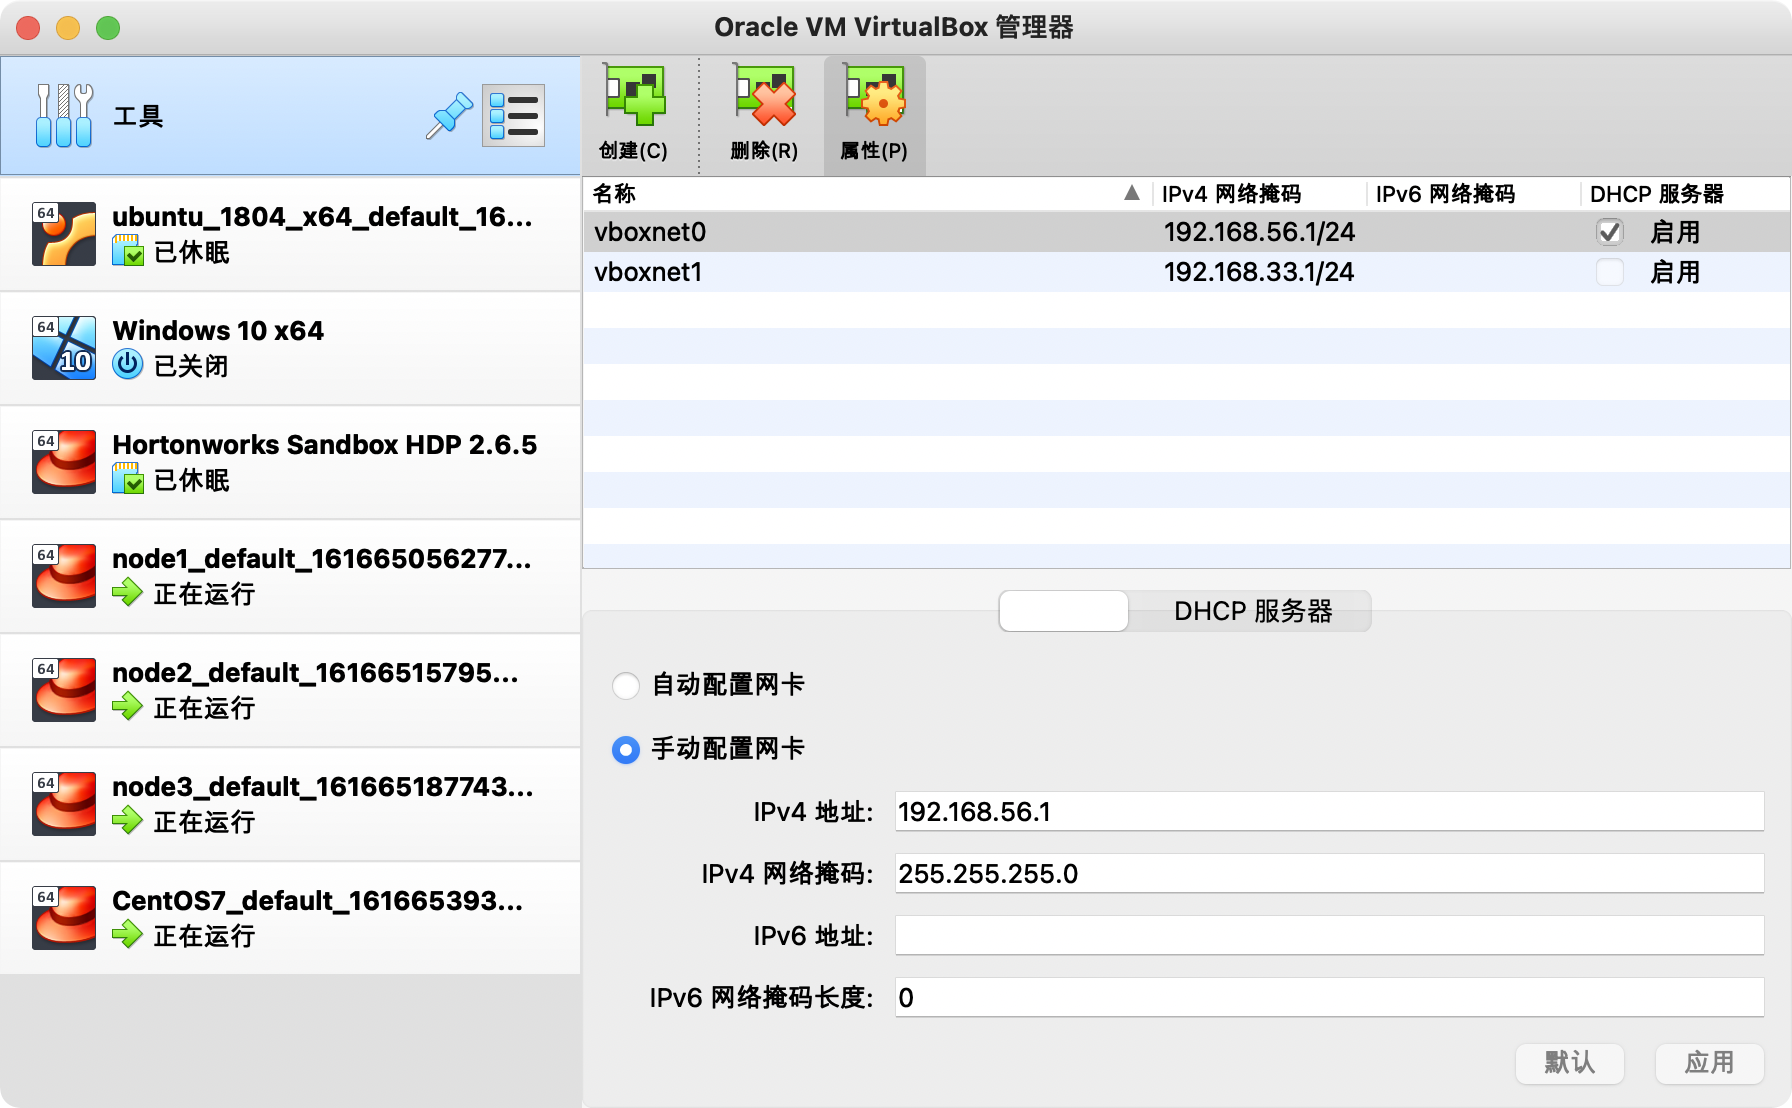
在宿主机上使用如下命令查看 virtualbox 的网卡
$ ifconfig | grep vboxnet
vboxnet0: flags=8843<UP,BROADCAST,RUNNING,SIMPLEX,MULTICAST> mtu 1500
        ether 0a:00:27:00:00:00
        inet 192.168.56.1 netmask 0xffffff00 broadcast 192.168.56.255
可以找到已有的网段是 192.68.56 网段,然后可以对虚拟机的网络进行配置
config.vm.network "private_network", ip: "192.168.56.13"

重启虚拟机:
$ vagrant reload
==> default: Attempting graceful shutdown of VM...
==> default: Checking if box 'centos/7' version '2004.01' is up to date...
==> default: Clearing any previously set forwarded ports...
==> default: Fixed port collision for 22 => 2222. Now on port 2201.
==> default: Clearing any previously set network interfaces...
==> default: Preparing network interfaces based on configuration...
    default: Adapter 1: nat
    default: Adapter 2: hostonly
==> default: Forwarding ports...
    default: 22 (guest) => 2201 (host) (adapter 1)
==> default: Running 'pre-boot' VM customizations...
==> default: Booting VM...
==> default: Waiting for machine to boot. This may take a few minutes...
    default: SSH address: 127.0.0.1:2201
    default: SSH username: vagrant
    default: SSH auth method: private key
==> default: Machine booted and ready!
==> default: Checking for guest additions in VM...
    default: No guest additions were detected on the base box for this VM! Guest
    default: additions are required for forwarded ports, shared folders, host only
    default: networking, and more. If SSH fails on this machine, please install
    default: the guest additions and repackage the box to continue.
    default:
    default: This is not an error message; everything may continue to work properly,
    default: in which case you may ignore this message.
==> default: Configuring and enabling network interfaces...
==> default: Rsyncing folder: /Users/jiangzhuolin/Vagrant/bigdata/node3/ => /vagrant
==> default: Machine already provisioned. Run `vagrant provision` or use the `--provision`
==> default: flag to force provisioning. Provisioners marked to run always will still run.
校验
ping 192.168.56.13
PING 192.168.56.13 (192.168.56.13): 56 data bytes
64 bytes from 192.168.56.13: icmp_seq=0 ttl=64 time=0.317 ms
64 bytes from 192.168.56.13: icmp_seq=1 ttl=64 time=0.380 ms
64 bytes from 192.168.56.13: icmp_seq=2 ttl=64 time=0.424 ms
64 bytes from 192.168.56.13: icmp_seq=3 ttl=64 time=0.517 ms
^C
--- 192.168.56.13 ping statistics ---
4 packets transmitted, 4 packets received, 0.0% packet loss
round-trip min/avg/max/stddev = 0.317/0.409/0.517/0.073 ms


$ vagrant ssh
Last login: Thu Mar 25 07:10:19 2021 from 10.0.2.2
[vagrant@localhost ~]$ ifconfig
eth0: flags=4163<UP,BROADCAST,RUNNING,MULTICAST>  mtu 1500
        inet 10.0.2.15  netmask 255.255.255.0  broadcast 10.0.2.255
        inet6 fe80::5054:ff:fe4d:77d3  prefixlen 64  scopeid 0x20<link>
        ether 52:54:00:4d:77:d3  txqueuelen 1000  (Ethernet)
        RX packets 736  bytes 88073 (86.0 KiB)
        RX errors 0  dropped 0  overruns 0  frame 0
        TX packets 521  bytes 91454 (89.3 KiB)
        TX errors 0  dropped 0 overruns 0  carrier 0  collisions 0
eth1: flags=4163<UP,BROADCAST,RUNNING,MULTICAST> mtu 1500
inet 192.168.56.13 netmask 255.255.255.0 broadcast 192.168.56.255
inet6 fe80::a00:27ff:feca:6320 prefixlen 64 scopeid 0x20<link>
ether 08:00:27:ca:63:20 txqueuelen 1000 (Ethernet)
RX packets 13 bytes 984 (984.0 B)
RX errors 0 dropped 0 overruns 0 frame 0
TX packets 22 bytes 1774 (1.7 KiB)
TX errors 0 dropped 0 overruns 0 carrier 0 collisions 0
lo: flags=73<UP,LOOPBACK,RUNNING> mtu 65536
inet 127.0.0.1 netmask 255.0.0.0
inet6 ::1 prefixlen 128 scopeid 0x10<host>
loop txqueuelen 1000 (Local Loopback)
RX packets 0 bytes 0 (0.0 B)
RX errors 0 dropped 0 overruns 0 frame 0
TX packets 0 bytes 0 (0.0 B)
TX errors 0 dropped 0 overruns 0 carrier 0 collisions 0
在 VirtualBox 中查看已有的网络:
近期评论