CentOS 6.7 + ElasticSearch 5.5.2 + Kibana 5.5.2 集群安装
1 三台虚拟机 CentOS 6.7 x64
2 Elasticsearch集群中的三种角色
3 节点角色
二、系统环境与依赖
1 操作系统
2 JDK
3 系统配置
三、安装 ElasticSearch
1 添加 CentOS 系统用户(所有节点)
2 创建程序目录(所有节点)
3 下载 elasticSearch v5.5.2 版本(所有节点)
4 配置 ElasticSearch 环境变量(所有节点)
5 修改 elasticSearch 配置
5.1 创建数据目录(数据节点)
5.2 修改配置
5.3 配置 elasticsearch.yml
6 配置防火墙 (所有节点)
7 启动运行 elasticSearch(所有节点)
8 验证程序运行(所有节点)
四、安装 Kibana(指定一个节点)
1 创建目录
2 下载 Kibana 5.5.2 版本程序
五、安装 X-pack
1 安装 ES x-pack 插件 (所有节点)
2 安装 Kibana x-pack 插件
3 x-pack 相关
六、ES 简单数据导入、Kibana 简单使用
1 ES简单数据导入
2 kibana 查看 ES 的数据
附录一: elasticsearch.yml 配置说明
1 配置文件官方参考地址
附录二:扩展 elasticsearch 节点
1 copy 一个 elasticsearch 文件夹,作为第四个节点
2 修改 node-4 中的yaml文件
3 es 用户启动节点
附录三:常见错误
1 问题一
2 问题二
3 问题三
4 问题四
5 问题五
6 问题六
7 问题七
8 问题八
9 问题九
Elastic 各产品各版本下载地址:
https://www.elastic.co/downloads/past-releases
一、安装规划
1 三台虚拟机 CentOS 6.7 x64
192.168.56.130 # master/datenode/kibana
192.168.56.131 # master/datanode
192.168.56.132 # datenode
2 Elasticsearch集群中的三种角色
master node: master 节点主要用于元数据(metadata)的处理,比如索引的新增、删除、分片分配等。
data node: data 节点上保存了数据分片。它负责数据相关操作,比如分片的 CRUD,以及搜索和整合操作。这些操作都比较消耗 CPU、内存和 I/O 资源;
client node: client 节点起到路由请求的作用,实际上可以看做负载均衡器。
3 节点角色
elasticsearch.yml 中的 node 节点对应的高性能集群拓扑结构模式为:
# 1. 如果你想让节点从不选举为主节点,只用来存储数据,可作为负载器
# node.master: false
# node.data: true
# 2. 如果想让节点成为主节点,且不存储任何数据,并保有空闲资源,可作为协调器
# node.master: true
# node.data: false
# 3. 如果想让节点既不称为主节点,又不成为数据节点,那么可将他作为搜索器,从节点中获取数据,生成搜索结果等
# node.master: false
# node.data: false
二、系统环境与依赖
1 操作系统
CentOS 7 x64
2 JDK
如下所示: JDK 1.8.0-20,官方指定最低版本 JDK 1.7,推荐版本为 JDK 1.8.0-141
[root@localhost ~]# java -version
java version "1.8.0_20"
Java(TM) SE Runtime Environment (build 1.8.0_20-b26)
Java HotSpot(TM) 64-Bit Server VM (build 25.20-b23, mixed mode)
3 系统配置
(1) 配置每个用户的最大文件数和最大进程数(ES 要求最少为 65536)
切换到root用户,编辑 limits.conf 配置文件
vim /etc/security/limits.conf
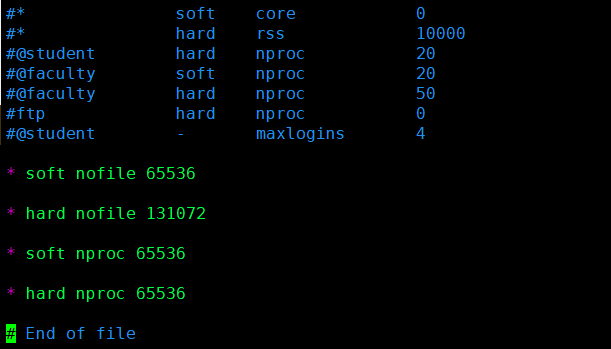
添加如下内容:
* soft nofile 65536 # 用户能打开的最大文件数,软限制

* hard nofile 131072 # 用户能打开的最大文件数,硬限制。用户打开的文件数不能超过这个值,硬限制设置不能比软限制低

* soft nproc 65536 # 用户能开启的最大进程数,软限制

* hard nproc 65536 # 用户能开启的最大进程数,硬限制。用户能开启的进程数不能超过这个值,硬限制设置不能比软限制低
示例:
(2) 配置虚拟内存大小
root 用户执行如下命令
vim /etc/sysctl.conf
在文件 /etc/sysctl.conf 中末尾添加下面配置:
vm.max_map_count=655360
并执行命令:
sysctl -p
示例:

(3) 配置用户线程
切换到 root 用户,进入 /etc/security/limits.d 目录下,修改 90-nproc.conf 配置文件。
vi /etc/security/limits.d/90-nproc.conf
找到如下内容:
* soft nproc 1024

#修改为

* soft nproc 2048
三、安装 ElasticSearch
1 添加 CentOS 系统用户(所有节点)
由于 ElasticSearch 从 2.x 版本以后便不再支持 root 用户运行,因此需要创建一个用于安装运行 ES 的系统账户。
(1) 创建用户,使用 root 用户执行如下命令:
useradd es -U -m
以上命令表示在 Linux 系统中创建一个名叫 es 的用户,【-U】:创建一个与用户名 es 相同的用户组作为该用户的用户组,【-m】:在 /home 下创建一个 es 的目录作为用户 es 的家目录。
(2) 为 es 用户设置用户密码,使用 root 用户执行如下命令:
[root@localhost bin]# passwd es
Changing password for user es.
New password:
BAD PASSWORD: it is too short
BAD PASSWORD: is too simple
Retype new password:
passwd: all authentication tokens updated successfully.
此处为 es 设置密码为 es123,只是用作简单示例,所示忽略 Linux 系统给出的密码过于简单的提醒,如果是生产环境,则建议提高密码的复杂度。
(3) 查看并验证创建的用户,使用 root 用户执行如下命令:
[root@localhost bin]# id es # 查看用户id,组id,群组
uid=504(es) gid=504(es) groups=504(es)
[root@localhost bin]# ls /home # 查看 /home 目录下是否有用户 es 的家目录
es jiang john
[root@localhost bin]# su - es # 使用 su 命令切换用户到 es,注意中横线以及它两侧的空格不可少
[es@localhost ~]$ pwd # 查看切换用户后的目录是否为 es 用户的家目录
/home/es
[es@localhost ~]$ su - es # 在 es 用户环境使用 su 命令切换到 es 用户验证密码是否正常生效
Password:
[es@localhost ~]$
如果以上命令都能正常执行,则说明用户创建正常
2 创建程序目录(所有节点)
(1) 创建目录,使用 root 用户执行如下命令:
[root@localhost opt]# mkdir -p /opt/elk/elasticSearch
以上命令在 /opt 目录下创建了一个 elk 目录作为 elasticSearch、kibana 等程序的共用目录,再在 elk 目录下创建 elasticSearch、kibana 目录作为程序的根目录。
(2) 更改目录所有者,使用 root 用户执行如下命令:
chown -R es:es /opt/elk
以上命令表示将 elk 及其所有子目录的所有者更改为 es 用户及 es 用户组。
(3) 验证目录创建,使用 root 用户执行如下命令:
[root@localhost opt]# ll |grep elk
drwxr-xr-x. 4 es es 4096 Aug 26 19:02 elk
[root@localhost opt]# ll /opt/elk
total 8
drwxr-xr-x. 2 es es 4096 Aug 26 19:02 elasticSearch
可以看到 elk 及子目录的所有者权限都已经是 es,表示目录创建操作成功。
3 下载 elasticSearch v5.5.2 版本(所有节点)
(1) 下载程序
执行如下命令,切换到 es 用户,并进入 elasticSearch 目录,再执行命令下载程序包:
[root@localhost opt]# su - es
[es@localhost ~]$ cd /opt/elk/elasticSearch/
[es@localhost ~]$ pwd
/opt/elk/elasticSearch
[es@localhost ~]$wget https://artifacts.elastic.co/downloads/elasticsearch/elasticsearch-5.5.2.tar.gz
(2) 解压程序包
es 用户执行如下命令,验证程序包下载完成,并解压程序包到 /opt/elk/elasticSearch:
[es@localhost elasticSearch]$ pwd
/opt/elk/elasticSearch
es@blnbpap01 elasticSearch]$ tar zxf elasticsearch-5.5.2.tar.gz
es@blnbpap01 elasticSearch]$ ll
total 32716
drwxr-xr-x. 7 es es 4096 Aug 14 08:35 elasticsearch-5.5.2
-rw-rw-r--. 1 es es 33485703 Aug 17 10:42 elasticsearch-5.5.2.tar.gz
4 配置 ElasticSearch 环境变量(所有节点)
root 用户执行如下命令,编辑 /etc/profile 文件
[root@blnbpap01 logs]$ vi /etc/profile
在文件的末尾添加如下配置,并保存退出
##### es env #####
export ES_HOME=/opt/elk/elasticSearch/elasticsearch-5.5.2
export PATH=$ES_HOME/bin:$PATH
示例

root 用户在命令行执行如下命令使用环境变量配置生效
[root@blnbpap01 ~]# source /etc/profile
5 修改 elasticSearch 配置
5.1 创建数据目录(数据节点)
在解压程序包完成后,root 用户执行如下命令,创建 ES 的数据文件存放目录:
[root@lab1 opt]# mkdir -p /data/elk/elasticsearch/data
[root@lab1 opt]# chown -R es.es /data/elk
[root@lab1 opt]# cd /data/elk/elasticsearch/
[root@lab1 elasticsearch]# ll
total 4
drwxr-xr-x. 2 es es 4096 Sep 23 05:43 data
注:
- 如果不配置 {ES_HOME}/data 与 {ES_HOME} 目录时,你可以参考如上示例创建。
- 如果你只在配置文件中配置一个不存在数据目录与日志目录路径,也完全可以,elasticsearch 会进行目录的创建,但请确保运行 elasticsearch 的系统用户拥有设置的路径的写入权限。
5.2 修改配置
(1) 进入 config 配置文件存放目录:
[es@blnbpap01 elasticSearch]$ cd elasticsearch-5.5.2/config
[es@blnbpap01 config]$ pwd
/opt/elk/elasticSearch/elasticsearch-5.5.2/config
[es@blnbpap01 config]$ ls
elasticsearch.yml jvm.options log4j2.properties scripts
(2) 给 ES 配置 JVM 堆空间,备份并修改配置文件 jvm.options,执行如下命令:
[es@localhost config]$ cp elasticsearch.yml elasticsearch.yml.bak
[es@localhost config]$ ls
elasticsearch.yml elasticsearch.yml.bak jvm.options jvm.options.bak log4j2.properties
[es@localhost config]$ vi jvm.options
(3) 设置 -Xms 与 Xmx 的值:
-Xms512m
-Xmx512m
示例:
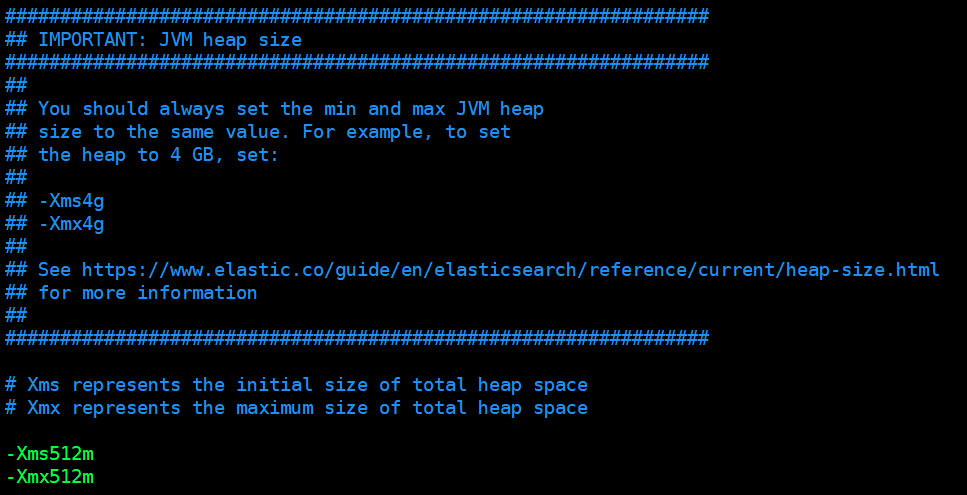
注:
- 此设置非常重要,分配适当的 JVM 堆内存可以提高 ES 的运行性能
- ES 的官方文档中推荐分配可用内存的 50% 给 ES 的 JVM 堆空间,以提高 ES 的运行性能
- -Xms 表示初始化堆空间大小,-Xmx 表示最大的堆空间大小,二者的设置值必须相同。应当根据服务器的内存来配置,比如,服务器的内存为 64g ,那么可以设置为 32g,但尽量别超过 32g。如下示例:
-Xms32g
-Xmx32g
5.3 配置 elasticsearch.yml
备份并修改配置文件 elasticsearch.yml,执行如下命令:
[es@localhost config]$ cp elasticsearch.yml elasticsearch.yml.bak
[es@localhost config]$ ls
elasticsearch.yml elasticsearch.yml.bak logging.yml
[es@localhost config]$ vi elasticsearch.yml
示例:
- node-1
# ======================== Elasticsearch Configuration =========================
#
# NOTE: Elasticsearch comes with reasonable defaults for most settings.
# Before you set out to tweak and tune the configuration, make sure you
# understand what are you trying to accomplish and the consequences.
#
# The primary way of configuring a node is via this file. This template lists
# the most important settings you may want to configure for a production cluster.
#
# Please consult the documentation for further information on configuration options:
# https://www.elastic.co/guide/en/elasticsearch/reference/index.html
#
# ---------------------------------- Cluster -----------------------------------
#
# Use a descriptive name for your cluster:
#
cluster.name: elasticsearch
#
# ------------------------------------ Node ------------------------------------
#
# Use a descriptive name for the node:
#
node.name: node-1
node.master: true
node.data: true
#
# Add custom attributes to the node:
#
#node.attr.rack: r1
#
# ----------------------------------- Paths ------------------------------------
#
# Path to directory where to store the data (separate multiple locations by comma):
#
path.data: /data/elk/elasticsearch/data
#
# Path to log files:
#
#path.logs: /path/to/logs
#
# ----------------------------------- Memory -----------------------------------
#
# Lock the memory on startup:
#
#bootstrap.memory_lock: true
bootstrap.system_call_filter: false
#
# Make sure that the heap size is set to about half the memory available
# on the system and that the owner of the process is allowed to use this
# limit.
#
# Elasticsearch performs poorly when the system is swapping the memory.
#
# ---------------------------------- Network -----------------------------------
#
# Set the bind address to a specific IP (IPv4 or IPv6):
#
network.host: 192.168.56.130
#
# Set a custom port for HTTP:
#
http.port: 9200
#
# For more information, consult the network module documentation.
#
# --------------------------------- Discovery ----------------------------------
#
# Pass an initial list of hosts to perform discovery when new node is started:
# The default list of hosts is ["127.0.0.1", "[::1]"]
#
discovery.zen.ping.unicast.hosts: ["192.168.56.130:9300", "192.168.56.131:9300"]
#
# Prevent the "split brain" by configuring the majority of nodes (total number of master-eligible nodes / 2 + 1):
#
discovery.zen.minimum_master_nodes: 2
#
# For more information, consult the zen discovery module documentation.
#
# ---------------------------------- Gateway -----------------------------------
#
# Block initial recovery after a full cluster restart until N nodes are started:
#
#gateway.recover_after_nodes: 3
#
# For more information, consult the gateway module documentation.
#
# ---------------------------------- Various -----------------------------------
#
# Require explicit names when deleting indices:
#
#action.destructive_requires_name: true
- node-2
# ======================== Elasticsearch Configuration =========================
#
# NOTE: Elasticsearch comes with reasonable defaults for most settings.
# Before you set out to tweak and tune the configuration, make sure you
# understand what are you trying to accomplish and the consequences.
#
# The primary way of configuring a node is via this file. This template lists
# the most important settings you may want to configure for a production cluster.
#
# Please consult the documentation for further information on configuration options:
# https://www.elastic.co/guide/en/elasticsearch/reference/index.html
#
# ---------------------------------- Cluster -----------------------------------
#
# Use a descriptive name for your cluster:
#
cluster.name: elasticsearch
#
# ------------------------------------ Node ------------------------------------
#
# Use a descriptive name for the node:
#
node.name: node-2
node.master: true
node.data: true
#
# Add custom attributes to the node:
#
#node.attr.rack: r1
#
# Path to directory where to store the data (separate multiple locations by comma):
#
path.data: /data/elk/elasticsearch/data
#
# Path to log files:
#
#path.logs: /path/to/logs
#
# ----------------------------------- Memory -----------------------------------
#
# Lock the memory on startup:
#
#
#bootstrap.memory_lock: true
bootstrap.system_call_filter: false
#
# Make sure that the heap size is set to about half the memory available
# on the system and that the owner of the process is allowed to use this
# limit.
#
# Elasticsearch performs poorly when the system is swapping the memory.
#
# ---------------------------------- Network -----------------------------------
#
# Set the bind address to a specific IP (IPv4 or IPv6):
#
network.host: 192.168.56.131
#
# Set a custom port for HTTP:
#
http.port: 9200
#
# For more information, consult the network module documentation.
#
# --------------------------------- Discovery ----------------------------------
#
# Pass an initial list of hosts to perform discovery when new node is started:
# The default list of hosts is ["127.0.0.1", "[::1]"]
#
discovery.zen.ping.unicast.hosts: ["192.168.56.130:9300", "192.168.56.131:9300"]
#
# Prevent the "split brain" by configuring the majority of nodes (total number of master-eligible nodes / 2 + 1):
#
discovery.zen.minimum_master_nodes: 2
#
# For more information, consult the zen discovery module documentation.
#
# ---------------------------------- Gateway -----------------------------------
#
# Block initial recovery after a full cluster restart until N nodes are started:
#
#gateway.recover_after_nodes: 3
#
# For more information, consult the gateway module documentation.
#
# ---------------------------------- Various -----------------------------------
#
# Require explicit names when deleting indices:
#
#action.destructive_requires_name: true
- node-3
# ======================== Elasticsearch Configuration =========================
#
# NOTE: Elasticsearch comes with reasonable defaults for most settings.
# Before you set out to tweak and tune the configuration, make sure you
# understand what are you trying to accomplish and the consequences.
#
# The primary way of configuring a node is via this file. This template lists
# the most important settings you may want to configure for a production cluster.
#
# Please consult the documentation for further information on configuration options:
# https://www.elastic.co/guide/en/elasticsearch/reference/index.html
#
# ---------------------------------- Cluster -----------------------------------
#
# Use a descriptive name for your cluster:
#
cluster.name: elasticsearch
#
# ------------------------------------ Node ------------------------------------
#
# Use a descriptive name for the node:
#
node.name: node-2
node.master: false
node.data: true
#
# Add custom attributes to the node:
#
#node.attr.rack: r1
#
# Path to directory where to store the data (separate multiple locations by comma):
#
path.data: /data/elk/elasticsearch/data
#
# Path to log files:
#
#path.logs: /path/to/logs
#
# ----------------------------------- Memory -----------------------------------
#
# Lock the memory on startup:
#
#bootstrap.memory_lock: true
bootstrap.system_call_filter: false
#
# Make sure that the heap size is set to about half the memory available
# on the system and that the owner of the process is allowed to use this
# limit.
#
# Elasticsearch performs poorly when the system is swapping the memory.
#
# ---------------------------------- Network -----------------------------------
#
# Set the bind address to a specific IP (IPv4 or IPv6):
#
network.host: 192.168.56.132
#
# Set a custom port for HTTP:
#
http.port: 9200
#
# For more information, consult the network module documentation.
#
# --------------------------------- Discovery ----------------------------------
#
# Pass an initial list of hosts to perform discovery when new node is started:
# The default list of hosts is ["127.0.0.1", "[::1]"]
#
discovery.zen.ping.unicast.hosts: ["192.168.56.130:9300", "192.168.56.131:9300"]
#
# Prevent the "split brain" by configuring the majority of nodes (total number of master-eligible nodes / 2 + 1):
#
discovery.zen.minimum_master_nodes: 2
#
# For more information, consult the zen discovery module documentation.
#
# ---------------------------------- Gateway -----------------------------------
#
# Block initial recovery after a full cluster restart until N nodes are started:
#
#gateway.recover_after_nodes: 3
#
# For more information, consult the gateway module documentation.
#
# ---------------------------------- Various -----------------------------------
#
# Require explicit names when deleting indices:
#
#action.destructive_requires_name: true
注:
- cluster.name 此设置为集群起一个名字,可自定义,无特殊要求
- node.name 的设置是给节点起一个集群中的管理名字,必须与其他节点名字不同,node.master 此设置指定该节点是否作为主节点(是:true,否:false);node.data 此设置指定该节点是否作为数据节点(是:true,否:false)
- path.data 指定 ES 数据存放目录
- bootstrap.system_call_filter: false 由于 CentOS 6.x 的 Linux Kernel 版本为 2.x 不支持 seccomp (secure compute),因此需要在 memory 下添加该设置,不然会启动报错。官方文档地址如下:
https://www.elastic.co/guide/en/elasticsearch/reference/current/system-call-filter-check.html
- network.host 设置该节点的 IP 或者域名
- http 端口如果不设置,则默认是9200,如果要自定义端口,如上 ip 设置一样,将 http.port 行的注释去掉,并将其后的 9200 更改为需要设置的端口
- discovery.zen.ping.unicast.hosts: ["192.168.56.130:9300", "192.168.56.131:9300"] 此设置指定了 master 节点运行的 ip 与 端口(端口不设置则是默认9300),当需要向集群中添加一个扩展节点时,可以通过此配置扫描连接到主节点,从而加入集群(重要)
- discovery.zen.minimum_master_nodes: 2 设置 master 节点的最小可用数量,当主节点的数量小于此设置时,集群将运行失败
其他 elasticsearch.yml 配置及介绍请参考附录一
6 配置防火墙 (所有节点)
根据 elasticsearch.yml 中设置的端口,配置对应的防火墙
root 用户执行如下命令:
vi /etc/sysconfig/iptables
在文件的中间部分添加如下内容:
# elasticSearch rules start
-A INPUT -m state --state NEW -m tcp -p tcp --dport 9200 -j ACCEPT
-A INPUT -m state --state NEW -m tcp -p tcp --dport 9300 -j ACCEPT
# elasticSearch rules end
示例:

重启 iptables 防火墙生效:
[root@lab1 ~]# service iptables restart
iptables: Setting chains to policy ACCEPT: filter [ OK ]
iptables: Flushing firewall rules: [ OK ]
iptables: Unloading modules: [ OK ]
iptables: Applying firewall rules: [ OK ]
注:
- 防火墙配置内容必须在如下内容之前,不然不会生效
-A INPUT -j REJECT --reject-with icmp-host-prohibited
-A FORWARD -j REJECT --reject-with icmp-host-prohibited
COMMIT
- 如果 elasticsearch.yml 中配置的端口不是 9200、9300,在配置防火墙时注意更改
7 启动运行 elasticSearch(所有节点)
进入 elasticSearch/bin 目录,执行如下命令启动:
[es@localhost config]$ cd ../bin
[es@localhost bin]$ pwd
/opt/elk/elasticSearch/elasticsearch-5.5.2/bin
[es@localhost bin]$ ./elasticsearch
[2017-09-07T10:23:16,881][INFO ][o.e.n.Node ] [] initializing ...
[2017-09-07T10:23:16,953][INFO ][o.e.e.NodeEnvironment ] [2fHakaz] using [1] data paths, mounts [[/ (rootfs)]], net usable_space [88.6gb], net total_space [95.8gb], spins? [unknown], types [rootfs]
[2017-09-07T10:23:16,953][INFO ][o.e.e.NodeEnvironment ] [2fHakaz] heap size [1.9gb], compressed ordinary object pointers [true]
[2017-09-07T10:23:16,954][INFO ][o.e.n.Node ] node name [2fHakaz] derived from node ID [2fHakazVQAmPqnD8zH_UnQ]; set [node.name] to override
[2017-09-07T10:23:16,954][INFO ][o.e.n.Node ] version[5.5.2], pid[28284], build[b2f0c09/2017-08-14T12:33:14.154Z], OS[Linux/3.10.0-327.13.1.el7.x86_64/amd64], JVM[Oracle Corporation/Java HotSpot(TM) 64-Bit Server VM/1.8.0_20/25.20-b23]
[2017-09-07T10:23:16,955][INFO ][o.e.n.Node ] JVM arguments [-Xms2g, -Xmx2g, -XX:+UseConcMarkSweepGC, -XX:CMSInitiatingOccupancyFraction=75, -XX:+UseCMSInitiatingOccupancyOnly, -XX:+AlwaysPreTouch, -Xss1m, -Djava.awt.headless=true, -Dfile.encoding=UTF-8, -Djna.nosys=true, -Djdk.io.permissionsUseCanonicalPath=true, -Dio.netty.noUnsafe=true, -Dio.netty.noKeySetOptimization=true, -Dio.netty.recycler.maxCapacityPerThread=0, -Dlog4j.shutdownHookEnabled=false, -Dlog4j2.disable.jmx=true, -Dlog4j.skipJansi=true, -XX:+HeapDumpOnOutOfMemoryError, -Des.path.home=/opt/elk/elasticSearch/elasticsearch-5.5.2]
[2017-09-07T10:23:17,573][INFO ][o.e.p.PluginsService ] [2fHakaz] loaded module [aggs-matrix-stats]
[2017-09-07T10:23:17,573][INFO ][o.e.p.PluginsService ] [2fHakaz] loaded module [ingest-common]
[2017-09-07T10:23:17,573][INFO ][o.e.p.PluginsService ] [2fHakaz] loaded module [lang-expression]
[2017-09-07T10:23:17,573][INFO ][o.e.p.PluginsService ] [2fHakaz] loaded module [lang-groovy]
[2017-09-07T10:23:17,574][INFO ][o.e.p.PluginsService ] [2fHakaz] loaded module [lang-mustache]
[2017-09-07T10:23:17,574][INFO ][o.e.p.PluginsService ] [2fHakaz] loaded module [lang-painless]
[2017-09-07T10:23:17,574][INFO ][o.e.p.PluginsService ] [2fHakaz] loaded module [parent-join]
[2017-09-07T10:23:17,574][INFO ][o.e.p.PluginsService ] [2fHakaz] loaded module [percolator]
[2017-09-07T10:23:17,574][INFO ][o.e.p.PluginsService ] [2fHakaz] loaded module [reindex]
[2017-09-07T10:23:17,574][INFO ][o.e.p.PluginsService ] [2fHakaz] loaded module [transport-netty3]
[2017-09-07T10:23:17,574][INFO ][o.e.p.PluginsService ] [2fHakaz] loaded module [transport-netty4]
[2017-09-07T10:23:17,575][INFO ][o.e.p.PluginsService ] [2fHakaz] no plugins loaded
[2017-09-07T10:23:18,762][INFO ][o.e.d.DiscoveryModule ] [2fHakaz] using discovery type [zen]
[2017-09-07T10:23:19,184][INFO ][o.e.n.Node ] initialized
[2017-09-07T10:23:19,185][INFO ][o.e.n.Node ] [2fHakaz] starting ...
[2017-09-07T10:23:19,302][INFO ][o.e.t.TransportService ] [2fHakaz] publish_address {ip:9300}, bound_addresses {ip:9300}
[2017-09-07T10:23:19,310][INFO ][o.e.b.BootstrapChecks ] [2fHakaz] bound or publishing to a non-loopback or non-link-local address, enforcing bootstrap checks
[2017-09-07T10:23:22,347][INFO ][o.e.c.s.ClusterService ] [2fHakaz] new_master {2fHakaz}{2fHakazVQAmPqnD8zH_UnQ}{CTThqUlKSOqqgZmEpftoRQ}{ip}{ip:9300}, reason: zen-disco-elected-as-master ([0] nodes joined)
[2017-09-07T10:23:22,360][INFO ][o.e.h.n.Netty4HttpServerTransport] [2fHakaz] publish_address {ip:9200}, bound_addresses {ip:9200}
[2017-09-07T10:23:22,360][INFO ][o.e.n.Node ] [2fHakaz] started
[2017-09-07T10:23:22,379][INFO ][o.e.g.GatewayService ] [2fHakaz] recovered [0] indices into cluster_state
如出现 started,则表示运行成功
由于使用 ./elasticsearch 命令运行程序只在当前会话窗口生效,一旦当前会话被取消或者中断,则程序运行中止。因此,我们使用 Ctrl + c 取消程序运行,使用 ./elasticsearch -d 选项使 elasticsearch 使用守护进程在后台运行:
[es@localhost bin]$ ps -ef|grep elasticsearch
es 4839 4743 0 19:49 pts/1 00:00:00 grep elasticsearch
[es@localhost bin]$
[es@localhost bin]$ ./elasticsearch -d
8 验证程序运行(所有节点)
(1) 查看程序运行日志,执行如下命令查看程序运行日志:
[es@localhost bin]$ cd ../logs
[es@localhost logs]$ pwd
/opt/elk/elasticSearch/elasticsearch-5.5.2/logs
[es@localhost logs]$ ls
elasticsearch_deprecation.log elasticsearch_index_indexing_slowlog.log elasticsearch_index_search_slowlog.log elasticsearch.log
[es@blnbpap01 logs]$ tail -20 elasticsearch.log
[2017-09-07T11:01:34,405][INFO ][o.e.p.PluginsService ] [7U135r_] loaded module [ingest-common]
[2017-09-07T11:01:34,405][INFO ][o.e.p.PluginsService ] [7U135r_] loaded module [lang-expression]
[2017-09-07T11:01:34,405][INFO ][o.e.p.PluginsService ] [7U135r_] loaded module [lang-groovy]
[2017-09-07T11:01:34,405][INFO ][o.e.p.PluginsService ] [7U135r_] loaded module [lang-mustache]
[2017-09-07T11:01:34,405][INFO ][o.e.p.PluginsService ] [7U135r_] loaded module [lang-painless]
[2017-09-07T11:01:34,406][INFO ][o.e.p.PluginsService ] [7U135r_] loaded module [parent-join]
[2017-09-07T11:01:34,406][INFO ][o.e.p.PluginsService ] [7U135r_] loaded module [percolator]
[2017-09-07T11:01:34,406][INFO ][o.e.p.PluginsService ] [7U135r_] loaded module [reindex]
[2017-09-07T11:01:34,406][INFO ][o.e.p.PluginsService ] [7U135r_] loaded module [transport-netty3]
[2017-09-07T11:01:34,406][INFO ][o.e.p.PluginsService ] [7U135r_] loaded module [transport-netty4]
[2017-09-07T11:01:34,406][INFO ][o.e.p.PluginsService ] [7U135r_] no plugins loaded
[2017-09-07T11:01:35,555][INFO ][o.e.d.DiscoveryModule ] [7U135r_] using discovery type [zen]
[2017-09-07T11:01:36,004][INFO ][o.e.n.Node ] initialized
[2017-09-07T11:01:36,004][INFO ][o.e.n.Node ] [7U135r_] starting ...
[2017-09-07T11:01:36,114][INFO ][o.e.t.TransportService ] [7U135r_] publish_address {ip:9300}, bound_addresses {ip:9300}
[2017-09-07T11:01:36,122][INFO ][o.e.b.BootstrapChecks ] [7U135r_] bound or publishing to a non-loopback or non-link-local address, enforcing bootstrap checks
[2017-09-07T11:01:39,160][INFO ][o.e.c.s.ClusterService ] [7U135r_] new_master {7U135r_}{7U135r_cQxmx7wepKpV81Q}{R69vUFAJTre3_LFgxaVwaQ}{ip}{ip:9300}, reason: zen-disco-elected-as-master ([0] nodes joined)
[2017-09-07T11:01:39,174][INFO ][o.e.h.n.Netty4HttpServerTransport] [7U135r_] publish_address {ip:9200}, bound_addresses {ip:9200}
[2017-09-07T11:01:39,174][INFO ][o.e.n.Node ] [7U135r_] started
[2017-09-07T11:01:39,195][INFO ][o.e.g.GatewayService ] [7U135r_] recovered [0] indices into cluster_state
(2) 查看运行进程
<code[es@blnbpap01 logs]$ ps -ef|grep elasticsearch
es 32187 1 15 11:01 pts/0 00:00:15 /usr/java/jdk1.8.0_20/bin/java -Xms2g -Xmx2g -XX:+UseConcMarkSweepGC -XX:CMSInitiatingOccupancyFraction=75 -XX:+UseCMSInitiatingOccupancyOnly -XX:+AlwaysPreTouch -server -Xss1m -Djava.awt.headless=true -Dfile.encoding=UTF-8 -Djna.nosys=true -Djdk.io.permissionsUseCanonicalPath=true -Dio.netty.noUnsafe=true -Dio.netty.noKeySetOptimization=true -Dio.netty.recycler.maxCapacityPerThread=0 -Dlog4j.shutdownHookEnabled=false -Dlog4j2.disable.jmx=true -Dlog4j.skipJansi=true -XX:+HeapDumpOnOutOfMemoryError -Des.path.home=/opt/elk/elasticSearch/elasticsearch-5.5.2 -cp /opt/elk/elasticSearch/elasticsearch-5.5.2/lib/* org.elasticsearch.bootstrap.Elasticsearch -d
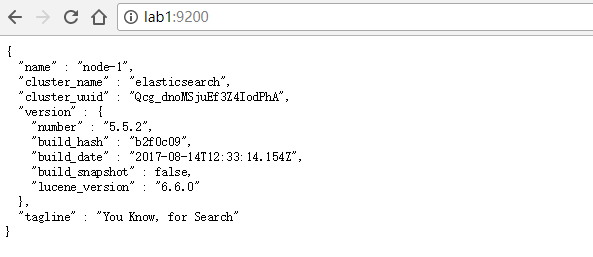
(3) http 访问服务
在浏览器中输入配置的地址端口,如出现如下内容,则表示 elasticsearch 运行正常
http://ip:9200/
注:
- ElasticSearch 常用命令,ElastaticSearch 没有停止命令,可以通过如下命令来执行
ps -ef|grep elasticsearch|grep -v grep | awk '{print $2}'|xargs kill
四、安装 Kibana(指定一个节点)
kibana 是 ES 的可视化工具,可以通过它来监控与操作 ES,类似于一款关系型数据库的客户端工具。此处使用 Kibana 5.5.2 作为 ES 的可视化工具。
注:kibana 可以安装在 ES 集群的服务器上,也可以安装在 ES 集群以外的服务器上,只要该服务器能够连接到 ES 集群即可,且 kibana 只需要安装一个节点即可,不用使用集群。
1 创建目录
创建 Kibana 程序根目录,使用 es 用户执行如下命令:
[es@localhost elk]$ cd /opt/elk
[es@localhost elk]$ pwd
/opt/elk
[es@localhost elk]$ mkdir kibana
[es@localhost elk]$ ll
total 8
drwxr-xr-x. 3 es es 4096 Aug 26 19:20 elasticSearch
drwxrwxr-x. 2 es es 4096 Aug 26 22:40 kibana
2 下载 Kibana 5.5.2 版本程序
(1) 下载程序
es 用户执行如下命令命令下载程序包:
[es@localhost ~]$ pwd
/opt/elk/kibana
[es@blnbpap01 kibana]$ wget https://artifacts.elastic.co/downloads/kibana/kibana-5.5.2-linux-x86_64.tar.gz
(2) 解压程序包
es 用户执行如下命令,验证程序包下载完成,并解压程序包到 /opt/elk/kibana:
[es@localhost kibana]$ pwd
/opt/elk/kibana
[es@blnbpap01 kibana]$ ll
total 49884
-rw-rw-r--. 1 es es 51073441 Aug 17 10:43 kibana-5.5.2-linux-x86_64.tar.gz
[es@localhost kibana]$ tar zxf kibana-5.5.2-linux-x86_64.tar.gz
(3) 修改 kibana 配置
在解压程序包完成后,执行如下命令,创建一个 Kibana 的日志目录
[es@lab1 kibana]$ cd kibana-5.5.2-linux-x86_64
[es@lab1 kibana-5.5.2-linux-x86_64]$ pwd
/opt/elk/kibana/kibana-5.5.2-linux-x86_64
[es@lab1 kibana-5.5.2-linux-x86_64]$ mkdir logs
进入 config 配置文件存放目录
[es@localhost kibana]$ cd kibana-5.5.2-linux-x64/config
[es@localhost config]$ pwd
/opt/elk/kibana/kibana-5.5.2-linux-x64/config
[es@localhost config]$ ls
kibana.yml
备份并修改配置文件 kibana.yml,执行如下命令:
[es@localhost config]$ cp kibana.yml kibana.yml.bak
[es@localhost config]$ ls
kibana.yml kibana.yml.bak
[es@localhost config]$ vi kibana.yml
配置文件示例:
# Kibana is served by a back end server. This setting specifies the port to use.
server.port: 5601

# Specifies the address to which the Kibana server will bind. IP addresses and host names are both valid values.
# The default is 'localhost', which usually means remote machines will not be able to connect.
# To allow connections from remote users, set this parameter to a non-loopback address.
server.host: "192.168.56.130"

# Enables you to specify a path to mount Kibana at if you are running behind a proxy. This only affects
# the URLs generated by Kibana, your proxy is expected to remove the basePath value before forwarding requests
# to Kibana. This setting cannot end in a slash.
#server.basePath: ""

# The maximum payload size in bytes for incoming server requests.
#server.maxPayloadBytes: 1048576

# The Kibana server's name. This is used for display purposes.
#server.name: "your-hostname"

# The URL of the Elasticsearch instance to use for all your queries.
elasticsearch.url: "http://192.168.56.130:9200"

# When this setting's value is true Kibana uses the hostname specified in the server.host
# setting. When the value of this setting is false, Kibana uses the hostname of the host
# that connects to this Kibana instance.
#elasticsearch.preserveHost: true

# Kibana uses an index in Elasticsearch to store saved searches, visualizations and
# dashboards. Kibana creates a new index if the index doesn't already exist.
#kibana.index: ".kibana"

# The default application to load.
#kibana.defaultAppId: "discover"

# If your Elasticsearch is protected with basic authentication, these settings provide
# the username and password that the Kibana server uses to perform maintenance on the Kibana
# index at startup. Your Kibana users still need to authenticate with Elasticsearch, which
# is proxied through the Kibana server.
#elasticsearch.username: "elastic"
#elasticsearch.password: "changeme"

# Enables SSL and paths to the PEM-format SSL certificate and SSL key files, respectively.
# These settings enable SSL for outgoing requests from the Kibana server to the browser.
#server.ssl.enabled: false
#server.ssl.certificate: /path/to/your/server.crt
#server.ssl.key: /path/to/your/server.key

# Optional settings that provide the paths to the PEM-format SSL certificate and key files.
# These files validate that your Elasticsearch backend uses the same key files.
#elasticsearch.ssl.certificate: /path/to/your/client.crt
#elasticsearch.ssl.key: /path/to/your/client.key

# Optional setting that enables you to specify a path to the PEM file for the certificate
# authority for your Elasticsearch instance.
#elasticsearch.ssl.certificateAuthorities: [ "/path/to/your/CA.pem" ]

# To disregard the validity of SSL certificates, change this setting's value to 'none'.
#elasticsearch.ssl.verificationMode: full

# Time in milliseconds to wait for Elasticsearch to respond to pings. Defaults to the value of
# the elasticsearch.requestTimeout setting.
#elasticsearch.pingTimeout: 1500

# Time in milliseconds to wait for responses from the back end or Elasticsearch. This value
# must be a positive integer.
#elasticsearch.requestTimeout: 30000

# List of Kibana client-side headers to send to Elasticsearch. To send *no* client-side
# headers, set this value to [] (an empty list).
#elasticsearch.requestHeadersWhitelist: [ authorization ]

# Header names and values that are sent to Elasticsearch. Any custom headers cannot be overwritten
# by client-side headers, regardless of the elasticsearch.requestHeadersWhitelist configuration.
#elasticsearch.customHeaders: {}

# Time in milliseconds for Elasticsearch to wait for responses from shards. Set to 0 to disable.
#elasticsearch.shardTimeout: 0

# Time in milliseconds to wait for Elasticsearch at Kibana startup before retrying.
#elasticsearch.startupTimeout: 5000

# Specifies the path where Kibana creates the process ID file.
#pid.file: /var/run/kibana.pid

# Enables you specify a file where Kibana stores log output.
#logging.dest: stdout
logging.dest: /opt/elk/kibana/kibana-5.5.2-linux-x86_64/logs/kibana.log
需要修改的内容如下:
server.port: 5601
server.host: "192.168.56.130"
elasticsearch.url: "http://192.168.56.130:9200"
logging.dest: /opt/elk/kibana/kibana-5.5.2-linux-x86_64/logs/kibana.log
(4) 配置 kibana 环境变量
root 用户执行如下命令,编辑 /etc/profile 文件
[root@blnbpap01 logs]$ vim /etc/profile
在文件的末尾添加如下配置,并保存退出
##### kibana env #####
export KIBANA_HOME=/opt/elk/kibana/kibana-5.5.2-linux-x86_64
export PATH=$KIBANA_HOME/bin:$PATH
示例

root 用户在命令行执行如下命令使用环境变量配置生效
[root@blnbpap01 ~]# source /etc/profile
(5) 启动运行 kibana
es 用户进入 kibana/bin 目录,执行如下命令启动:
[es@localhost config]$ cd ../bin
[es@localhost bin]$ ls
kibana kibana.bat
[es@localhost bin]$ pwd
/opt/elk/kibana/kibana-5.5.2-linux-x64/bin
[es@blnbpap01 bin]$ ./kibana
log [15:17:42.119] [info][status][plugin:kibana@5.5.2] Status changed from uninitialized to green - Ready
log [15:17:42.181] [info][status][plugin:elasticsearch@5.5.2] Status changed from uninitialized to yellow - Waiting for Elasticsearch
log [15:17:42.207] [info][status][plugin:console@5.5.2] Status changed from uninitialized to green - Ready
log [15:17:42.220] [info][status][plugin:metrics@5.5.2] Status changed from uninitialized to green - Ready
log [15:17:42.373] [info][status][plugin:timelion@5.5.2] Status changed from uninitialized to green - Ready
log [15:17:42.377] [info][listening] Server running at http://ip:5601
log [15:17:42.378] [info][status][ui settings] Status changed from uninitialized to yellow - Elasticsearch plugin is yellow
log [15:17:47.418] [info][status][plugin:elasticsearch@5.5.2] Status changed from yellow to yellow - No existing Kibana index found
log [15:17:47.939] [info][status][plugin:elasticsearch@5.5.2] Status changed from yellow to green - Kibana index ready
log [15:17:47.941] [info][status][ui settings] Status changed from yellow to green - Ready
如出现 Server running at http://ip:5601,则表示运行成功
由于使用 ./kibana 命令运行程序只在当前会话窗口生效,一旦当前会话被取消或者中断,则程序运行中止。因此,我们使用 Ctrl + c 终止刚才的程序运行,编写一个启动与停止程序的脚本:
[es@localhost bin]$ vi startup.sh
startup.sh 内容如下:
# /bin/bash
echo "starting kibana..."
nohup /opt/elk/kibana/kibana-5.5.2-linux-x64/bin/kibana /dev/null &
pid=`ps -ef|grep kibana|grep -v grep|awk '{print $2}'`
echo "kibana is started,pid:$pid"
[es@localhost bin]$ vi shutdown.sh
shutdown.sh 内容如下:
# /bin/bash
pid=`ps -ef|grep kibana|grep -v grep|awk '{print $2}'`
if [ -z $pid ];then
echo 'No kibana progress'
else
echo "starting shutdown kibana...pid:$pid"
kill -9 $pid
echo "kibana is shutdown"
fi
exit 0
es 用户执行如下命令,给 startup.sh/shutdown.sh 执行权限:
[es@localhost bin]$ ls
kibana kibana.bat shutdown.sh startup.sh
[es@localhost bin]$ chmod -R u+x *.sh
[es@localhost bin]$ ll
total 16
-rwxr-xr-x. 1 es es 598 Jan 9 2016 kibana
-rw-r--r--. 1 es es 466 Jan 30 2016 kibana.bat
-rwxrw-r--. 1 es es 218 Aug 27 01:06 shutdown.sh
-rwxrw-r--. 1 es es 218 Aug 27 01:03 startup.sh
验证启动、停止脚本:
[es@localhost bin]$ ./startup.sh
starting kibana...
kibana is started,pid:5352
[es@localhost bin]$ ./shutdown.sh
starting shutdown kibana...pid:5352
kibana is shutdown
(6) 验证程序运行
查看运行进程
[es@blnbpap01 bin]$ ps -ef|grep kibana
es 32602 1 13 11:22 pts/0 00:00:02 /opt/elk/kibana/kibana-5.5.2-linux-x86_64/bin/../node/bin/node --no-warnings /opt/elk/kibana/kibana-5.5.2-linux-x86_64/bin/../src/cli
es 32623 26879 0 11:22 pts/0 00:00:00 grep --color=auto kibana
http 访问服务
在浏览器中输入配置的地址端口,如出现如下内容,则表示 kibana 运行正常
http://ip:5601/
注:
- 如果程序运行的服务器上开启了防火墙服务,那么想要从浏览器访问远程的的 kibana 服务,则需要配置防火墙规则,允许配置的 kibana 端口通行。
五、安装 X-pack
x-pack 是 ES 的一个重要的扩展,在 5.x 后集成了很多功能,包括 security/monitoring/graph/machine learning 等等
1 安装 ES x-pack 插件 (所有节点)
es 用户执行如下操作安装 x-pack
[es@lab1 bin]$ ./elasticsearch-plugin install x-pack
安装完成后,重新启动 ES 集群
2 安装 Kibana x-pack 插件
es 用户执行如下操作安装 x-pack
[es@lab1 bin]$ pwd
/opt/elk/kibana/kibana-5.5.2-linux-x86_64/bin
[es@lab1 bin]$ ./kibana-plugin install x-pack
安装完成后,重启 Kibana 服务
3 x-pack 相关
安装 x-pack 后,会生成一个系统用户 elastic/changeme,并且访问 Kibana 需要使用用户验证

至此, ES 集群相关安装完成。
六、ES 简单数据导入、Kibana 简单使用
1 ES简单数据导入
下载一个 Chrome Sense extension 扩展,打开后执行如下
PUT http://ip:9200/books/book/1
{
"name": "Think in Java",
"author": "Bruce Eckel",
"description": "a book for java program",
"publisher": "China Machine press"
}
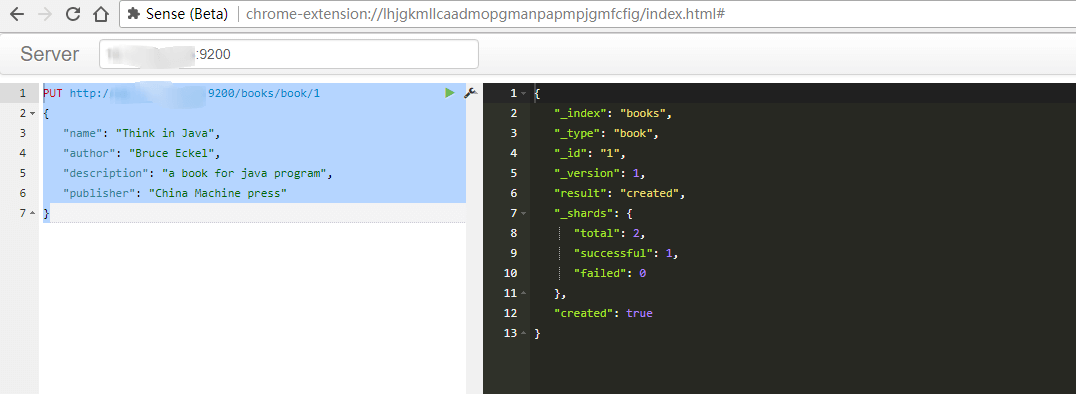
books 是 elsticSearch 中的 index,使用 PUT 向 ES 中写入数据时,若指定的 index 存在,则使用已有的 index;若不存在,则新建一个 index。类似于关系型数据库中的数据库
program-books 是 elsticSearch 中的 type,使用 PUT 向 ES 中写入数据时,若指定的 type 存在,则使用已有的 index;若不存在,则新建一个 type
1 是 ES 中的 ID,用来索引数据使用
下方花括号中的内容,使用 key-value 键值对的方式定义,每一组数据使用逗号 "," 分割
若返回如右侧的信息,"successful":1,则表示数据写入 ES 成功
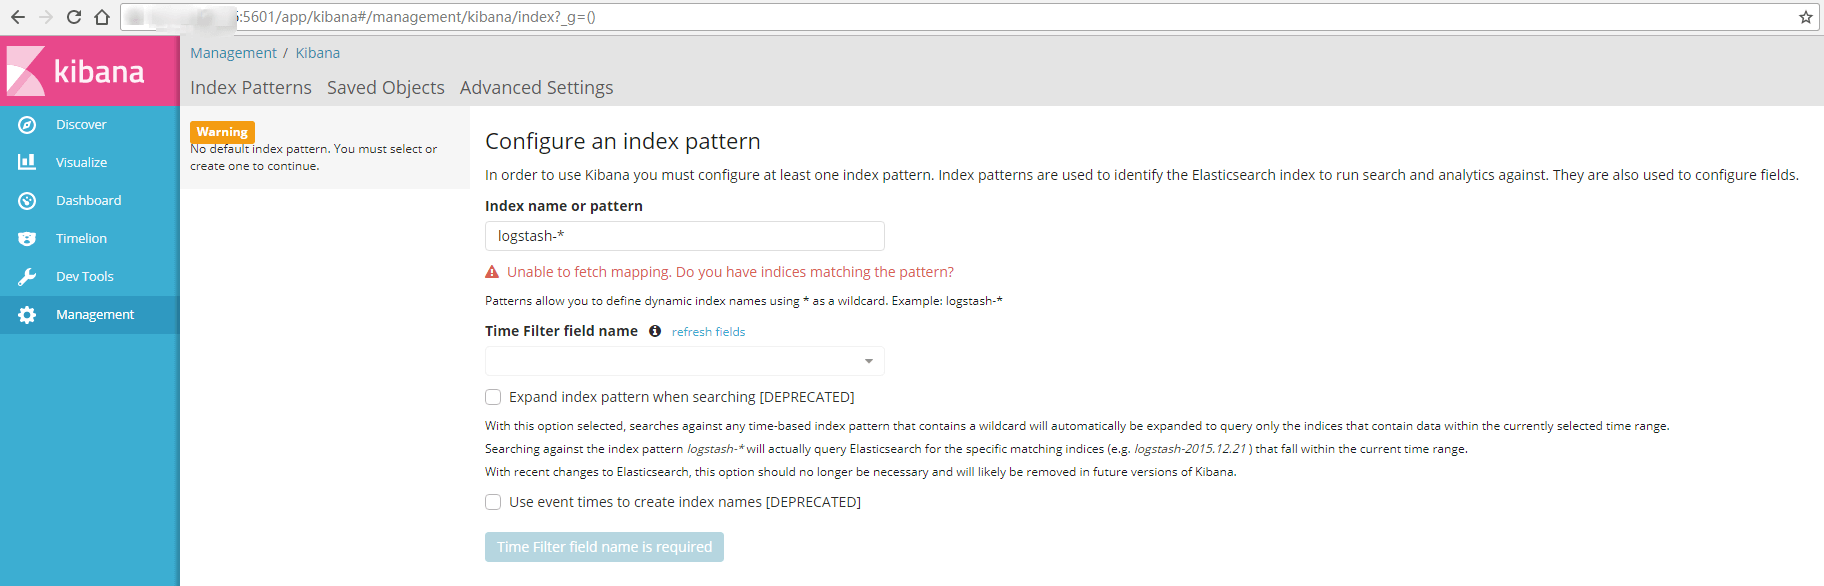
2 kibana 查看 ES 的数据
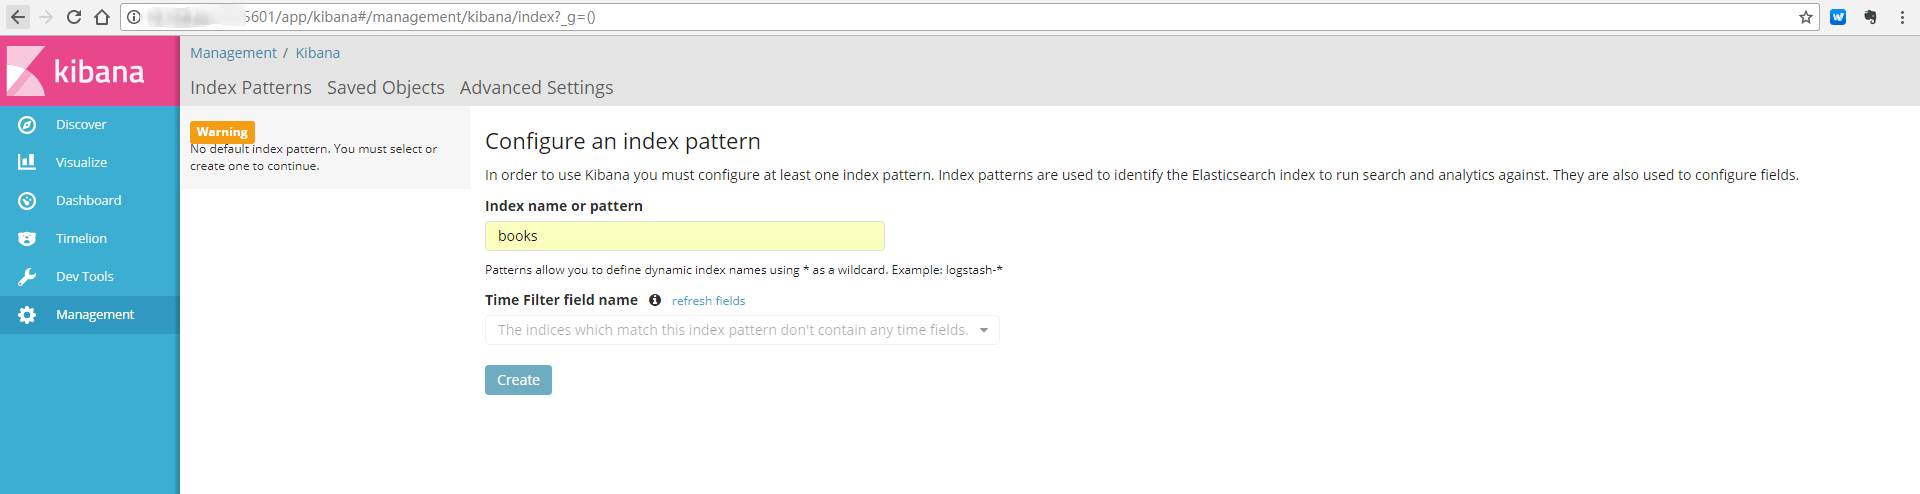
第一次使用 http 方式访问 kibana 需要配置一个 index 结构,可以是全名匹配一个 index,也可以使用模糊匹配。
如下:配置上面创建的 books 的全名 index,点击 "create"
创建完成后,可以看到如下信息:
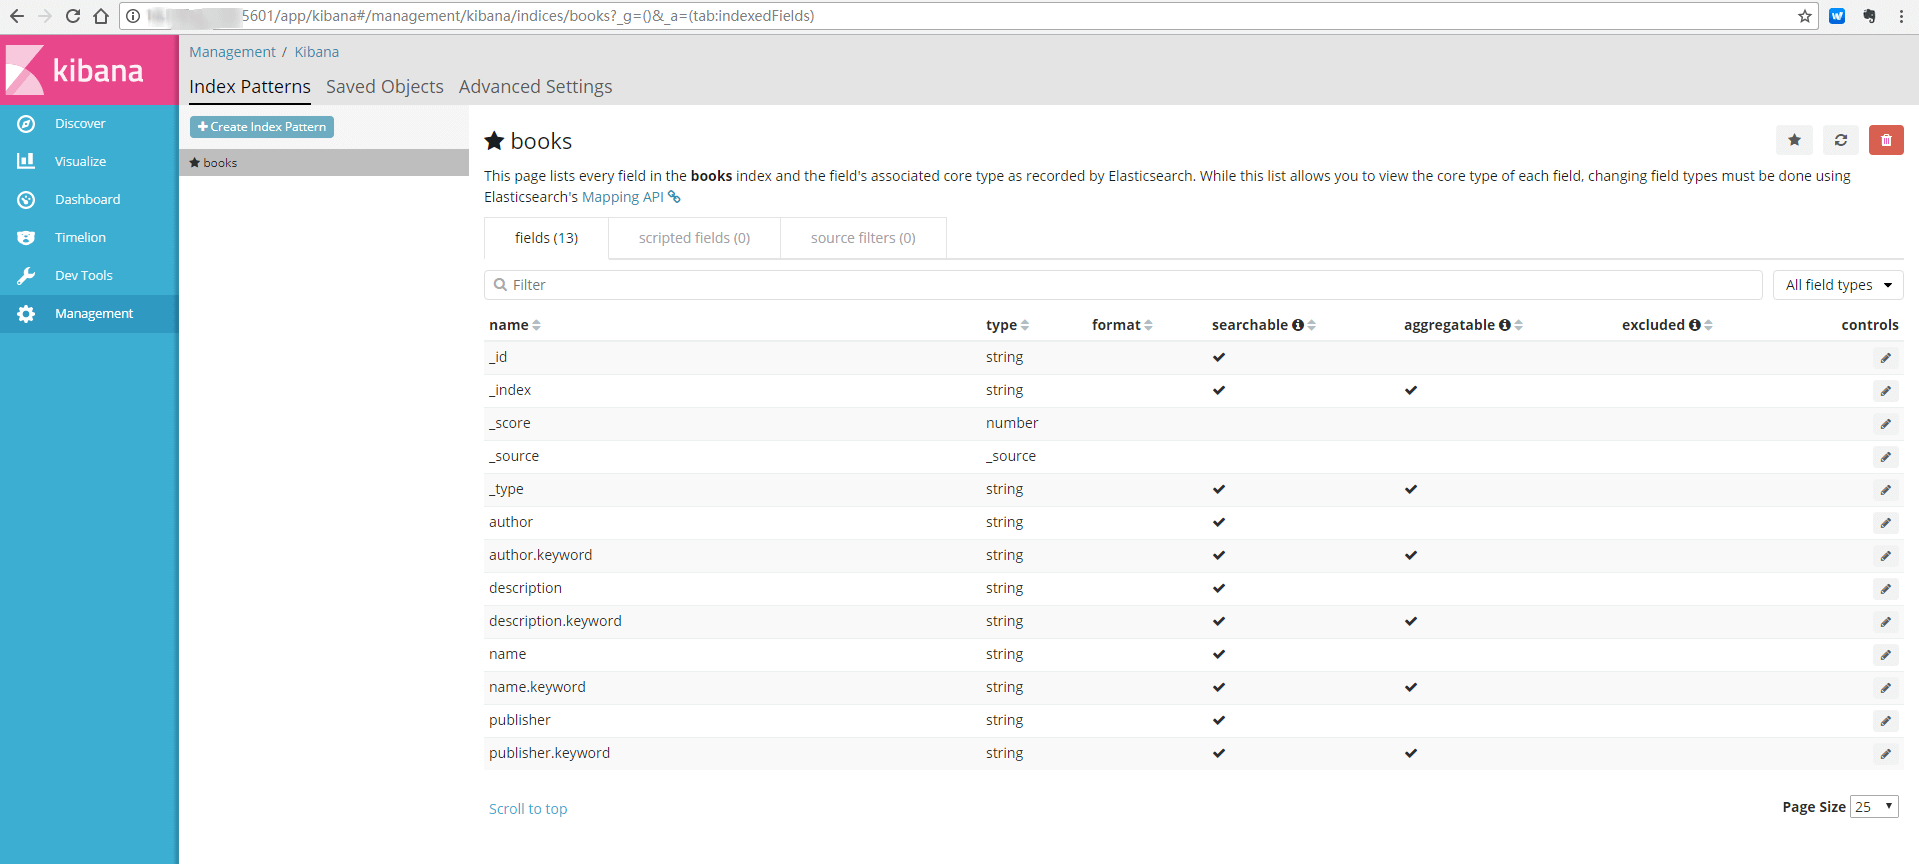
注意 indexed 列显示有勾的字段表示已经建立索引,可以进行搜索。
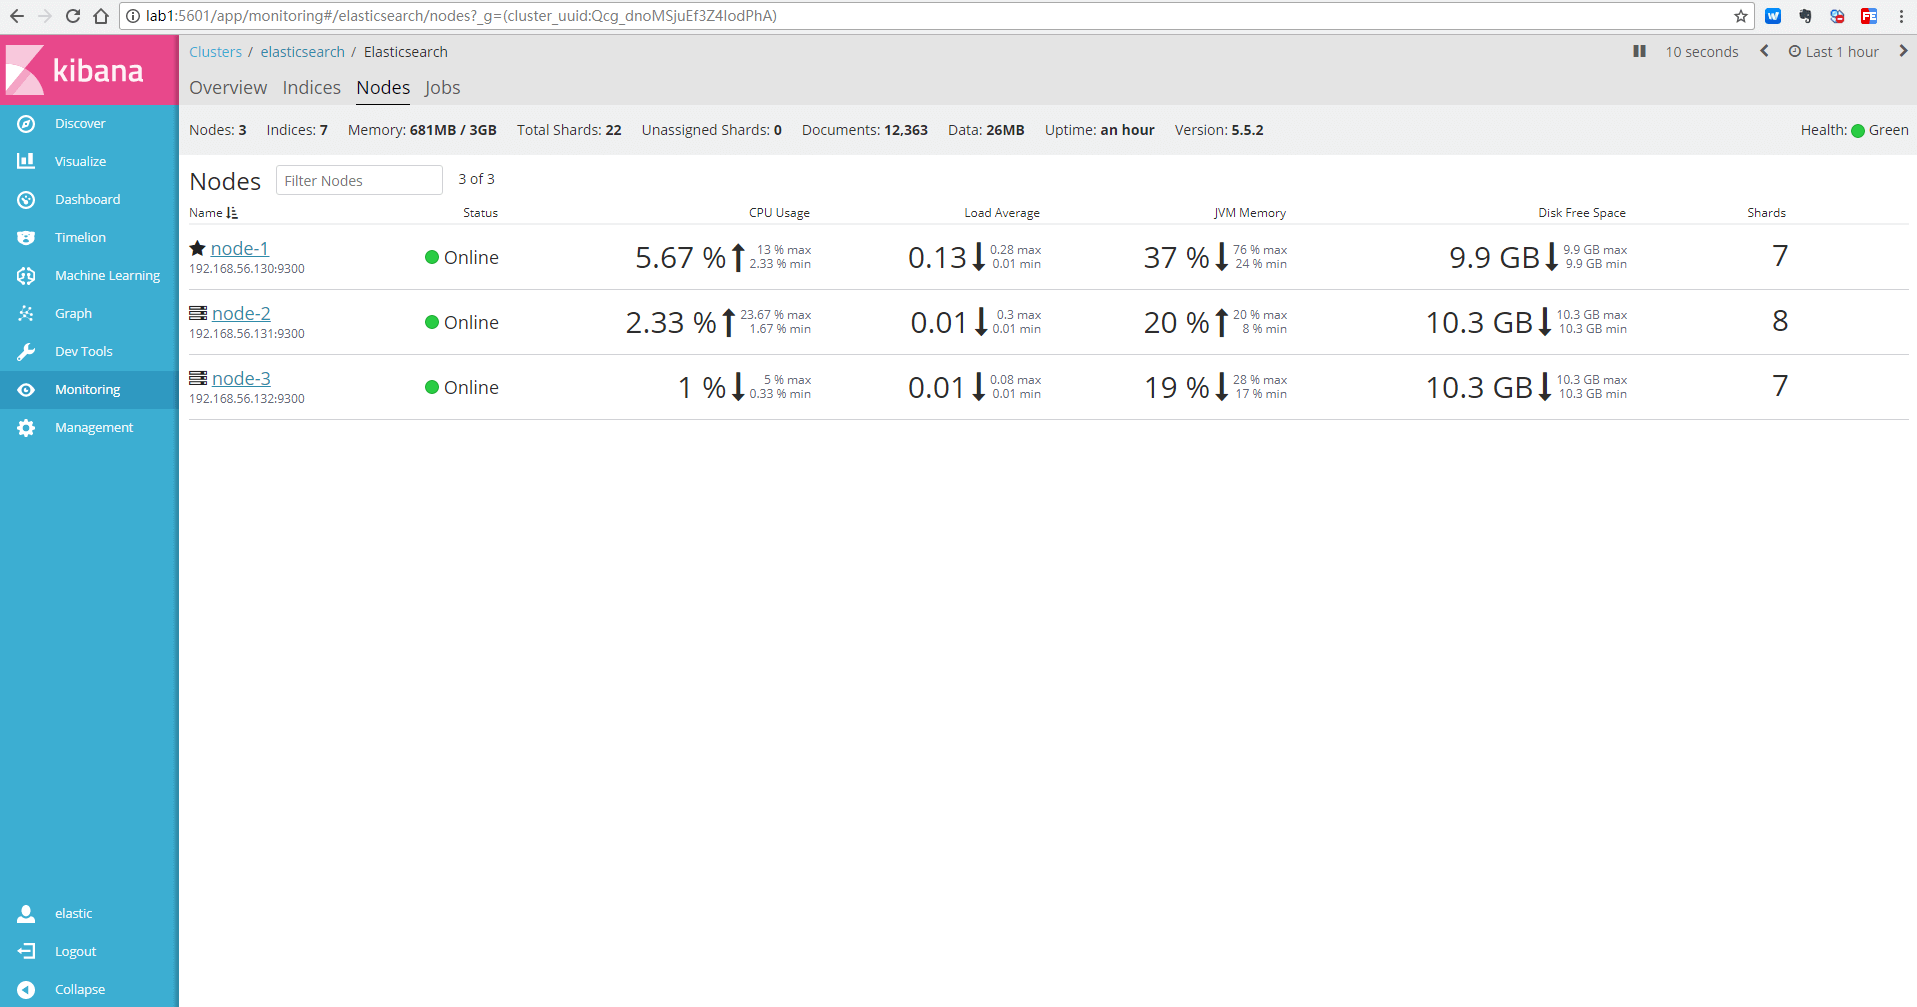
点击 "Discover",可以看见如下信息
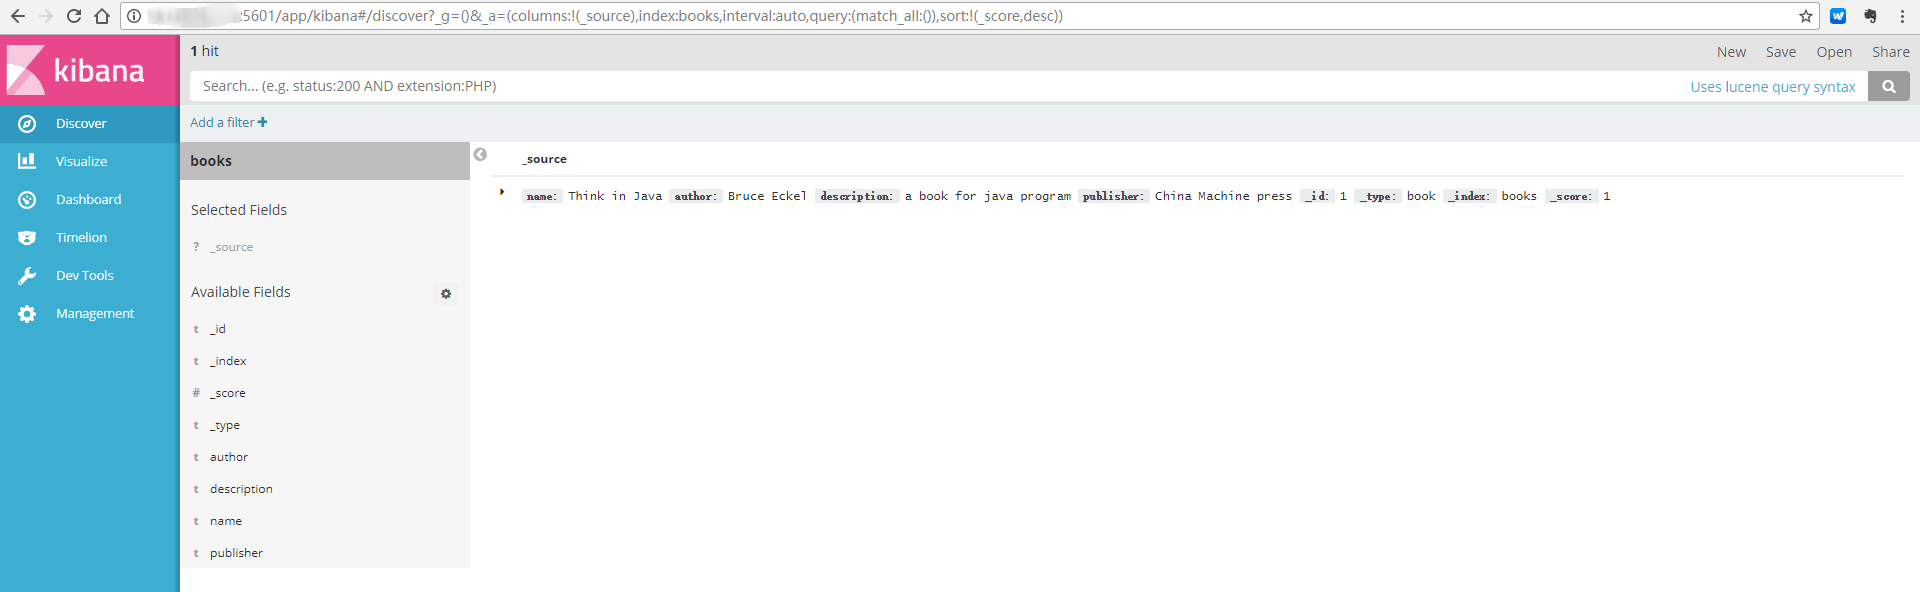
如果有创建多个 index pattern,则可以在左侧红框处进行 index 的选择
右侧红框显示 books 下的资源信息。
附录一: elasticsearch.yml 配置说明
1 配置文件官方参考地址
https://www.elastic.co/guide/en/elasticsearch/reference/5.5/important-settings.html
##################### Elasticsearch Configuration Example #####################
# 我只是挑些重要的配置选项进行注释,其实自带的已经有非常细致的英文注释了.有理解偏差的地方请以英文原版解释为准.

################################### Cluster ###################################

# 代表一个集群,集群中有多个节点,其中有一个为主节点,这个主节点是可以通过选举产生的,主从节点是对于集群内部来说的.
# es的一个概念就是去中心化,字面上理解就是无中心节点,这是对于集群外部来说的,因为从外部来看es集群,在逻辑上是个整体,你与任何一个节点的通信和与整个es集群通信是等价的。
# cluster.name可以确定你的集群名称,当你的elasticsearch集群在同一个网段中elasticsearch会自动的找到具有相同cluster.name的elasticsearch服务.
# 所以当同一个网段具有多个elasticsearch集群时cluster.name就成为同一个集群的标识.

#cluster.name: elasticsearch

#################################### Node #####################################

# 节点名称同理,可自动生成也可手动配置.
#node.name: "Franz Kafka"

# 允许一个节点是否可以成为一个master节点,es是默认集群中的第一台机器为master,如果这台机器停止就会重新选举master.
#node.master: true

# 允许该节点存储数据(默认开启)
#node.data: true

# 配置文件中给出了三种配置高性能集群拓扑结构的模式,如下:
# 1. 如果你想让节点从不选举为主节点,只用来存储数据,可作为负载器
# node.master: false
# node.data: true
#
# 2. 如果想让节点成为主节点,且不存储任何数据,并保有空闲资源,可作为协调器
# node.master: true
# node.data: false
#
# 3. 如果想让节点既不称为主节点,又不成为数据节点,那么可将他作为搜索器,从节点中获取数据,生成搜索结果等
# node.master: false
# node.data: false

# 监控集群状态有一些插件和API可以使用:
# Use the Cluster Health API [http://localhost:9200/_cluster/health], the
# Node Info API [http://localhost:9200/_nodes] or GUI tools
# such as ,
# ,
#  and
#  to inspect the cluster state.

# A node can have generic attributes associated with it, which can later be used
# for customized shard allocation filtering, or allocation awareness. An attribute
# is a simple key value pair, similar to node.key: value, here is an example:
#
#node.rack: rack314

# By default, multiple nodes are allowed to start from the same installation location
# to disable it, set the following:
#node.max_local_storage_nodes: 1

#################################### Index ####################################

# 设置索引的分片数,默认为5
#index.number_of_shards: 5

# 设置索引的副本数,默认为1:
#index.number_of_replicas: 1

# 配置文件中提到的最佳实践是,如果服务器够多,可以将分片提高,尽量将数据平均分布到大集群中去
# 同时,如果增加副本数量可以有效的提高搜索性能
# 需要注意的是,"number_of_shards" 是索引创建后一次生成的,后续不可更改设置
# "number_of_replicas" 是可以通过API去实时修改设置的

#################################### Paths ####################################

# 配置文件存储位置
#path.conf: /path/to/conf

# 数据存储位置(单个目录设置)
#path.data: /path/to/data
# 多个数据存储位置,有利于性能提升
#path.data: /path/to/data1,/path/to/data2

# 临时文件的路径
#path.work: /path/to/work

# 日志文件的路径
#path.logs: /path/to/logs

# 插件安装路径
#path.plugins: /path/to/plugins

#################################### Plugin ###################################

# 设置插件作为启动条件,如果一下插件没有安装,则该节点服务不会启动
#plugin.mandatory: mapper-attachments,lang-groovy

################################### Memory ####################################

# 当JVM开始写入交换空间时(swapping)ElasticSearch性能会低下,你应该保证它不会写入交换空间
# 设置这个属性为true来锁定内存,同时也要允许elasticsearch的进程可以锁住内存,linux下可以通过 `ulimit -l unlimited` 命令
#bootstrap.mlockall: true

# 确保 ES_MIN_MEM 和 ES_MAX_MEM 环境变量设置为相同的值,以及机器有足够的内存分配给Elasticsearch
# 注意:内存也不是越大越好,一般64位机器,最大分配内存别超过32G

############################## Network And HTTP ###############################

# 设置绑定的ip地址,可以是ipv4或ipv6的,默认为0.0.0.0
#network.bind_host: 192.168.0.1

# 设置其它节点和该节点交互的ip地址,如果不设置它会自动设置,值必须是个真实的ip地址
#network.publish_host: 192.168.0.1

# 同时设置bind_host和publish_host上面两个参数
#network.host: 192.168.0.1

# 设置节点间交互的tcp端口,默认是9300
#transport.tcp.port: 9300

# 设置是否压缩tcp传输时的数据,默认为false,不压缩
#transport.tcp.compress: true

# 设置对外服务的http端口,默认为9200
#http.port: 9200

# 设置请求内容的最大容量,默认100mb
#http.max_content_length: 100mb

# 使用http协议对外提供服务,默认为true,开启
#http.enabled: false

################################### Gateway ###################################

# gateway的类型,默认为local即为本地文件系统,可以设置为本地文件系统
#gateway.type: local

# 下面的配置控制怎样以及何时启动一整个集群重启的初始化恢复过程
# (当使用shard gateway时,是为了尽可能的重用local data(本地数据))

# 一个集群中的N个节点启动后,才允许进行恢复处理
#gateway.recover_after_nodes: 1

# 设置初始化恢复过程的超时时间,超时时间从上一个配置中配置的N个节点启动后算起
#gateway.recover_after_time: 5m

# 设置这个集群中期望有多少个节点.一旦这N个节点启动(并且recover_after_nodes也符合),
# 立即开始恢复过程(不等待recover_after_time超时)
#gateway.expected_nodes: 2

############################# Recovery Throttling #############################

# 下面这些配置允许在初始化恢复,副本分配,再平衡,或者添加和删除节点时控制节点间的分片分配
# 设置一个节点的并行恢复数

# 1.初始化数据恢复时,并发恢复线程的个数,默认为4
#cluster.routing.allocation.node_initial_primaries_recoveries: 4
#
# 2.添加删除节点或负载均衡时并发恢复线程的个数,默认为2
#cluster.routing.allocation.node_concurrent_recoveries: 2

# 设置恢复时的吞吐量(例如:100mb,默认为0无限制.如果机器还有其他业务在跑的话还是限制一下的好)
#indices.recovery.max_bytes_per_sec: 20mb

# 设置来限制从其它分片恢复数据时最大同时打开并发流的个数,默认为5
#indices.recovery.concurrent_streams: 5

# 注意: 合理的设置以上参数能有效的提高集群节点的数据恢复以及初始化速度

################################## Discovery ##################################

# 设置这个参数来保证集群中的节点可以知道其它N个有master资格的节点.默认为1,对于大的集群来说,可以设置大一点的值(2-4)
#discovery.zen.minimum_master_nodes: 1

# 探查的超时时间,默认3秒,提高一点以应对网络不好的时候,防止脑裂
#discovery.zen.ping.timeout: 3s

# For more information, see
#

# 设置是否打开多播发现节点.默认是true.
# 当多播不可用或者集群跨网段的时候集群通信还是用单播吧
#discovery.zen.ping.multicast.enabled: false

# 这是一个集群中的主节点的初始列表,当节点(主节点或者数据节点)启动时使用这个列表进行探测
#discovery.zen.ping.unicast.hosts: ["host1", "host2:port"]

# Slow Log部分与GC log部分略,不过可以通过相关日志优化搜索查询速度

############## Memory(重点需要调优的部分) ################

# Cache部分:
# es有很多种方式来缓存其内部与索引有关的数据.其中包括filter cache

# filter cache部分:
# filter cache是用来缓存filters的结果的.默认的cache type是node type.node type的机制是所有的索引内部的分片共享filter cache.node type采用的方式是LRU方式.即:当缓存达到了某个临界值之后,es会将最近没有使用的数据清除出filter cache.使让新的数据进入es.

# 这个临界值的设置方法如下:indices.cache.filter.size 值类型:eg.:512mb 20%。默认的值是10%。

# out of memory错误避免过于频繁的查询时集群假死
# 1.设置es的缓存类型为Soft Reference,它的主要特点是据有较强的引用功能.只有当内存不够的时候,才进行回收这类内存,因此在内存足够的时候,它们通常不被回收.另外,这些引用对象还能保证在Java抛出OutOfMemory异常之前,被设置为null.它可以用于实现一些常用图片的缓存,实现Cache的功能,保证最大限度的使用内存而不引起OutOfMemory.在es的配置文件加上index.cache.field.type: soft即可.
# 2.设置es最大缓存数据条数和缓存失效时间,通过设置index.cache.field.max_size: 50000来把缓存field的最大值设置为50000,设置index.cache.field.expire: 10m把过期时间设置成10分钟.
#index.cache.field.max_size: 50000
#index.cache.field.expire: 10m
#index.cache.field.type: soft

# field data部分&&circuit breaker部分:
# 用于field data 缓存的内存数量,主要用于当使用排序,faceting操作时,elasticsearch会将一些热点数据加载到内存中来提供给客户端访问,但是这种缓存是比较珍贵的,所以对它进行合理的设置.

# 可以使用值:eg:50mb 或者 30%(节点 node heap内存量),默认是:unbounded
#indices.fielddata.cache.size: unbounded

# field的超时时间.默认是-1,可以设置的值类型: 5m
#indices.fielddata.cache.expire: -1

# circuit breaker部分:
# 断路器是elasticsearch为了防止内存溢出的一种操作,每一种circuit breaker都可以指定一个内存界限触发此操作,这种circuit breaker的设定有一个最高级别的设定:indices.breaker.total.limit 默认值是JVM heap的70%.当内存达到这个数量的时候会触发内存回收

# 另外还有两组子设置:
#indices.breaker.fielddata.limit:当系统发现fielddata的数量达到一定数量时会触发内存回收.默认值是JVM heap的70%

#indices.breaker.fielddata.overhead:在系统要加载fielddata时会进行预先估计,当系统发现要加载进内存的值超过limit * overhead时会进行进行内存回收.默认是1.03

#indices.breaker.request.limit:这种断路器是elasticsearch为了防止OOM(内存溢出),在每次请求数据时设定了一个固定的内存数量.默认值是40%

#indices.breaker.request.overhead:同上,也是elasticsearch在发送请求时设定的一个预估系数,用来防止内存溢出.默认值是1

# Translog部分:
# 每一个分片(shard)都有一个transaction log或者是与它有关的预写日志,(write log),在es进行索引(index)或者删除(delete)操作时会将没有提交的数据记录在translog之中,当进行flush 操作的时候会将tranlog中的数据发送给Lucene进行相关的操作.一次flush操作的发生基于如下的几个配置

#index.translog.flush_threshold_ops:当发生多少次操作时进行一次flush.默认是 unlimited

#index.translog.flush_threshold_size:当translog的大小达到此值时会进行一次flush操作.默认是512mb

#index.translog.flush_threshold_period:在指定的时间间隔内如果没有进行flush操作,会进行一次强制flush操作.默认是30m

#index.translog.interval:多少时间间隔内会检查一次translog,来进行一次flush操作.es会随机的在这个值到这个值的2倍大小之间进行一次操作,默认是5s

#index.gateway.local.sync:多少时间进行一次的写磁盘操作,默认是5s

# 以上的translog配置都可以通过API进行动态的设置
附录二:扩展 elasticsearch 节点
上边我们已经部署了三个结点的es集群,现在我们要另外加入一台服务器一个 data node,我们该怎么办?
1 copy 一个 elasticsearch 文件夹,作为第四个节点
scp -r /opt/elk/elasticsearch es@lab4:/opt/elk/
2 修改 node-4 中的yaml文件
# ======================== Elasticsearch Configuration =========================
#
# NOTE: Elasticsearch comes with reasonable defaults for most settings.
# Before you set out to tweak and tune the configuration, make sure you
# understand what are you trying to accomplish and the consequences.
#
# The primary way of configuring a node is via this file. This template lists
# the most important settings you may want to configure for a production cluster.
#
# Please consult the documentation for further information on configuration options:
# https://www.elastic.co/guide/en/elasticsearch/reference/index.html
#
# ---------------------------------- Cluster -----------------------------------
#
# Use a descriptive name for your cluster:
#
cluster.name: elasticsearch
#
# ------------------------------------ Node ------------------------------------
#
# Use a descriptive name for the node:
#
node.name: node-4
node.master: false
node.data: true
#
# Add custom attributes to the node:
#
#node.attr.rack: r1
#
# Path to directory where to store the data (separate multiple locations by comma):
#
path.data: /data/elk/elasticsearch/data
#
# Path to log files:
#
#path.logs: /path/to/logs
#
# ----------------------------------- Memory -----------------------------------
#
# Lock the memory on startup:
#
bootstrap.memory_lock: false
bootstrap.system_call_filter: false
#
# Make sure that the heap size is set to about half the memory available
# on the system and that the owner of the process is allowed to use this
# limit.
#
# Elasticsearch performs poorly when the system is swapping the memory.
#
# ---------------------------------- Network -----------------------------------
#
# Set the bind address to a specific IP (IPv4 or IPv6):
#
network.host: 192.168.56.133
#
# Set a custom port for HTTP:
#
http.port: 9200
#
# For more information, consult the network module documentation.
#
# --------------------------------- Discovery ----------------------------------
#
# Pass an initial list of hosts to perform discovery when new node is started:
# The default list of hosts is ["127.0.0.1", "[::1]"]
#
discovery.zen.ping.unicast.hosts: ["192.168.56.130:9300", "192.168.56.131:9300"]
#
# Prevent the "split brain" by configuring the majority of nodes (total number of master-eligible nodes / 2 + 1):
#
discovery.zen.minimum_master_nodes: 2
#
# For more information, consult the zen discovery module documentation.
#
# ---------------------------------- Gateway -----------------------------------
#
# Block initial recovery after a full cluster restart until N nodes are started:
#
#gateway.recover_after_nodes: 3
#
# For more information, consult the gateway module documentation.
#
# ---------------------------------- Various -----------------------------------
#
# Require explicit names when deleting indices:
#
#action.destructive_requires_name: true
3 es 用户启动节点
[es@lab1 bin]$ pwd
/opt/elk/elasticSearch/elasticsearch-5.5.2/bin
[es@lab1 bin]$ ./elasticsearch -d
附录三:常见错误
1 问题一
[2016-11-06T16:27:21,712][WARN ][o.e.b.JNANatives ] unable to install syscall filter:

Java.lang.UnsupportedOperationException: seccomp unavailable: requires kernel 3.5+ with CONFIG_SECCOMPandCONFIG_SECCOMP_FILTERcompiledinatorg.elasticsearch.bootstrap.Seccomp.linuxImpl(Seccomp.java:349) ~[elasticsearch-5.0.0.jar:5.0.0]

at org.elasticsearch.bootstrap.Seccomp.init(Seccomp.java:630) ~[elasticsearch-5.0.0.jar:5.0.0]
原因:报了一大串错误,大家不必惊慌,其实只是一个警告,主要是因为你Linux版本过低造成的。
解决方案:
- 重新安装新版本的 Linux 系统
- 警告不影响使用,可以忽略
2 问题二
ERROR: bootstrap checks failed

max file descriptors [4096] for elasticsearch process likely too low, increase to at least [65536]
原因:无法创建本地文件问题,用户最大可创建文件数太小
解决方案:
切换到 root 用户,编辑 /etc/security/limits.conf 配置文件, 添加类似如下内容:
vi /etc/security/limits.conf
添加如下内容:
* soft nofile 65536

* hard nofile 131072

* soft nproc 2048

* hard nproc 4096
备注:* 代表Linux所有用户名称(比如 hadoop)
保存、退出、重新登录才可生效
3 问题三
max number of threads [1024] for user [es] likely too low, increase to at least [2048]
原因:无法创建本地线程问题,用户最大可创建线程数太小
解决方案:切换到root用户,进入limits.d目录下,修改90-nproc.conf 配置文件。
vi /etc/security/limits.d/90-nproc.conf
找到如下内容:
* soft nproc 1024

#修改为

* soft nproc 2048
4 问题四
max virtual memory areas vm.max_map_count [65530] likely too low, increase to at least [262144]
原因:最大虚拟内存太小
解决方案:切换到root用户下,修改配置文件sysctl.conf
vi /etc/sysctl.conf
添加下面配置:
vm.max_map_count=655360
并执行命令:
sysctl -p
然后重新启动 elasticsearch,即可启动成功。
5 问题五
ElasticSearch启动找不到主机或路由
原因:ElasticSearch 单播配置有问题
解决方案:
检查ElasticSearch中的配置文件
vi config/elasticsearch.yml
找到如下配置:
discovery.zen.ping.unicast.hosts:["192.168.**.**:9300","192.168.**.**:9300"]
一般情况下,是这里配置有问题,注意书写格式
6 问题六
org.elasticsearch.transport.RemoteTransportException: Failed to deserialize exception response from stream
原因:ElasticSearch节点之间的jdk版本不一致
解决方案:ElasticSearch集群统一jdk环境
7 问题七
Unsupported major.minor version 52.0
原因:jdk版本问题太低
解决方案:更换jdk版本,ElasticSearch5.0.0支持jdk1.8.0
8 问题八
bin/elasticsearch-plugin install license
ERROR: Unknown plugin license
原因:ElasticSearch5.0.0以后插件命令已经改变
解决方案:使用最新命令安装所有插件
bin/elasticsearch-plugin install x-pack
9 问题九
ERROR: bootstrap checks failed
system call filters failed to install; check the logs and fix your configuration or disable system call filters at your own risk
问题原因:因为Centos6不支持SecComp,而 ES5.5.2 默认bootstrap.system_call_filter为true进行检测,所以导致检测失败,失败后直接导致ES不能启动。详见 :
https://github.com/elastic/elasticsearch/issues/22899
解决方法:
在elasticsearch.yml中配置bootstrap.system_call_filter为false,注意要在Memory下面:
bootstrap.memory_lock: false
bootstrap.system_call_filter: false

近期评论